Posts Tagged Floor Plan
One Month Later
Posted by Adam A. Ries in DIY, Home Improvement, Interior Design on September 1, 2014
It turns out tiling takes forever. Or at least a full month for me. Part of the reason is that I’ve traveled to visit friends on my weekends or helped on house projects with family members. The majority of the tiling I had left required using the deathly loud wet saw, and I feel terrible cranking that thing up later than 7 o’clock at night – it is seriously the loudest piece of equipment I’ve ever used, all wrapped up in a table-top saw. I decided to spare my neighbors the screaming from the wet saw, and in turn the tiling wasn’t getting done. Here is how it looked at the last post:

The walls were nearly all tiled, just the trim pieces missing along the top, and of course that pesky wall niche. But more on that later, as I couldn’t make up my mind how I wanted to trim it out.

So it was time for the floor. I sketched out a pattern for the floor that I thought would complement the walls. I knew I wanted white hexagon tile, but I liked how many of the period bathrooms I saw had a black border around the edge, either in black hexagons, little stars, or a solid stripe. In the name on consistency, I used the same narrow black lines that I used on the walls, only a single black line rather than a double.
I started with a 6″ square all around the room and flat up against the tub, then the skinny black liner tile, and then filled in the center – about 5 ft x 5 ft – with the white hex.

While the border pieces went down 1 at a time, I thought the center field would be faster because the hex comes in 12″ sheets with the tiles glued to a mesh backing. But once again I made it more difficult on myself in an effort to ensure the final result looked like a professional installation. In my weeks spent searching inspiration photos on Pinterest and Google, I’ve come across too many bathrooms where intentions were great – but execution was less than impressive. Below is just one example – notice that line where each sheet starts and ends? I vowed not to let that happen.

So my solution was to cut the first sheet of every 2nd row in half and lay the sheets across the floor the way one might lay brick – in a running bond pattern. And although the tiles are glued to a mesh, the spacing between the tiles still wants to vary. It took constant eyeballing the lines and watching for any spacing that looked too thin or too wide. And I still used a ton of 1/8″ plastic spacers.

By this point, I was nearly as far as I could go using full sheets. This last row by the doorway I cut and laid 2 rows at a time, and then it was down to the little fillers around the border. These pieces – each one just a little smaller or larger than the one beside it. What a pain in the ass:

Seriously – the worst part of the whole tiling job right there. Other spots were tricky, but in a good way – like a “DIY Show Off” challenge, like these chair-rail returns:
![P1030849 B]](https://humblebungalow.com/wp-content/uploads/2014/09/p1030849-b.jpg)
But those tiny slivers to finish the floor? Pretty sure every other finger has been cut trying to push those tiny pieces through the wet saw. I was glad when the floor was finished. Speaking of injury, this tiling project has been cruel. Cut hands and fingers on sharp tile edges; tiny little tile chips from the wet saw stick to my arms, but don’t try to brush them off – more cuts like little slivers of glass; like dozens of little paper cuts!
And then there are my knees. By the time I finished, I wish I had invested in a quality pair of knee pads. Lesson learned for the next flooring project. Check out those hexagons!

But in the end, the result was worth all the blood, sore finger tips, and smashed knees. As my neighbors described it over the weekend when they stopped by for a progress tour, “it looks like a charming historic hotel bathroom!” My goal all along has been something that looks “timeless.” I want anyone who sees it to wonder if it’s the home’s original bathroom. By the way, I have some awesome neighbors who are super friendly and invite me over for homemade ice cream… #homebuyingscore.

Not yet floored
Posted by Adam A. Ries in DIY, Home Improvement, Interior Design on May 10, 2014
Finished the last of the plumbing supply lines today, but no, the bathroom still does not have a floor. Because I spent all morning loading and hauling 2 truck loads full of scrap metal and old pipes to the local metals recycling center. The new company that opened a few years ago is much more competitive on price than another local company, and they have much better customer service when I called to get metal prices over the phone. That better customer service was experienced in person, too.
All together there was galvanized steel duct, cast iron pipes, steel pipes, copper pipes, brass fittings, aluminum cans, steel cans, buckets of scrap metal (pulled nails, screws, other small parts & pieces), sheet aluminum, the old steel furnace housing, and the cast iron furnace heater.
Two trips and one small cut on the forearm later, I walked out with cash in hand. Not to shabby, considering half of what I scrapped in was just laying under the house. FREE. All I had to do was carry it out and load it onto a truck. In total, the cash I got was close to half of the amount I’ve invested in PEX hoses & fittings for the new supply lines. Nothing like tearing out old plumbing to pay for the new! (Whoa: imagine if every DIY project was like that… what you tore out would pay for half of the new project?)
Now it’s onto choosing and installing a water heater, but also installing the drain lines. The only portion that concerns me is the home’s original cast iron sewer drain. I’m not sure how to connect the new PVC drains into that, to end up with a leak-free drain that will last. So I need to make friends with a plumber and ask for help.
So now for a peak at the new bathroom layout!
Below is the original layout, with the tub and toilet so close together, sitting on the stool meant soaking your feet for a bath.

Here is how I am planning the new bathroom. I love Google SketchUp for quick floor-planning and 3-D modeling. Its quick to learn, but if you want to spend more time you can actually create a very detailed 3-D rendered model of a space or object. I literally drew out 12 different plans of how to move the 3 bath fixtures around in this space, and this naturally came out as the best solution.

You can see the door through the wall at the right, and the window above the tub on the left. Overall, I think this floor-plan of the bath feels so much more open. All the bathroom drains will be along one wall, which I hope will be easy to connect.

The bathroom is 68″ wide, and the tub is only 60″ long. This leaves a 8″ space between the tub and the finished wall. I tried several different versions of shelves, skinny cabinets, or other storage in this narrow nook, but decided on a knee wall to act as a ledge for bath bottles and such. The ledge doesn’t go directly to the window wall. Instead, there is a small chase to run the drain vent up though the ceiling and out the roof.
There will still be room on the wall opposite the toilet for a narrow storage cabinet if I need one. And although I didn’t show all the detail here, I am planning on a built-in mirrored medicine cabinet above the vanity, and another shallow in the wall to the right of the sink.
While drawing out this plan, I took some criticism for the idea of keeping the window. In this layout, the window will be in the shower area. I found several answers online on how to install a water-tight shower window, and they were all nearly the same. This instructional page & photo is what I will be following.
I just think natural daylight and ventilation is too important to close-in the window, no matter the room. Secondly, the window opens to the backyard, more than 50 feet from an alley, and another 50 feet to a neighboring house. If I really feel concerned about privacy, I can order the new window with opaque glass.
House Tour
Posted by Adam A. Ries in About Me, Home Improvement on May 5, 2014
I told myself the full house tour would be the first post about the new house. I took photos of every room the first week I had the keys. I even asked the realtor not to remove the “Sold” sign too early, until I could get a photo outside on a blue sky day. But then I got so excited about ripping out and tearing into the bathroom, that I never organized and posted the photos. So without further ado, won’t you please come in!
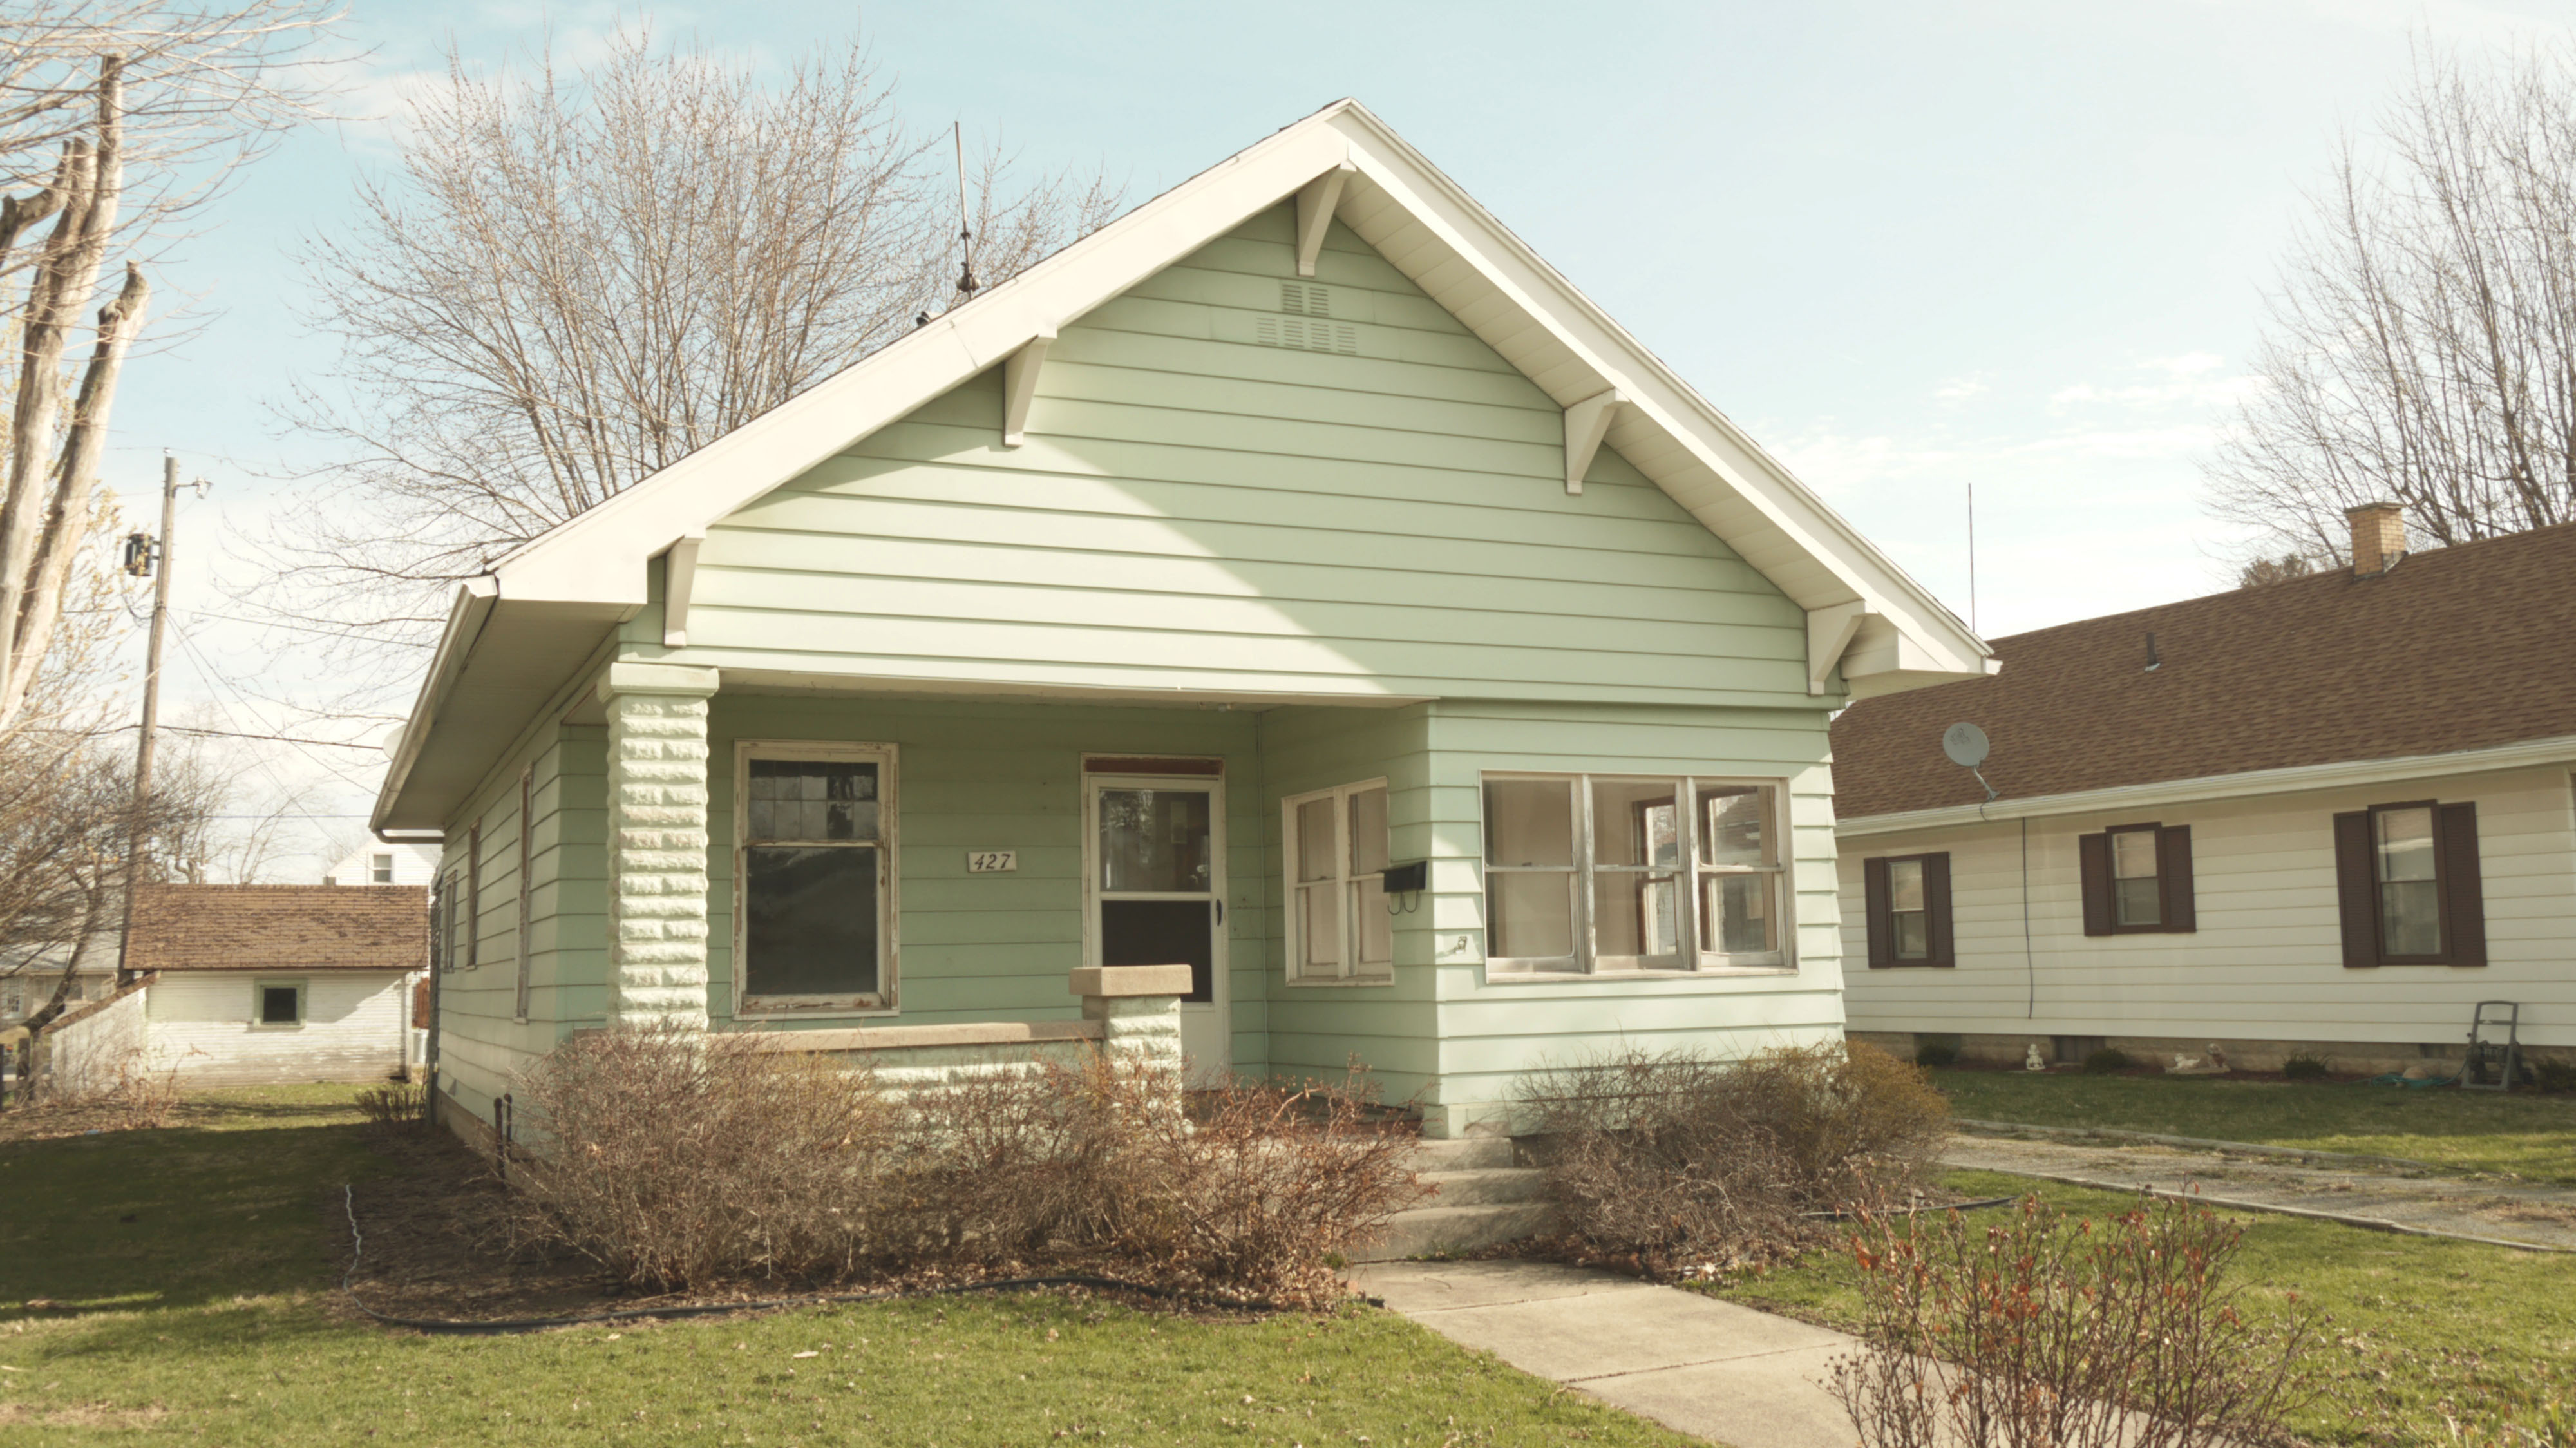
From the street, it has a nice size covered front porch, just begging for refreshed flooring, lush planters, and a porch swing.
The front door is probably not enticing. It’s old, yes, but the style doesn’t match the other Craftsman qualities about the house, especially because it is veneered. The door handle is pretty cool, but the latching mechanism or spring must be broken, and the inside handle is about to fall off.

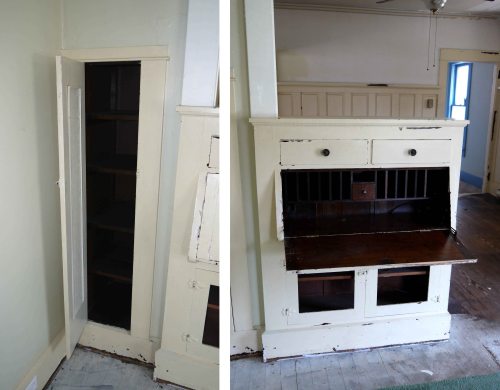
Through the front door is the living room. Very square, but with a nice large window looking east, and built-ins creating some separation from the dining room. As you can see, the woodwork is painted as far as the eye can see.

I especially love the little nook cabinet in the corner, and then this fold down secretary! How awesome that it is still in the house.
Decent size windows in the house fill nearly every room with ample sunlight. I didn’t yet have the electricity on when I took these photos, and it was super light inside. I’d like to say bright and cheerful, but I’ll stick with just bright. I’m gonna have to restore the cheerful.

From the living room is also the doorway into the closed-in side of the porch.

With lots of windows, this will be a great cozy space to drink coffee in the mornings and get some plants growing.
Back to the west, a set of double French doors open into the first bedroom.
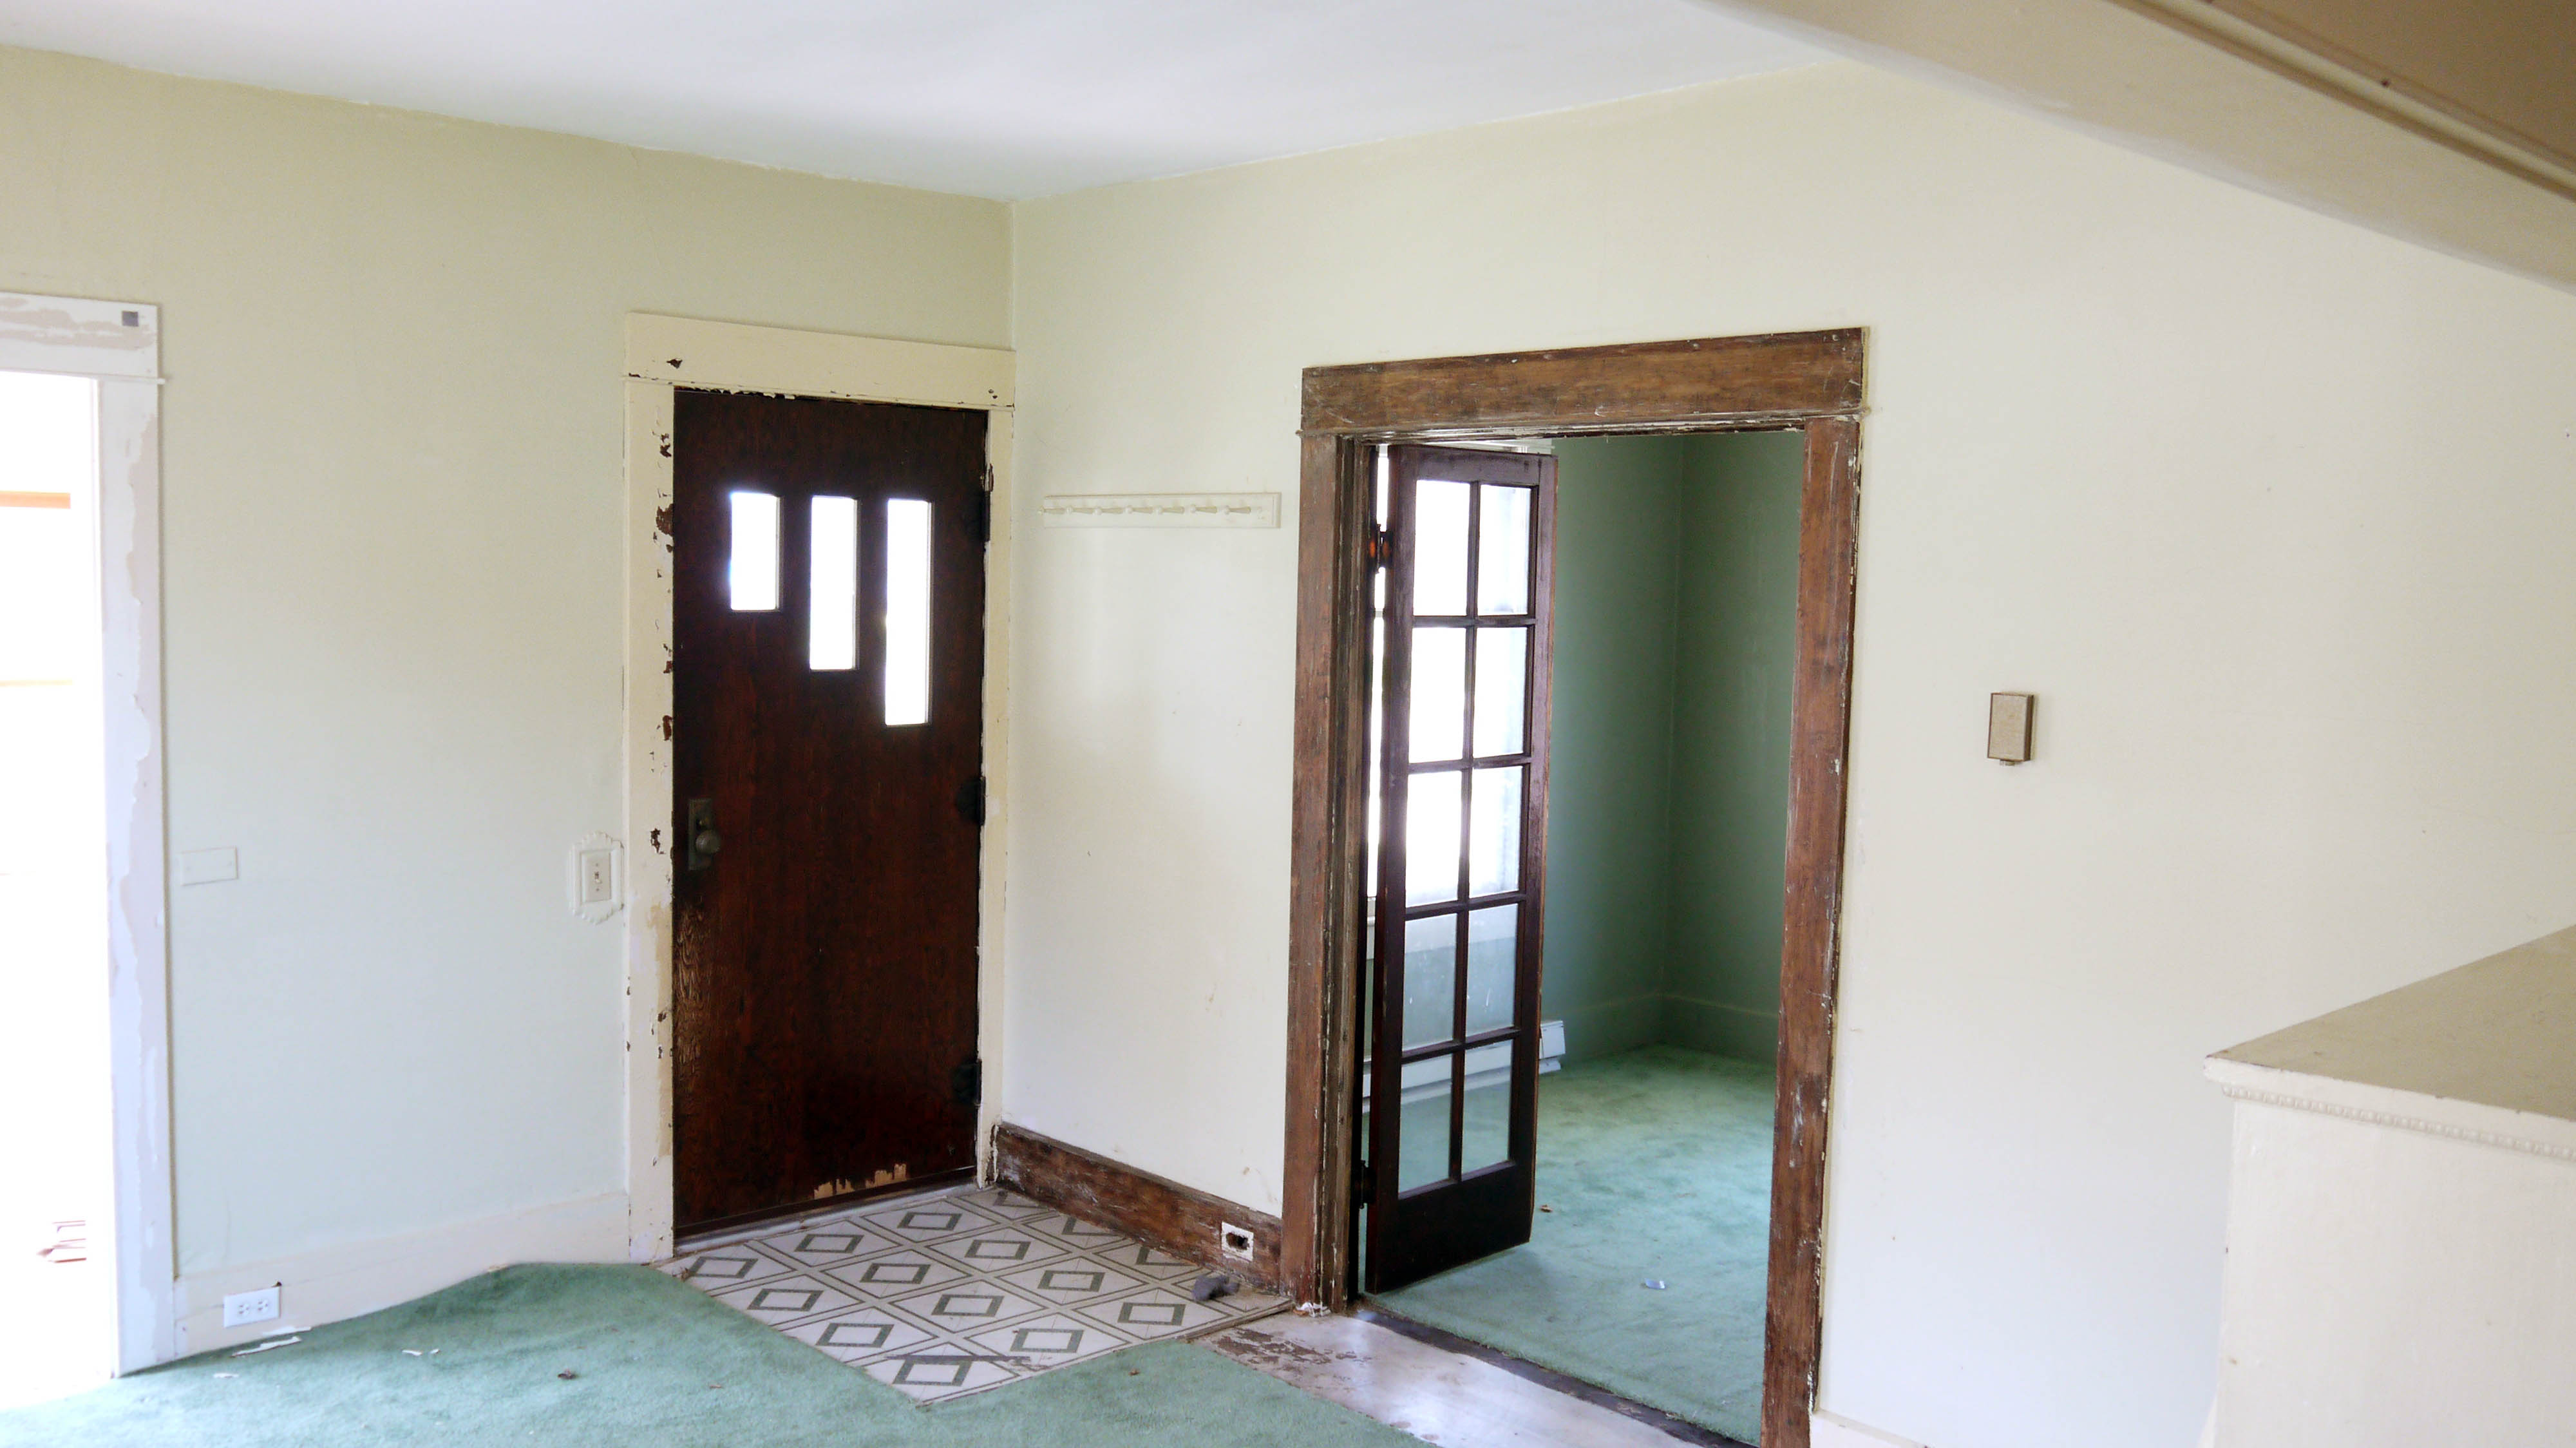
From the inside, the door trim is just a little bit fancier: this is the only room where the woodwork above a door has this cornice or cap at the very top. My guess is every room had these at one time, and they either broke or they wanted to tone down the Victorian influence so they were removed.

Once again, it is the original details throughout that sold me on this house. Can I please have a full house of door handles & escutcheon plates to match this one?

Two large windows in this bedroom.

And some details I could do without, like this ceiling fan. The electrical box was probably not originally for a fan, which must be secured tighter. So what happens when the wiggling of the fan makes the plaster start to crumble? Just tape and staple up a piece of plastic, that will fix it.
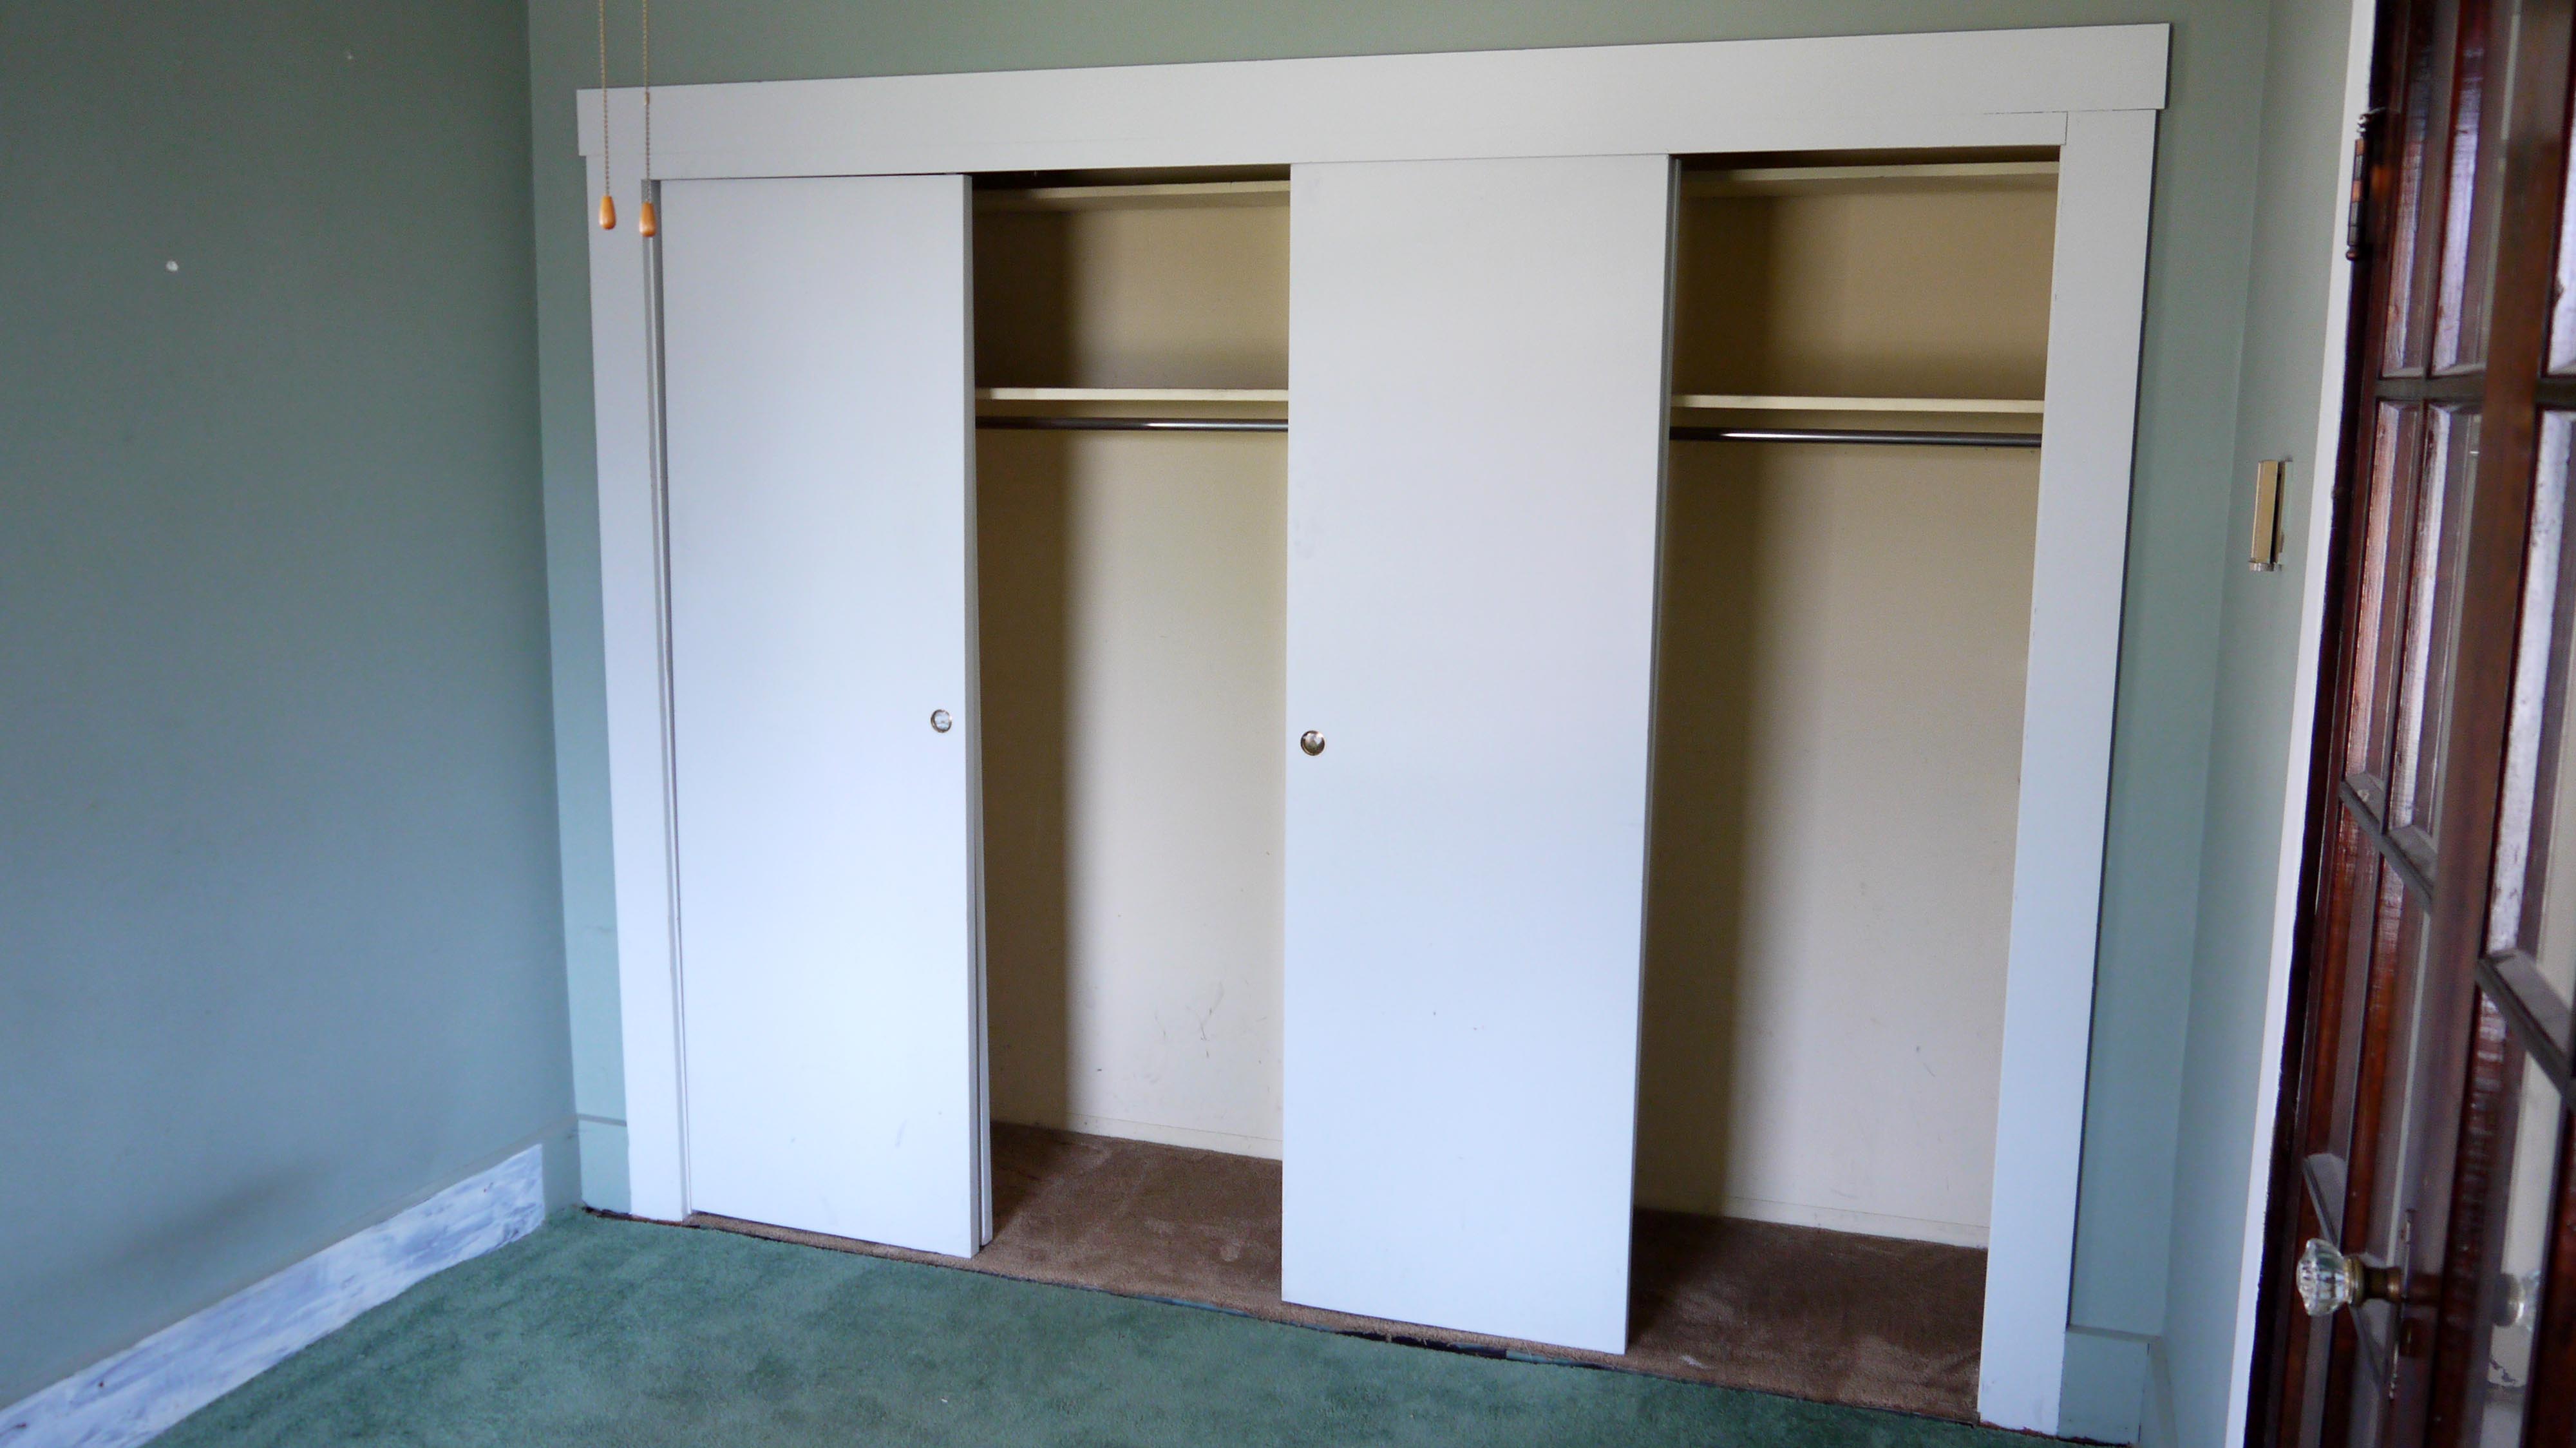
This bedroom does have a nice double wide closet. The trim suggests that it was added later, as they are just flat painted boards, along with the sliding hollow doors. I have a great idea to make this closet look more original, using salvaged trim and doors (that are nearly a perfect match!) from a commercial building that was demolished earlier this winter.
Back through the living area, we walk into the dining room. This is the room that sold me on the house. The cabinets, paneled walls, and built-in buffet are just screaming for me to strip them of their layers of paint. And now a glimpse of the wood floors too, which are in every room either under carpet or linoleum. And we also get a sense of how beautiful the woodwork is under the dingy carpet and paint.

Who would paint these paneled walls?

And what a nice air conditioner unit… not.
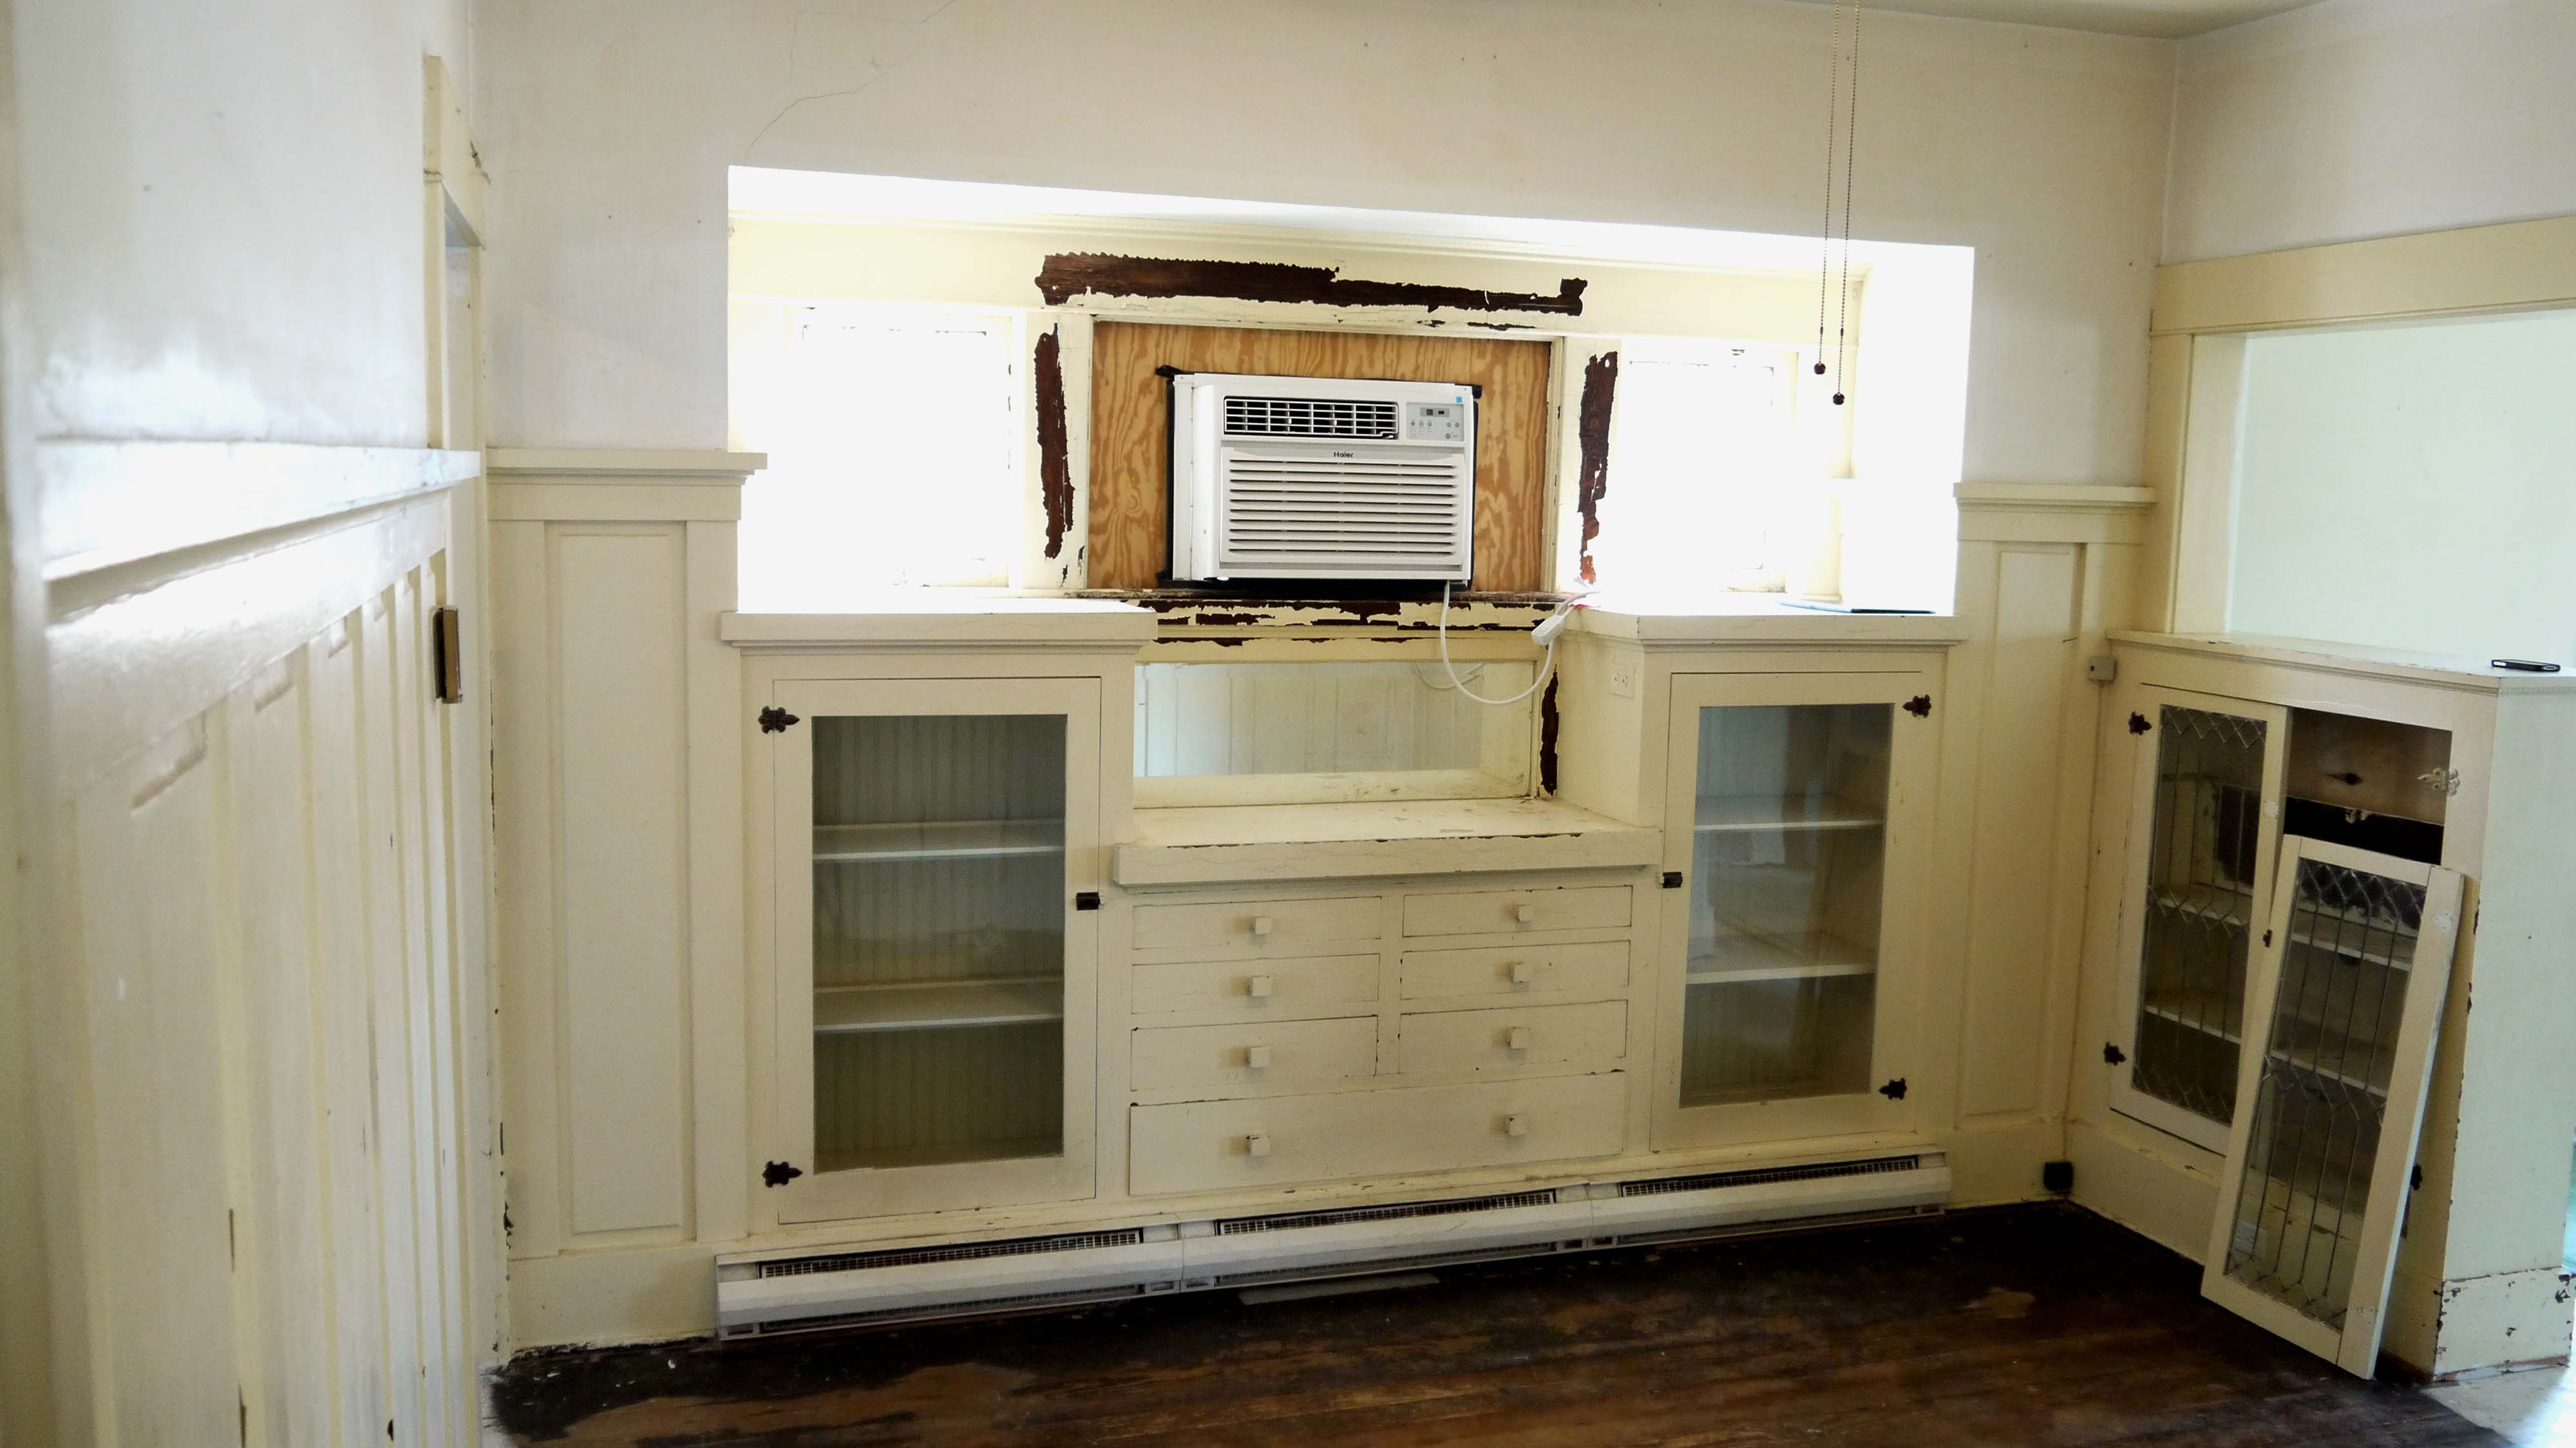
I can’t help but think that the center window must have been leaded glass like the two on the sides, and it was removed for an air conditioner. I’m still hoping to find the original window in the attic somewhere.

And the doors to the left bookcase are leaded glass too! The frame on the one is bad, it has come unglued and the glass became loose, which is why it is off of its hinges. But at least it is still there, and wasn’t trashed at some point. It’s easier to fix something broken than replace something not there.
The dining room leads first into the second bedroom, or as I have been calling it, the blue room. Overall, it feels a little more private than the first bedroom. Not only is it in the back of the house, but is has much smaller windows which makes it a little darker. There is no closet, but a built-in wardrobe from floor to ceiling.

The window to the back yard is half as tall as any others in the house. The large blank wall to the left will work as a space to center a large bed and headboard, with room for a nightstand on either side.

This window faces east and, although it is too bright to see out, actually shows the detached garage. Unfortunately, the cardboard piece covers a broken corner of the window. So terrible, because all of the windows in the house are original, and they show it. They are wavy and full of lines, bubbles, and those imperfections that show they are panels of hand blown glass. Made by hand. Not rolled on a glass machine and perfectly flat. They show the signs of how they were made, and looking through them they slightly distort the view outside. The light coming in is also refracted a bit, making neat patterns on the walls, like little sunbursts that move on the walls in each room.

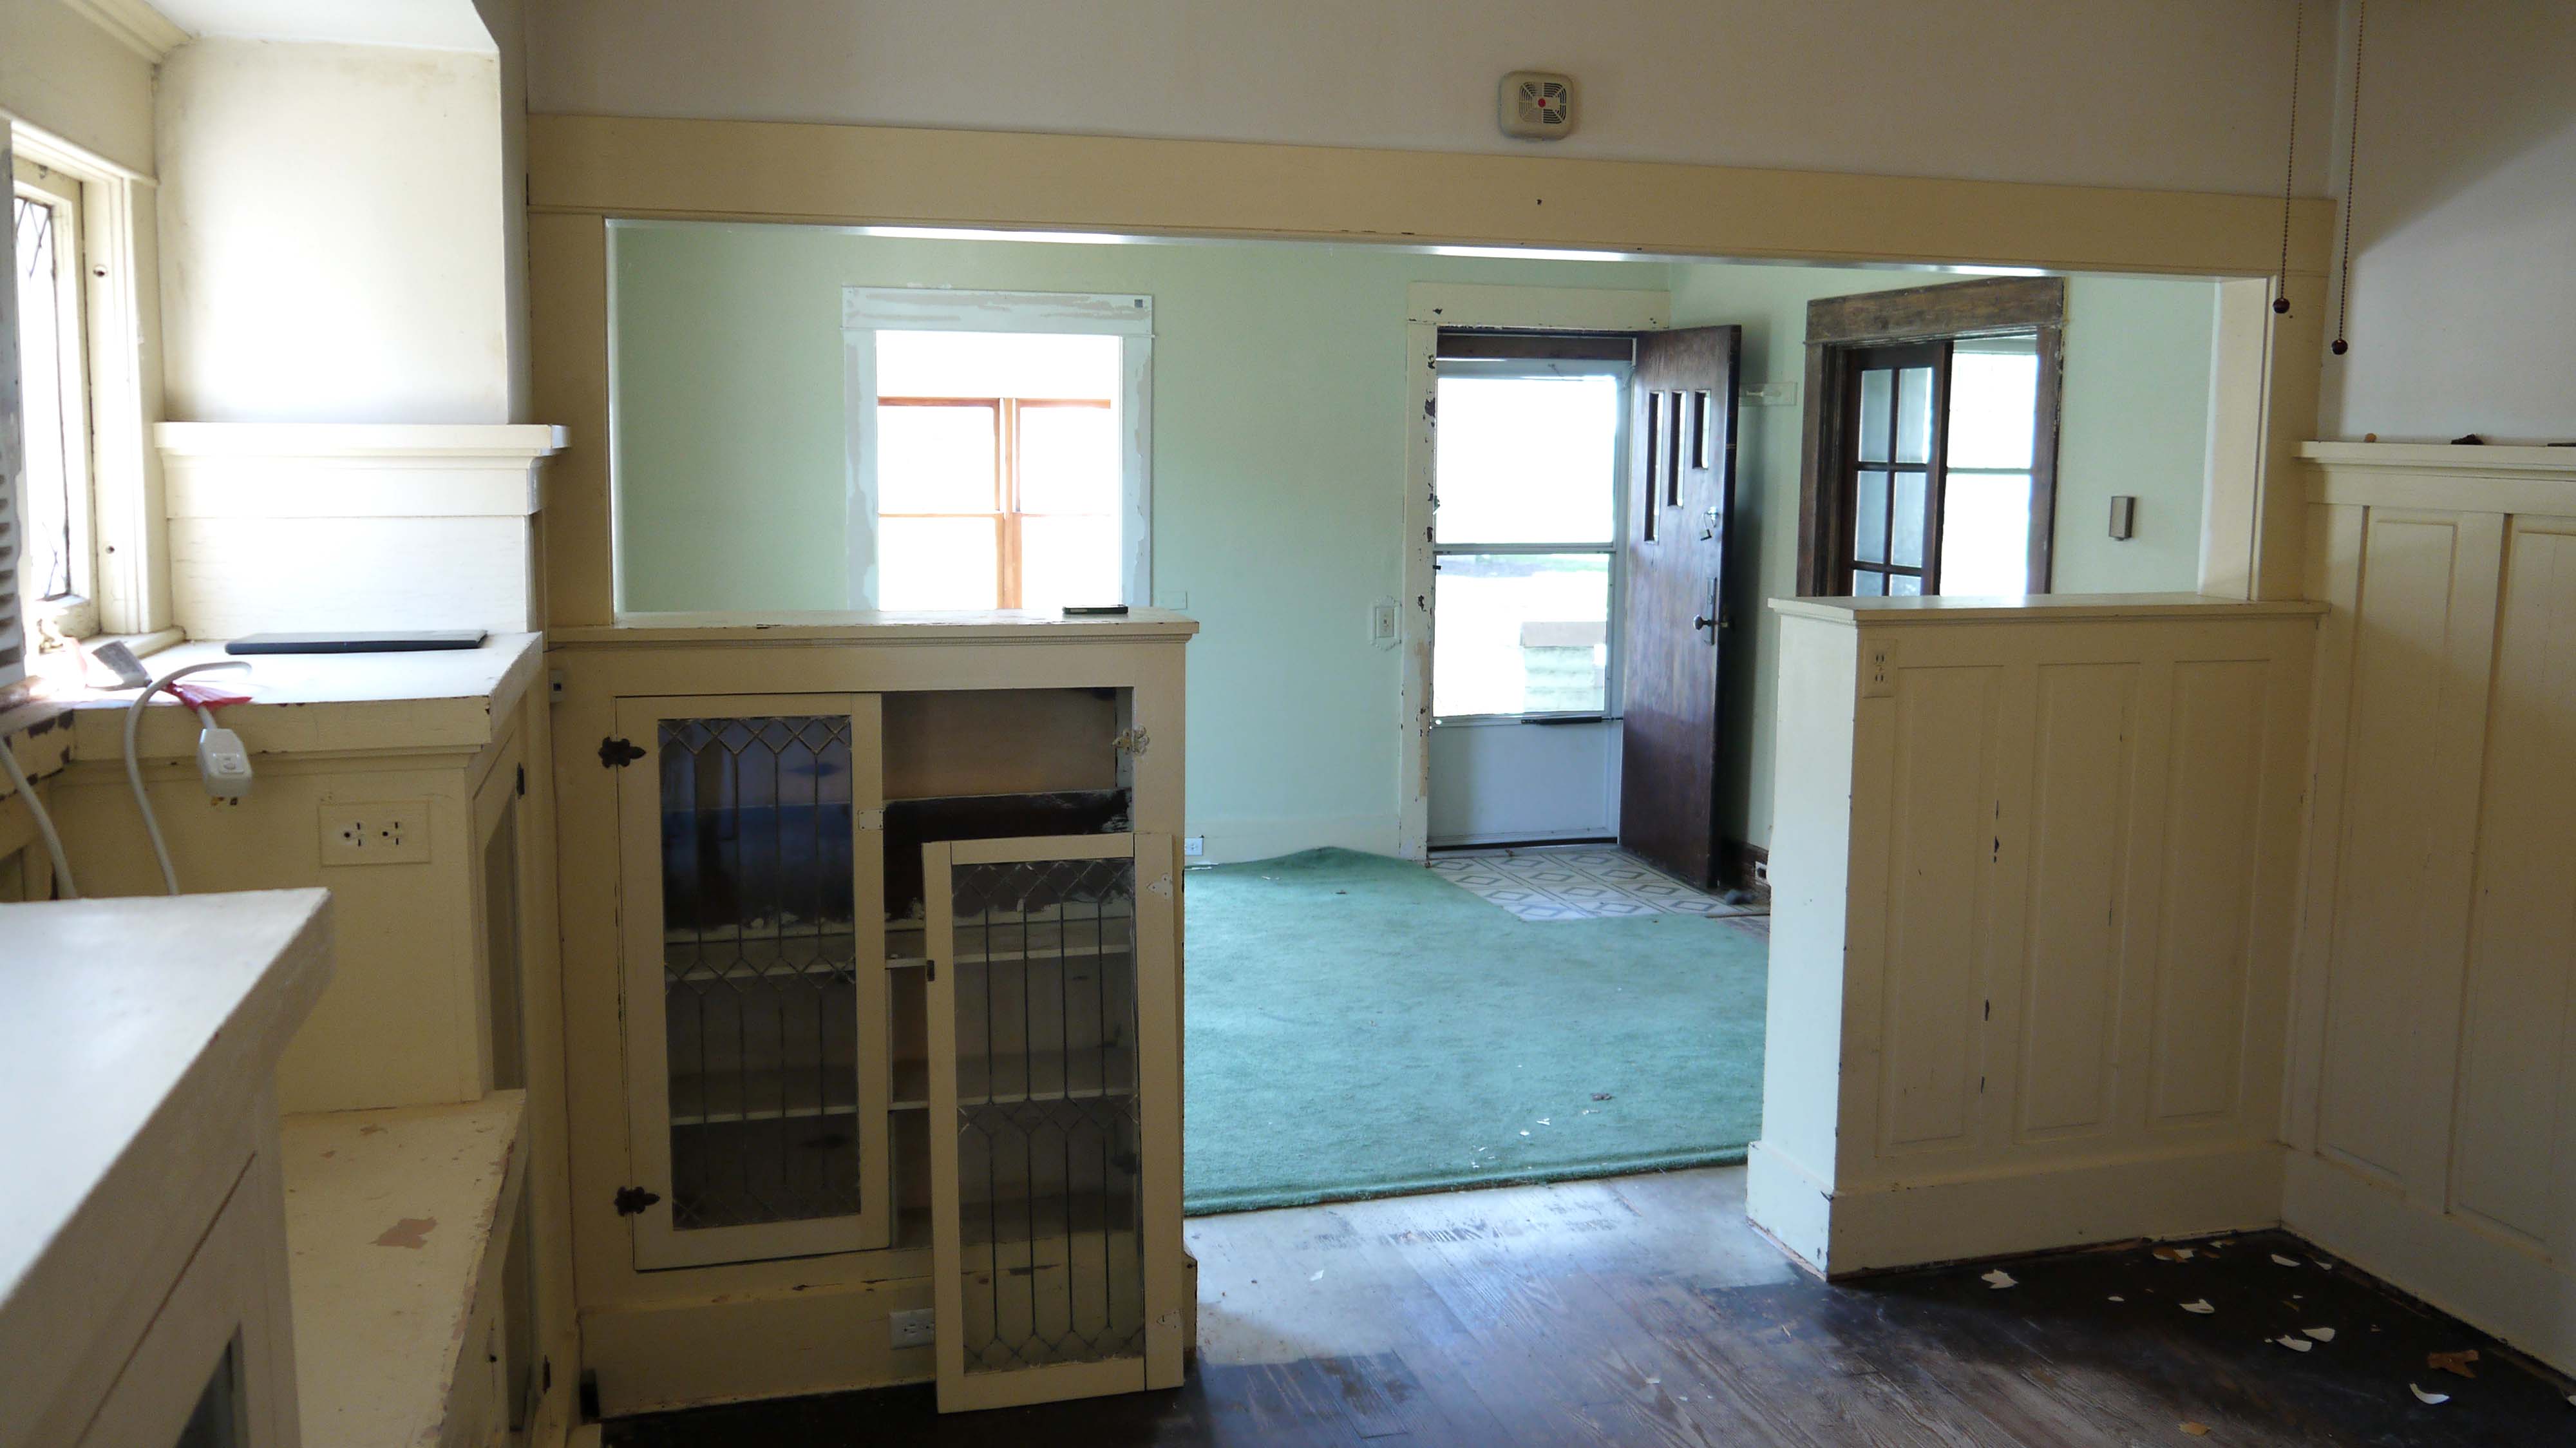
Walking back through the dining room, this doorway to the west leads into the kitchen. There are just a few spots on the ceilings where the paint is peeling like this. There doesn’t seem to be much evidence of water damage, so I have to believe the drastic temperature changes from no heat this past winter is what made the paint start to peel. This photo also gives you a sense of how tall the dining room paneling is.

It’s by far not a glamorous space yet, I will not be hosting any dinner parties in the near future at least. But it is a nice square room, and I’m hopeful that I can pull up the old linoleum and reveal wood floors to refinish.
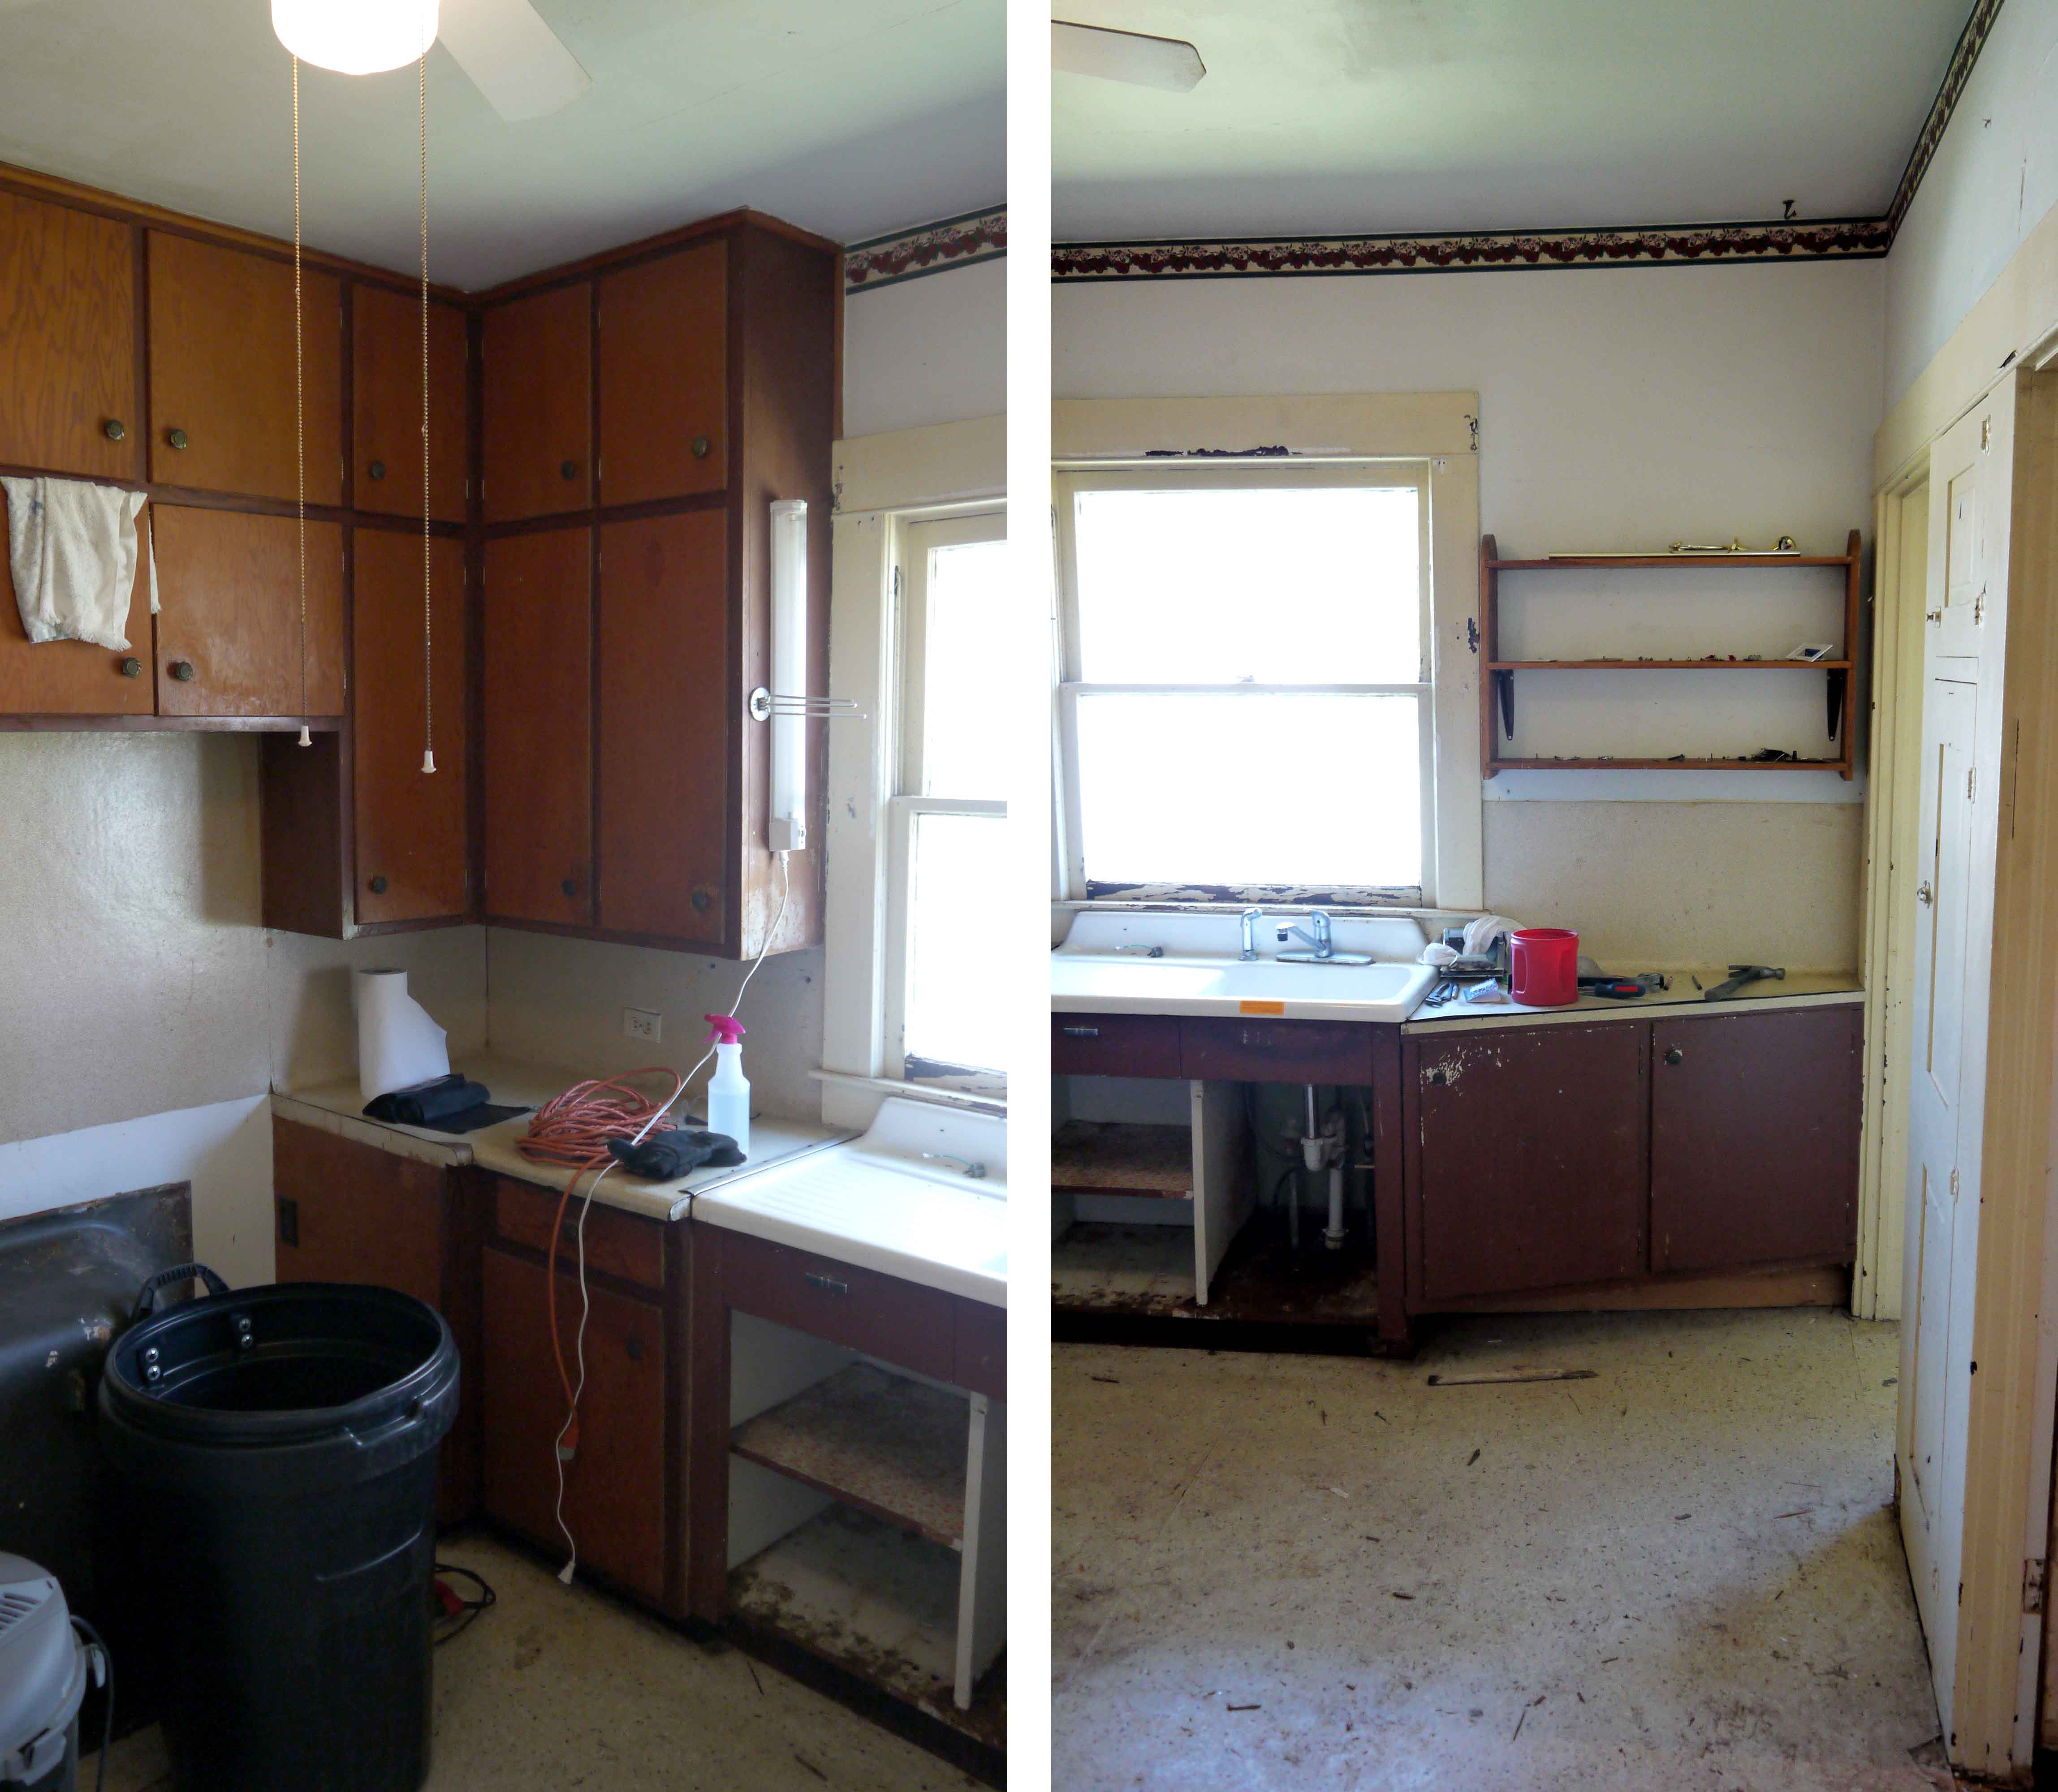
In the mean time, it just needs a thorough scrub-down. The tall cabinets are a good start! And yes, as I mentioned before, you can see how the stove and fridge are on the left, and in there place is the underneath side of my tub.

The best thing about the kitchen is the porcelain sink! What a statement piece, enormous for this size of kitchen, with its built in drain board. This is staying! Or, rather, it will get tore out, scrubbed top to bottom, and then put back in.

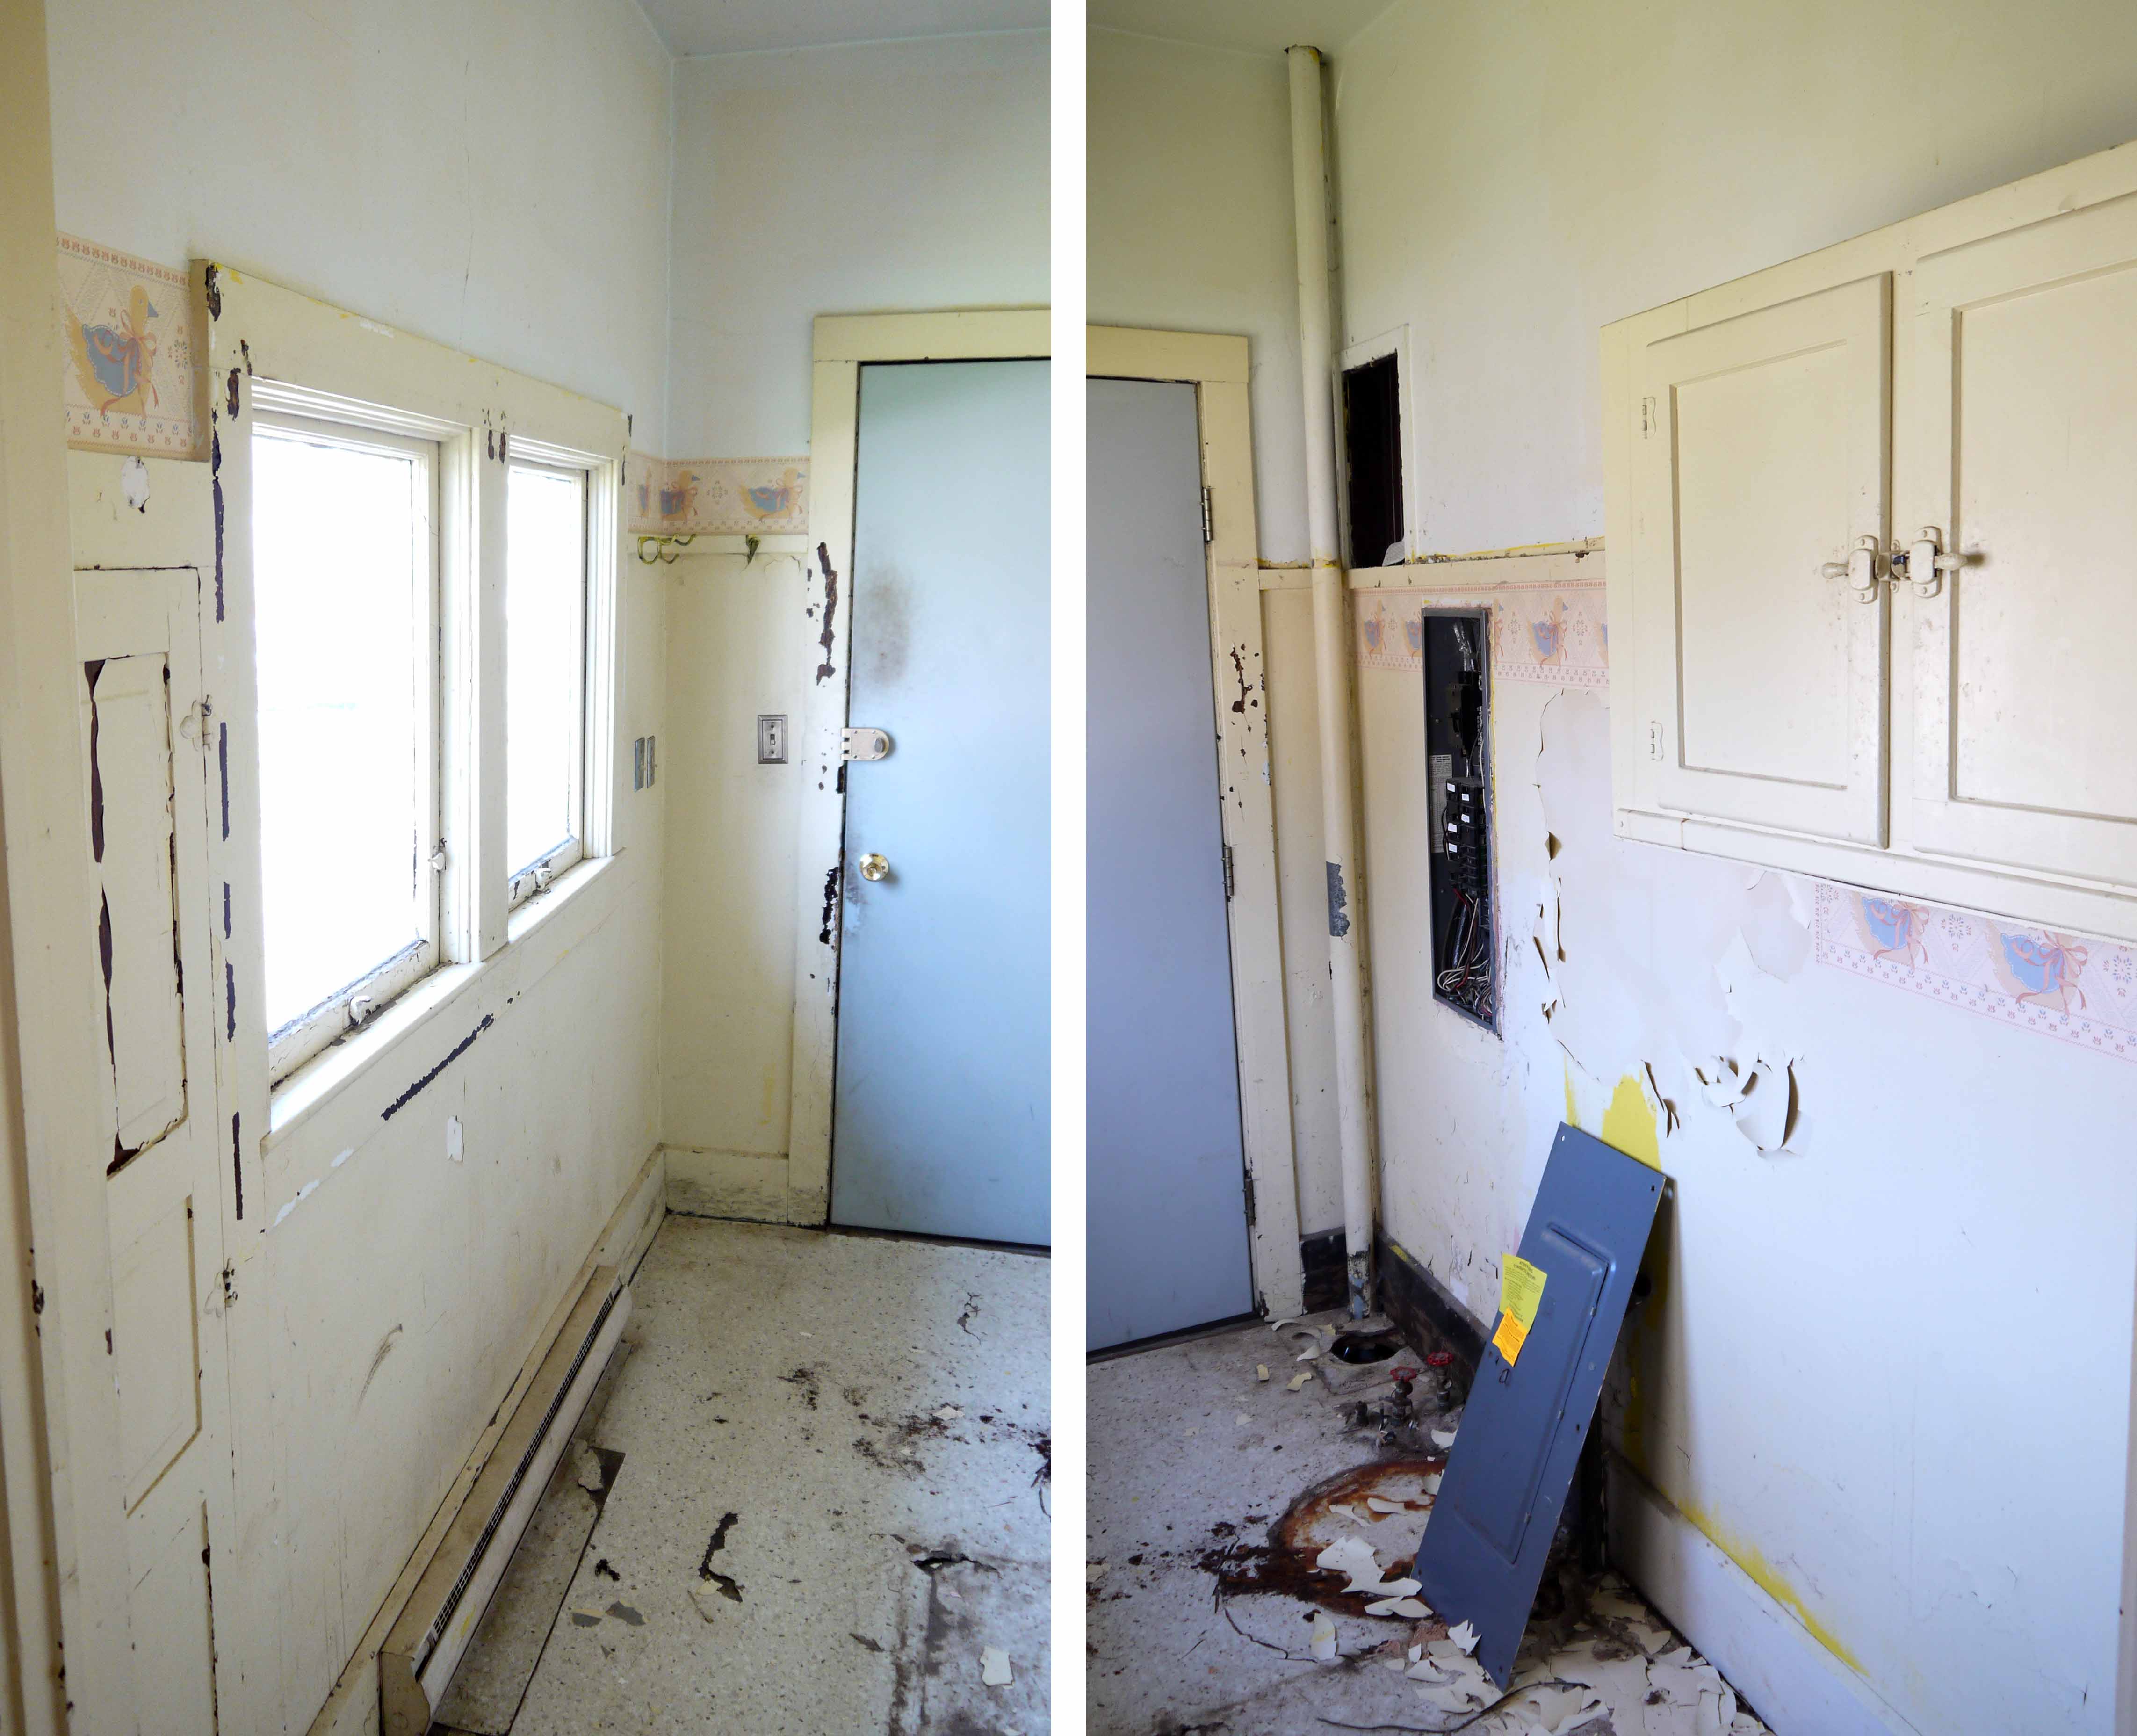
Standing with the sink at my left, this shot looks into both the laundry room and bathroom. I already detailed the bathroom “before” condition in this post. And in the space between them is another shallow wall cabinet, it looks as though it originally held a fold-down ironing board (like this one), but it’s been removed. I wonder if I could ever find one to replace it? Or perhaps build one to look original? Can you tell I love these little cubbies? These Craftsman home builders thought of everything. Why buy so much furniture; instead just build a house with a wardrobe, bookcases, buffet, and wall cabinets all as part of the design. Form meets function? I think so.
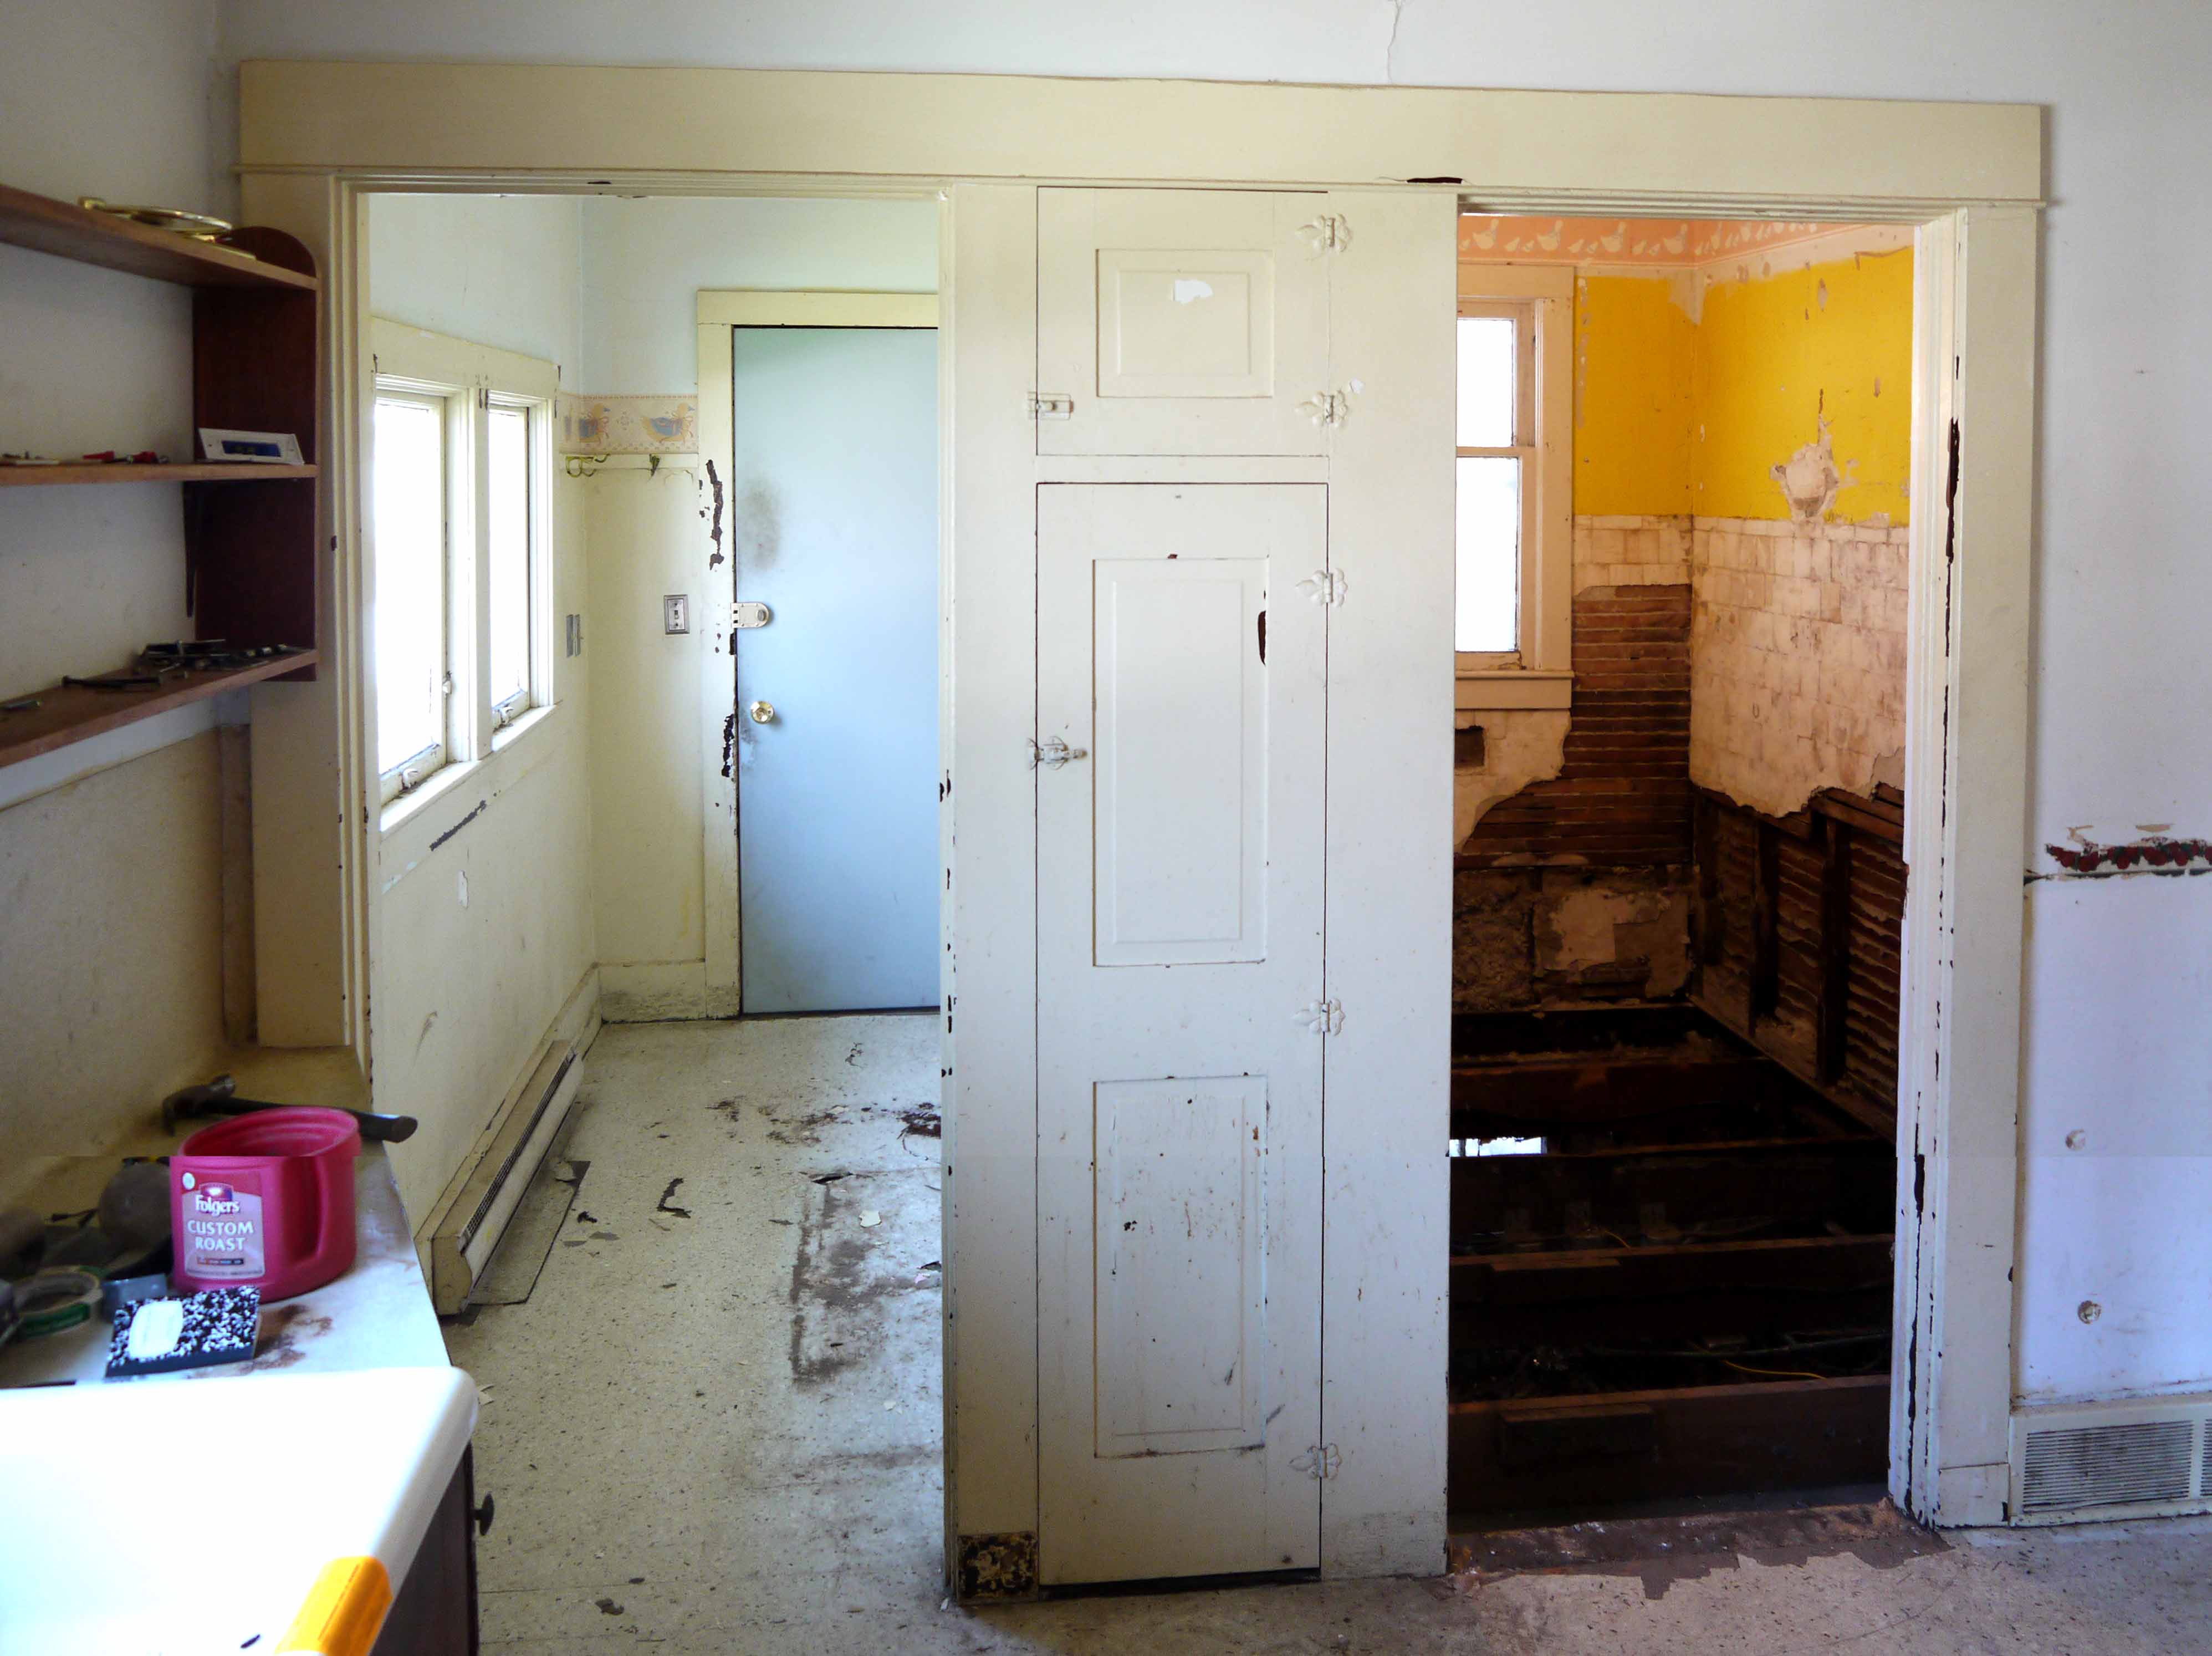
And then through the doorway, you see the narrow but bright laundry room. Another shallow wall cupboard on the left is perfect for a broom closet, and the double window floor floods the room with light. On the right is the drain plumbing vent and electrical panel (with door sitting on the floor). I hope to run the plumbing vent through the wall, but the breaker panel is staying. It’s 200 amp, and has empty breaker bays for expanding.
The rust circle on the floor shows where the water heater was, I carried that out the first week (and my hand went right through the bottom it was so rusted). I am researching tankless water heaters in hopes of saving that much floor space, as this is really a small room. Under the cabinet is where the washer and dryer go, and the steel door leads to the back yard.
So that’s the tour! I didn’t think to take photos of the outside of the house, including the garage and outbuilding, so that will be next. My family helped last weekend to do some yard clean-up, raking, planting a few perennials and trimming the overgrown shrubs.
