Archive for October, 2010
It’s Alive!!
Posted by Adam A. Ries in Equipment on October 30, 2010
A cheeky Halloween title to this post, but I was truly excited to bring my orbital sander back from the dead. Back a few posts I mentioned how I burned up my orbital sander while removing the old varnish and stain off of the cabinet I salvaged from a yard sale. One evening while sanding I noticed constant blue sparks visible through the air vents in the side of the orbital sander. Although it didn’t quit working while I was using it, the next evening when I plugged in the cord and switched the sander to ‘on’, I was immediately surprised that nothing happened. The sander just remained a dead wait in my hand. I tried a 2nd (and 3rd) outlet to be certain, but eventually came to the conclusion that my sander had died at the young age of only about 6 years.
Of course I was distraught, that sander and I had gone through so much together; my first endeavors in drywall repair, speeding up the pace of furniture sanding, even prepping dozens of cabinets for painting. Without a doubt I knew I had gotten my money’s worth out of that sander. In the week after its death, I already began researching brands, models, and comparing prices from stores and online shopping sites. But I didn’t throw the dusty old sander out yet. Although a designer, I believe I have a bit of an engineers mind. My immediate thought when the sander didn’t turn on was something like, “Ooh, I am going to take this thing apart screw by screw!”
Now let me admit I know very little (or nothing) about electrical motors. After talking with my grandfather, an extremely knowledgeable Jack of all trades (actually, his name is Bob), I had quite a good understanding about how an orbital sander works. He encouraged me to take the sander apart (as if I needed any encouragement) and thoroughly blow out all the dust inside of the plastic housing. I did just as he recommended. As he described, I found two small metal brushes on springs that had become gunked up with dust and weren’t making an electrical contact.
After making sure these two small pieces were springing like new, I reassembled the sander to find it works once again! (Ok, in reality I had to reassemble it twice because I thought I was finished until I found a spare metal piece and had to take it back apart).
The un-dead in most movies always seem to wander in search of fresh brains… If I wake some night to find it staring at me I may get nervous.
Staining up a Storm
Posted by Adam A. Ries in DIY, Furniture on October 29, 2010
This is post 2 of a 3 part series. Scroll down or simply click here to read post 1 of this series. Expect the final installment in another couple weeks or so. And no, this is not a paid endorsement for Minwax; I just enjoy blogging about high quality products.
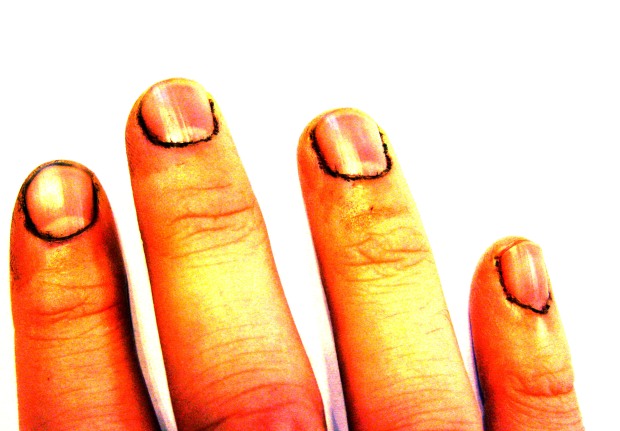
Just in time for Halloween, the cuticles around my fingernails look better than those of a real live movie zombie, which can only mean one thing: (no, I’m not preparing for a breakout role in the flick ZombieLand II: Small Town Takeover). I’ve been getting Minwax manicures while applying the stain to my Roadside Redo two door cabinet. As promised, I am going to walk through the entire staining process, but first I want to talk about how I prepared the cabinet for staining.
At the end of the first post of this project I had finished reassembling the cabinet. Before reassembling, I sanded the old varnish off with 60 and then 80 grit sandpaper on my orbital sander. After reassembling I had so many nail holes, brad holes, and seams to fill with wood putty. Because I knew I wanted a dark cabinet, I used a stainable wood filler I have had positive results with in the past.

This is where I have to insert a warning about cheap wood putty; although suitable for painted projects or naturally finished wood, they often don’t absorb dark or even medium stain very well. Just ask the kitchen cabinets I refinished about that.
Using a putty knife I filled all the necessary areas with wood filler and allowed it to dry for several hours, as per the instructions. I first sanded the entire piece with 120 grit and finished with 220 grit sandpaper, leaving the piece exceptionally smooth. Before staining it is crucial to make sure your furniture piece and working area is dust free; getting dust in your stain or finish can be disastrous, leaving a rough surface or imperfections in the finish sheen. I prefer to use a lightly dampened rag to collect the majority of the sanding dust, but always use a tack cloth over the entire furniture piece immediately before applying stain. Now onto the stain I chose.
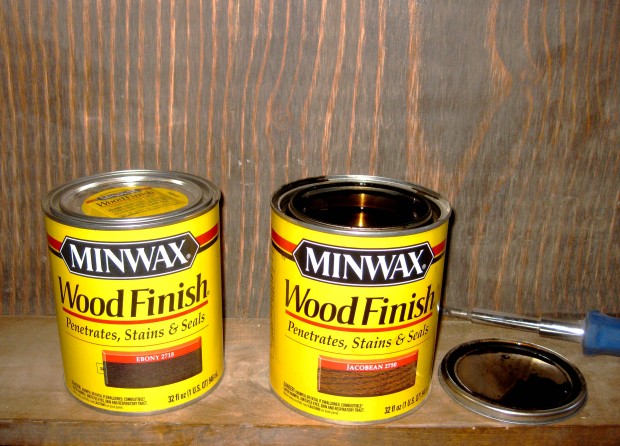
I knew I wanted a rich, dark brown color; I felt a dark stain would not only look good in the room I intend this piece for, but would help even out the grain pattern and minimize the appearance of knots. From past experience, however, I also knew that a dark stain would be a risky challenge as I am fairly certain this cabinet is yellow pine. Yellow pine does not always accept dark stain well or evenly. I tested every stain I already have from previous projects on the underneath side of the cabinet, but none gave me a deep chocolate color. After a quick trip to my local hardware store, I knew one of the two stain colors I purchased would be the one (but which one…?). Off the Minwax interior wood stain chart, I chose both Jacobean 2750 and Ebony 2718. If Jacobean proved uneven or not dark enough, I would trade deep chocolate for dark chocolate. I ventured to first open only the can I thought would be the most likely successful stain. If I was correct, I would have only opened one and could return the unopened can to the store. Much to my satisfaction, Jacobean proved to be very close to the deep chocolate color I had in mind. No need to even open Ebony (although I am really curious to see how it would have looked, I would rather return it and get my $7.99 back).
Also learned during a previous project, when staining any soft woods (pine, yellow pine, fir, and maple among a few others), it doesn’t hurt to use a pre-stain wood conditioner. Once again I rely on a Minwax product, but I know there are other successful manufacturers. As with any wood filler, stain, varnish, etc, I like to stick with products I have had positive results with in the past. Using the conditioner helps the wood to absorb the stain evenly and prevents dark blotches or streaks from occurring. Just apply it like you would stain, allow to penetrate for 5 – 15 minutes, then wipe off any excess and you’re ready for stain.
For this cabinet I used a clean soft cotton cloth to apply both the conditioner and stain, rubbing the color into the wood but in the direction of the grain. I applied the stain heavily, letting it soak no longer than 5 minutes, then buffed off the excess with another clean absorptive cloth. When completed, the stain was not as dark as I would have hoped in certain spots; I also quickly realized there were more than 1 type of wood in this cabinet as the two side frames stained exceptionally dark (and stand out a bit…hmm). I waited a full 24 hours and reapplied a second coat of stain, letting it soak a few minutes again before wiping off the excess. This darkened and evened out the stain a bit, but as with any furniture piece composed of multiple woods, there will always be color variations that make the piece unique.
Above is a photo of the drawer front as a sneak peek of how the cabinet will look. In the final posts of this series I will elaborate on varnishing the cabinet, fastening the glass into the doors, and securing all the hardware. Hopefully you will read all about that and see the final completed piece soon. Be on the lookout for the Big Finish & Reveal post!
Without Woodwork
Posted by Adam A. Ries in Home Improvement on October 25, 2010
This past weekend I removed the woodwork around almost absolutely every window in my family’s house. Why you may ask? Not just on impulse; we have a local lumberyard coming to the house this week to take measurements for new windows. Probably the last big (BIG) improvement project of this year, just in time to take advantage of the Federal Tax Credit for Consumer Energy Efficiency. So much to my family’s discontent, every window in every room of the house now looks like this:
Unpainted plaster edges, exposed chicken wire ends (apparently what they used in 1955 for quick lathe), and dirty fiberglass insulation. I was actually a bit surprised to find any insulation at all; in certain rooms, the curtains move when there are strong winds. Although the chosen windows aren’t the highest efficiency models available today, they will be a drastic improvement on the existing. That being said, after getting the advice of 2 different contractors, the decision was made to go with new construction windows rather than replacement windows. In researching windows, I found that standard replacement windows are installed inside the existing window frames; only the sashes are removed and the replacement windows are custom-made to fit inside the opening.
With our home, half of the existing windows are original while the other half have been replaced at one time, though probably at least 15 years ago. The newer (I use that term loosely) windows, however, are actually a few inches smaller than the homes framed openings. That means that on either side of the windows is between a 1″ and 2″ gap, stuffed with insulation, as you can see below in this close up.

Also, when the “newer” windows were trimmed out with woodwork, wall base molding was used to hide the large gaps since standard window trim would not have been wide enough. Not only did the wall base trim not match the woodwork around all the other windows, whoever played carpenter didn’t trim them out with window sills. So basically each of the poorly replaced windows stood out because they were trimmed to look like a 4″ wide photo frame. I understand that new construction windows will be a little more work than replacement windows, but when do I ever back down from a challenge? In the words of a contractor friend, “if it were my house, I would do it the right way.” Ok; new construction windows then. Enough said.
Now onto the windows that were chosen for this 1955 ranch home. We took many factors into consideration (including material, glazing type, warranty, and finish) and got price quotes from several different companies. The final decision was for double-hung, all vinyl construction, double pane, argon filled low E insulated glass, white interior and exterior. All the homes windows are originally double hung, but in wood. The price jump for wood windows was just not an option for this small of a ranch house, plus I know how low maintenance vinyl will be for the life of the home. Another driving factor was to purchase the windows locally. Although the windows themselves are manufactured in Oregon, our local lumberyard is a certified dealer. They measure, give quotes, deliver, and will even install them if you want that service. We are going to install them ourselves to save that much more. After all, what kind of DIY enthusiast would I be if I sat back and allowed someone else to install my family’s windows?


