Archive for July, 2014
Mud Wrestling, and how the ceiling turned yellow
Posted by Adam A. Ries in DIY, Home Improvement on July 13, 2014
Not really wrestling, more like flinging. Because taping and mudding all of the drywall seams actually went pretty smoothly (no pun intended), but I did throw a little mud. There is definitely a knack to mudding drywall, flinging it from one trowel to the other to keep it manageable and at the edge of the knife. I watched several videos with tips and step by step instructions. The main lessons I took from the videos were 1) be generous with the mud first, then 2) scrape off as much as possible. Number 3), professionals use paper tape for seams. 4) Thin coats are the secret to a professional looking mud job. As are the correct drywall knives.
That being said, I started on the wall where I knew most of the seams would eventually be covered in tile. I figured that would be the best way to begin.

Sheets of drywall are 4′ x 8′, so laying them sideways in a typical house with 8′ ceilings results in 1 seam in the center of the wall. My house has 9′ ceilings, which throws off that whole system. Since I know I want to tile the walls from the floor to plate-rail height (about 4′-6″ off the ground – to match the wainscot in the dining room), I put the 12 inch stripe in the center of the room where the two seams will be hidden once the tile goes up.
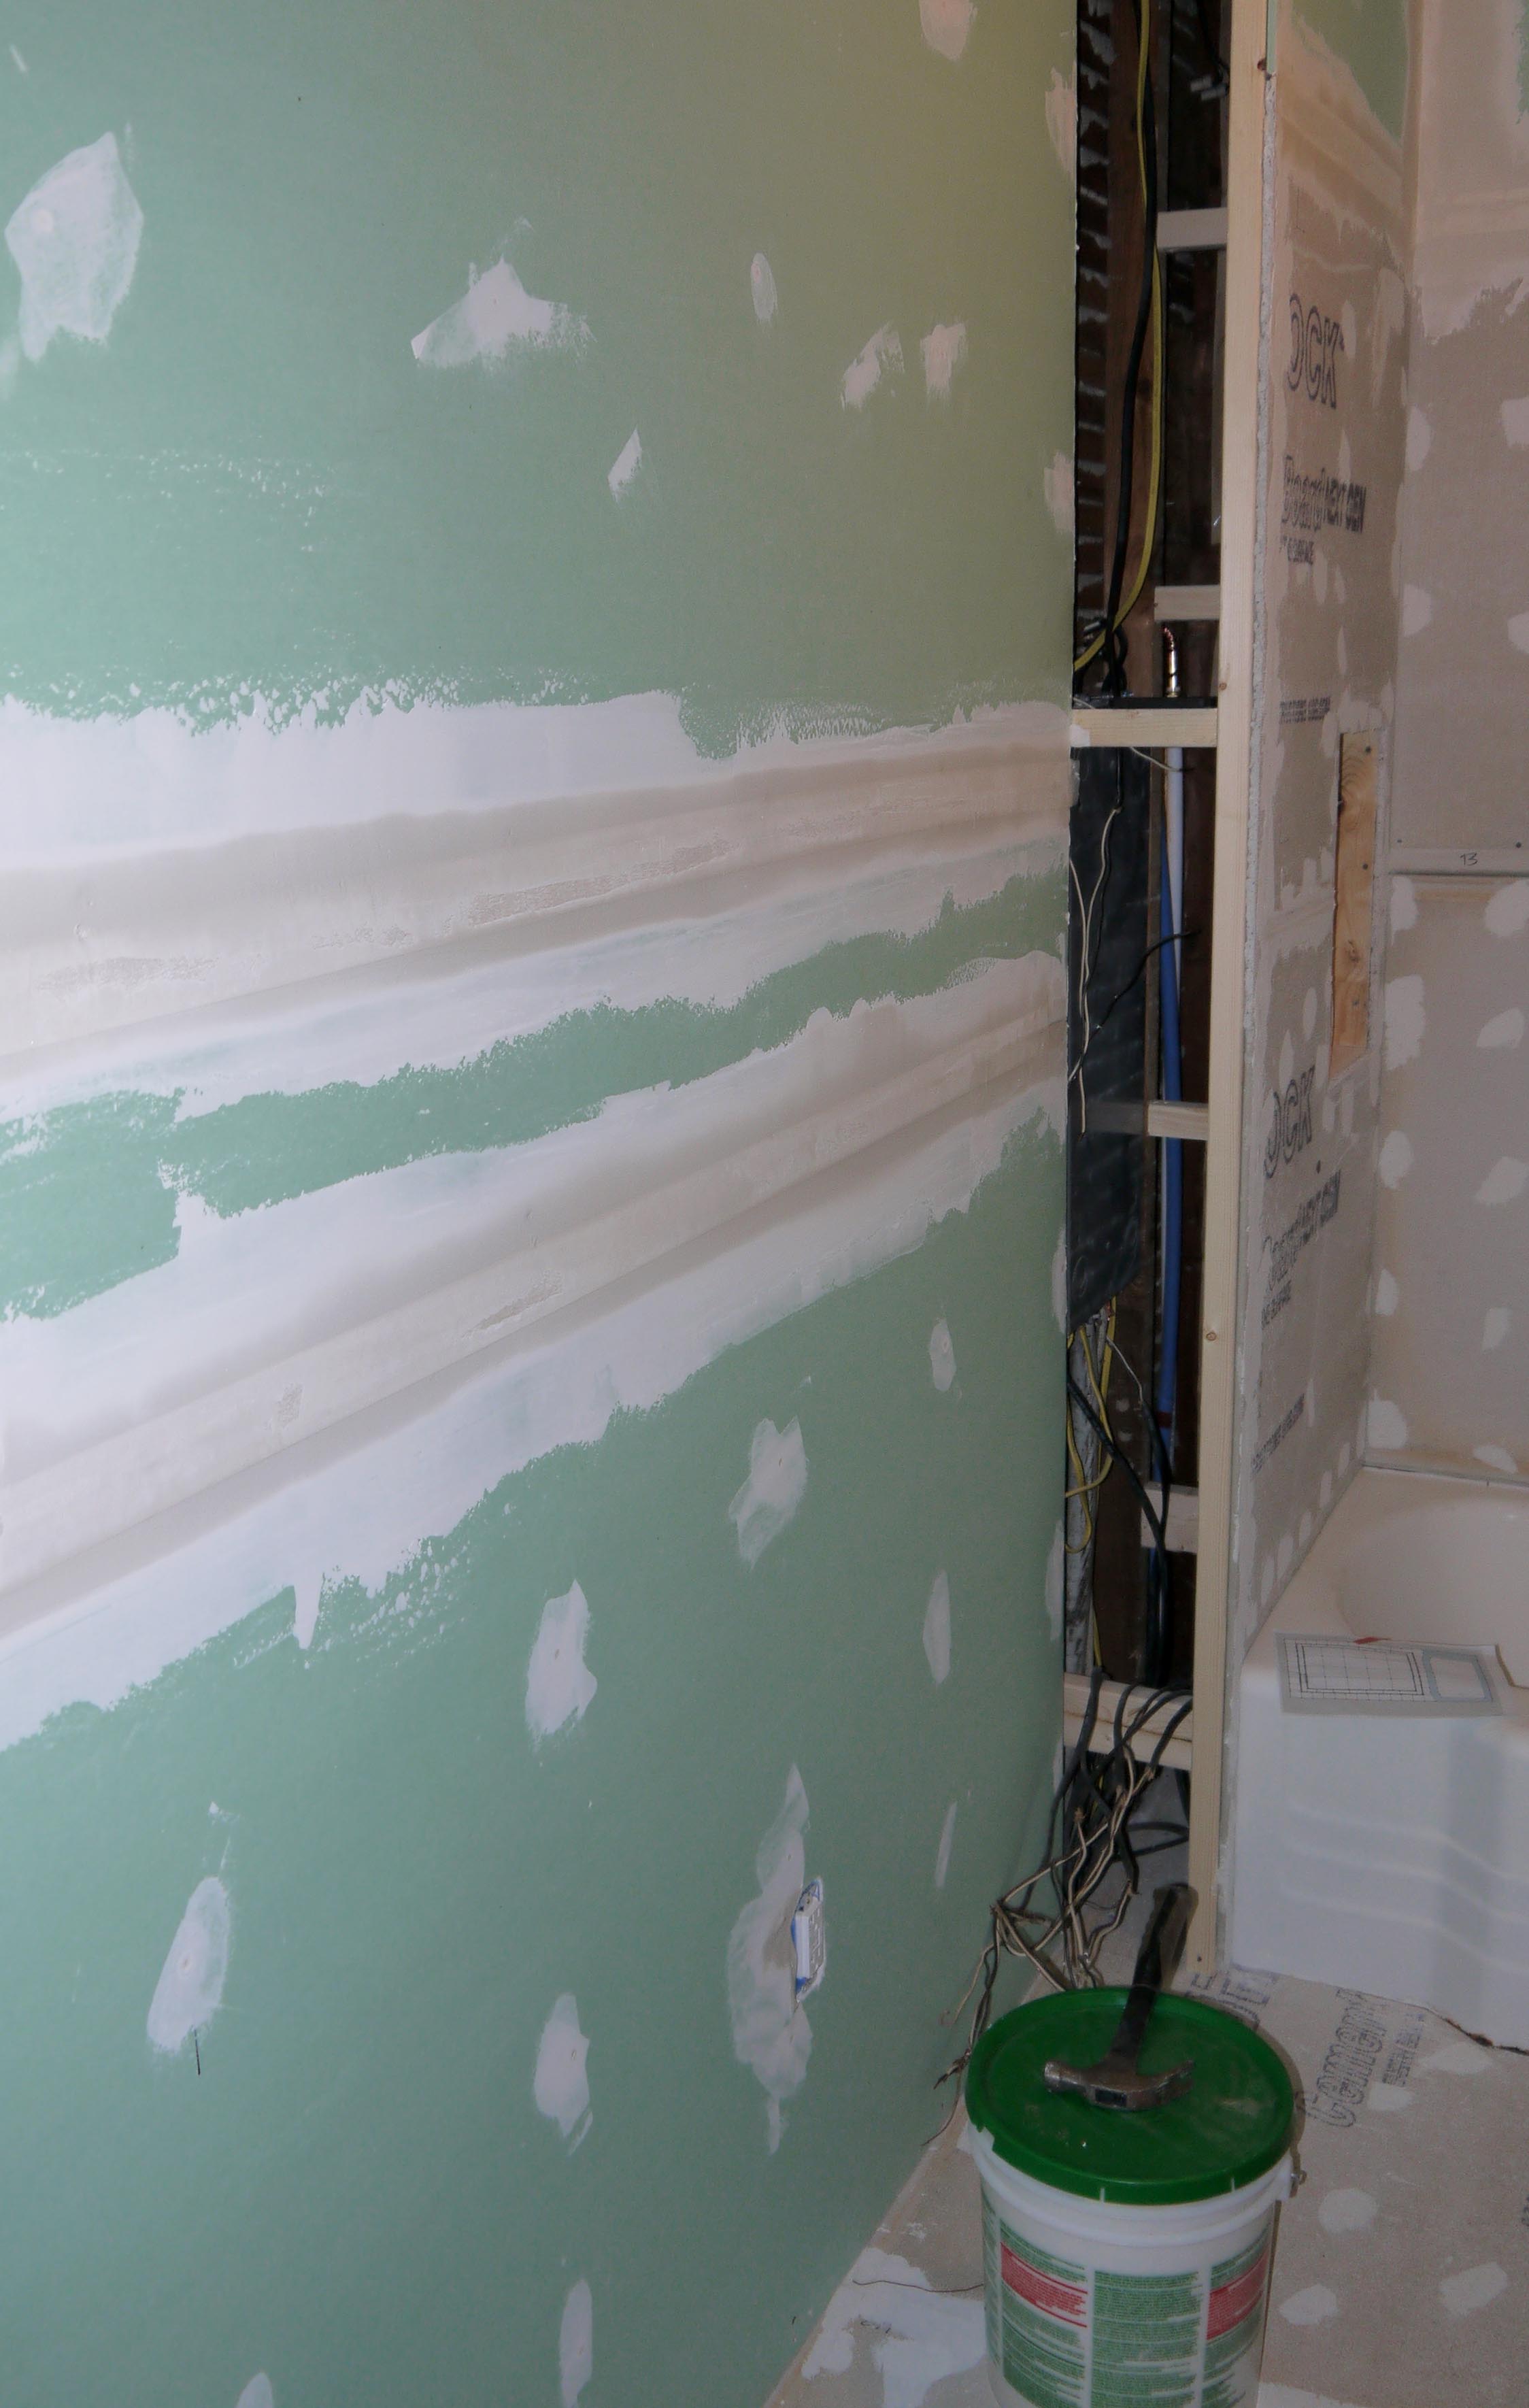
Even after the 2nd coat of joint compound, each coat is so thin that the tape is still visible. I cannot stress enough that scraping off the excess mud after each coat is the most important step. Lather on, scrape and scrape and scrape off. And all the joint compound scraped off can be thrown back into the bucket and used for the next seam.

I’m not sure if I had to, but I went ahead and taped the seam between the drywall and cement board along the shower walls. I haven’t fully made up my mind about how tall the tile in the shower will go. I’ve seen some examples where they tile clear up to the ceiling:

and some other examples where they leave anywhere from 12 to 24 inches of drywall to be painted:

I’m leaning toward leaving drywall to be painted. There’s going to be plenty of white, so leaving that much wall space will bring the paint color onto all 4 walls.
I also like how in this shower, they part wrapped the window opening with tile, and then above the shower head height, they wrapped the upper portion of the window to look like the rest of the home’s trim. I’m thinking this is how I will wrap the window, except using the style of trim that matches my house.

Now onto the second half of the title. As the photo below shows, the ceiling in the bathroom is white was white. The ceiling’s plaster is in really good shape, so I only wanted to patch the cracks and few small holes. But first I used a 3″ putty knife to scrape off the areas of chipping or peeling paint. And that’s where “areas” turned into a larger and larger section of peeling paint. Not just a small area either, a huge area. And it wasn’t just a few layers of paint, I’m talking like every layer of paint in the history of the house. It must have been nearly a 1/16 of an inch thick. Back to a really early layer of most likely oil base paint, possibly the original plaster coat.

It just kept scraping off, I never got to a point where I felt comfortable leaving it. An hour later, the entire ceiling was scraped. So that’s how the ceiling turned yellow.

But the good news is that I got all of the paint scraped off. Better now than down the road when steam from the shower might have caused it to peel or pieces to fall off. And although I did fill all of the cracks, I wasn’t all that particular. If the ceiling looks just a bit crackly and old, that’s fine. After all, every room should have something that helps show the age of the house. It will give it character. After just a light sanding on the ceiling and all the walls, the bathroom is ready to be primed.
On the Up and Up
Posted by Adam A. Ries in DIY, Home Improvement, Interior Design on July 9, 2014
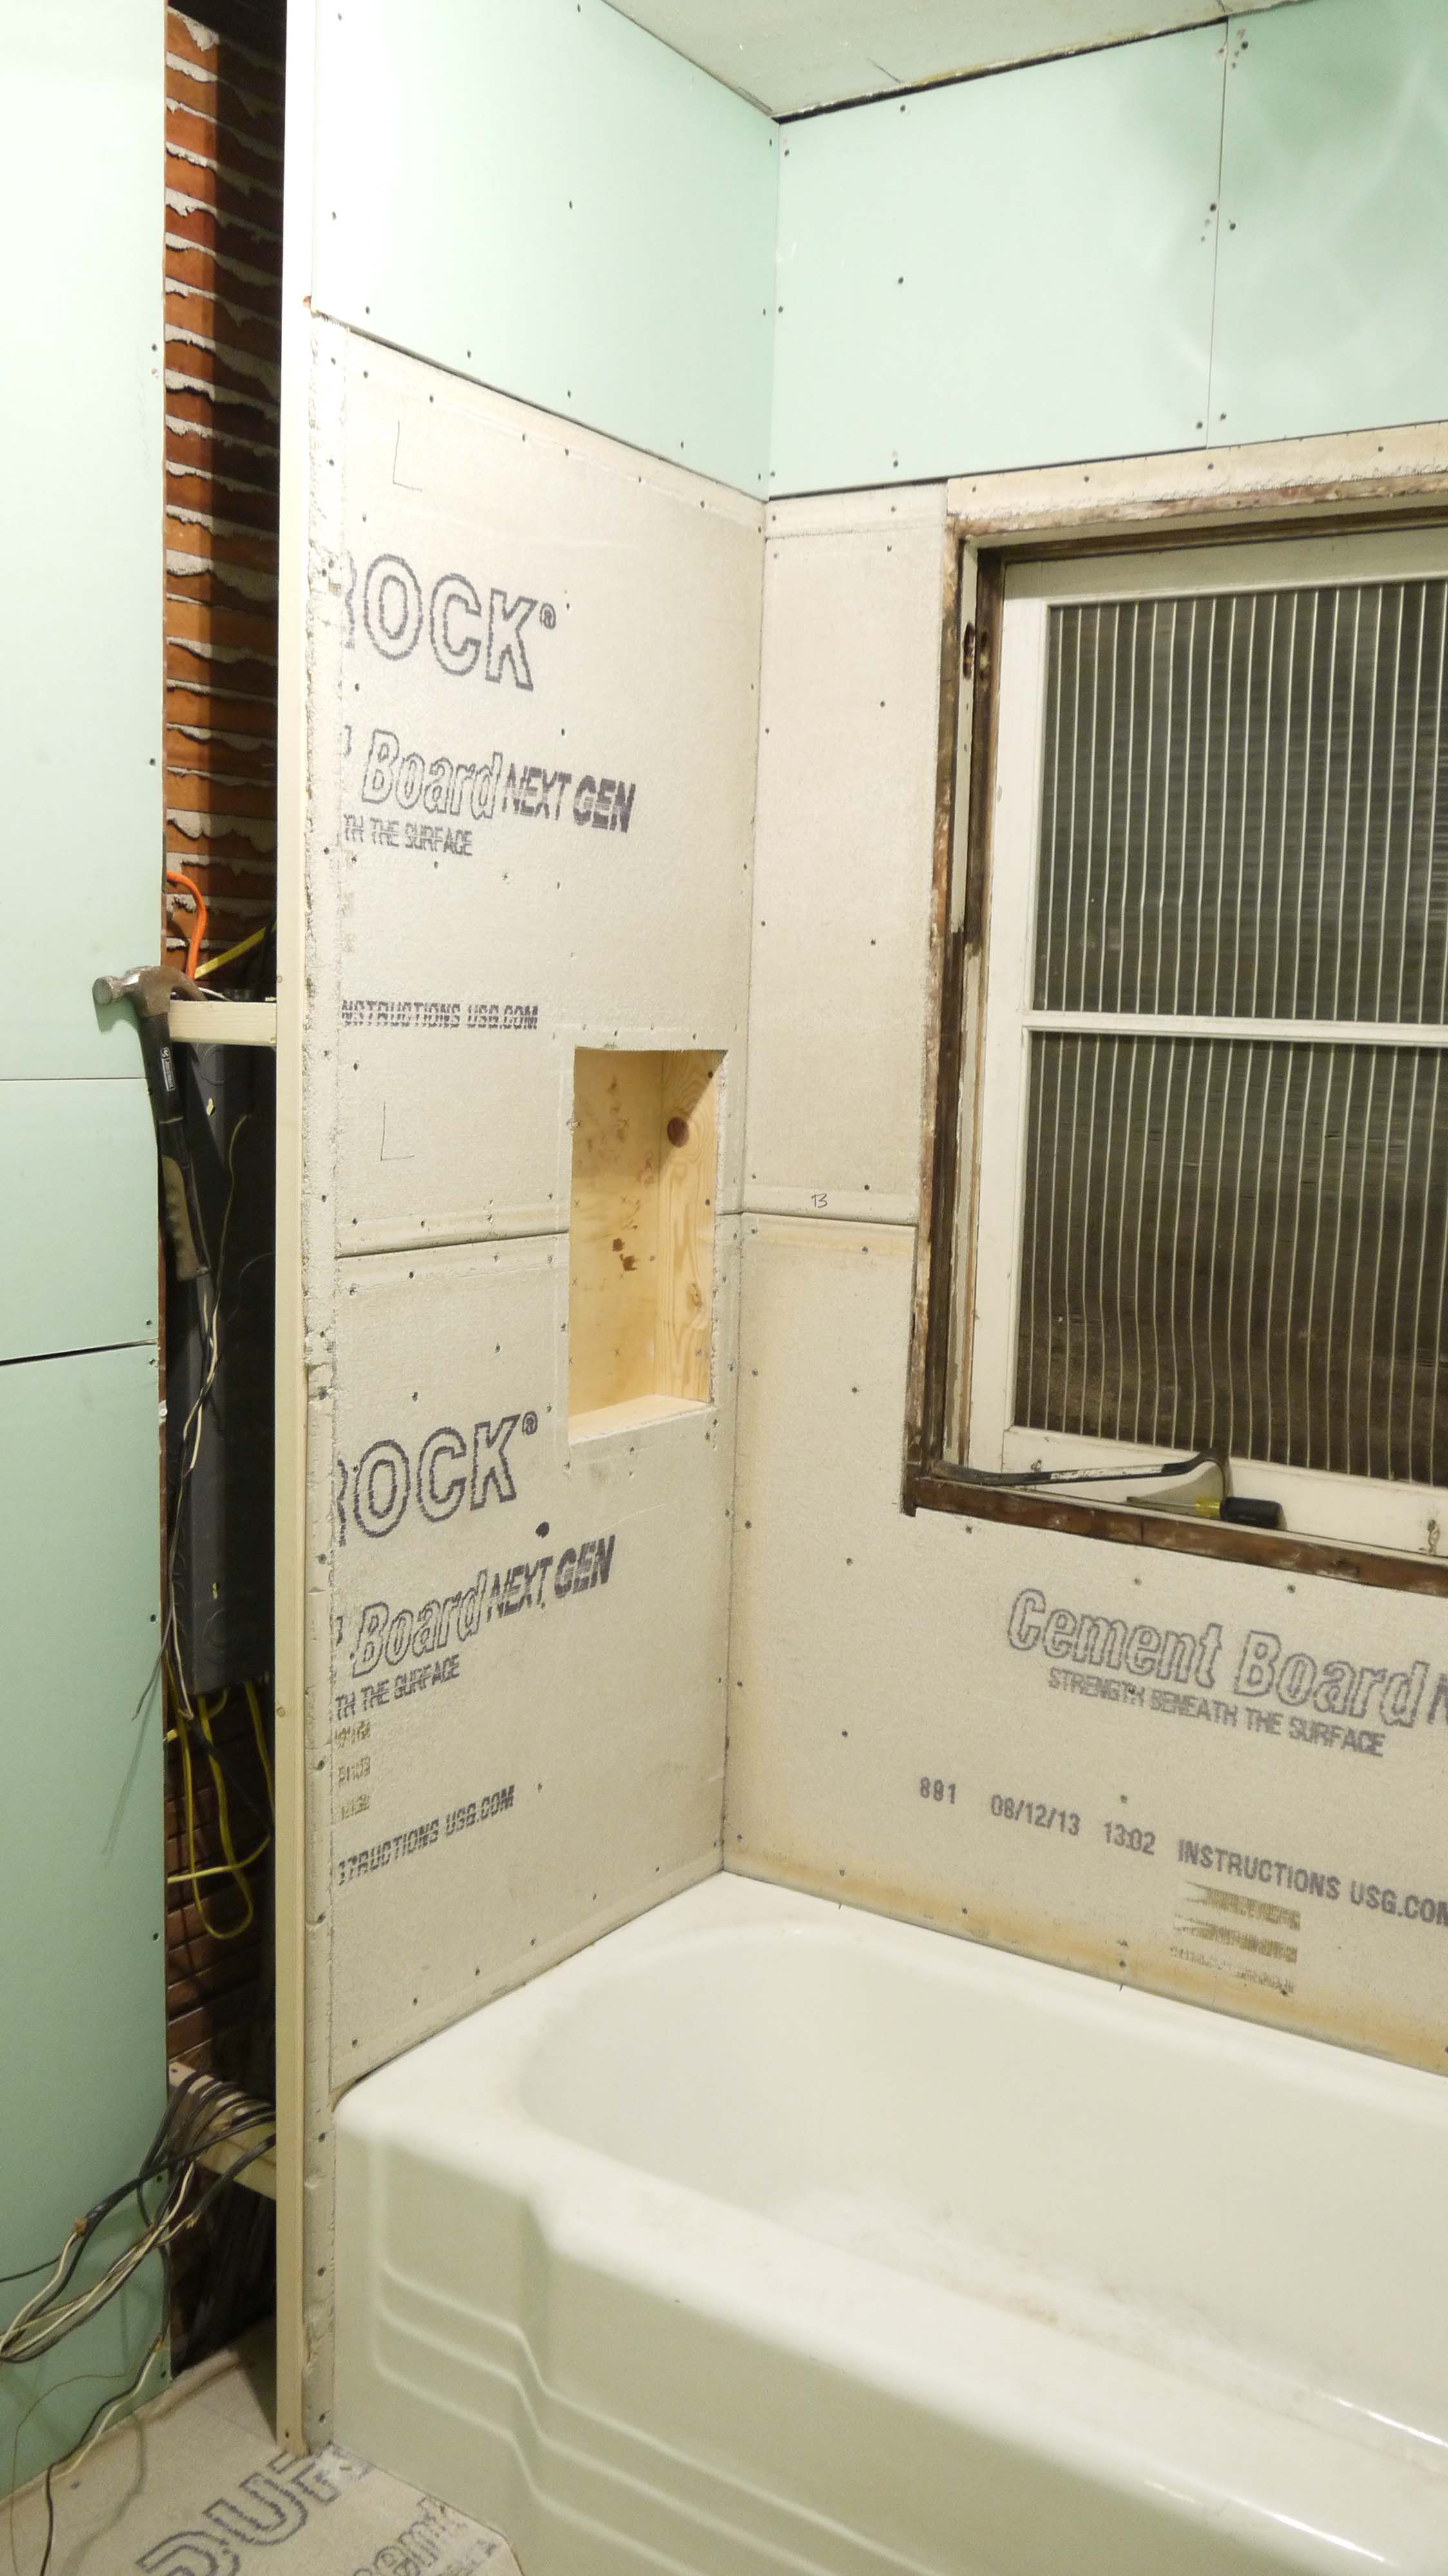
Meaning, drywall and cement board! Although most of the bathroom was ready to accept wallboard once the plaster was torn off, I did have to do a little framing at what would be the back of the tub/shower. As you can see in this 3D model, the bathroom is about 5′-8″ wide, and a tub is only 5 feet.

That leaves me with a 8 in gap between the tub and the existing bath wall. So I framed in a full height wall to have a support to build a shower wall. In the end, I’m planning to trim it out with little cubbie cabinets to look very similar to this (only I will continue it all the way to the ceiling).

I used 2×2 lumber as the main section, and a 2×4 on the outside for strength (non-weight bearing walls can be constructed of 2×2 lumber – it’s how thin walls and even walls that house a pocket door are constructed).

I added lots of cross-supports between the studs and the wall behind. Although it was very strong on it’s own, this will be a tiled shower wall, and I don’t want any flexing to crack tiles or cause them to break off. The 1×4 sections between the studs are flush to the front of the framing studs. Just like the ones you can see along the top edge of the tub, these were a recommendation from a how-to video I found very informative on YouTube (Seriously, TileMasterGA: I have learned so much from his many videos documenting each thorough step of a quality and long-lasting bathroom renovation). These boards he recommended are to provide additional support to secure the wallboard as strong as possible, minimizing flexing. I just used scrap boards for these pieces. I also put them at the height where 2 sections of wall board will meet, to make sure the joint has this strong support as well.
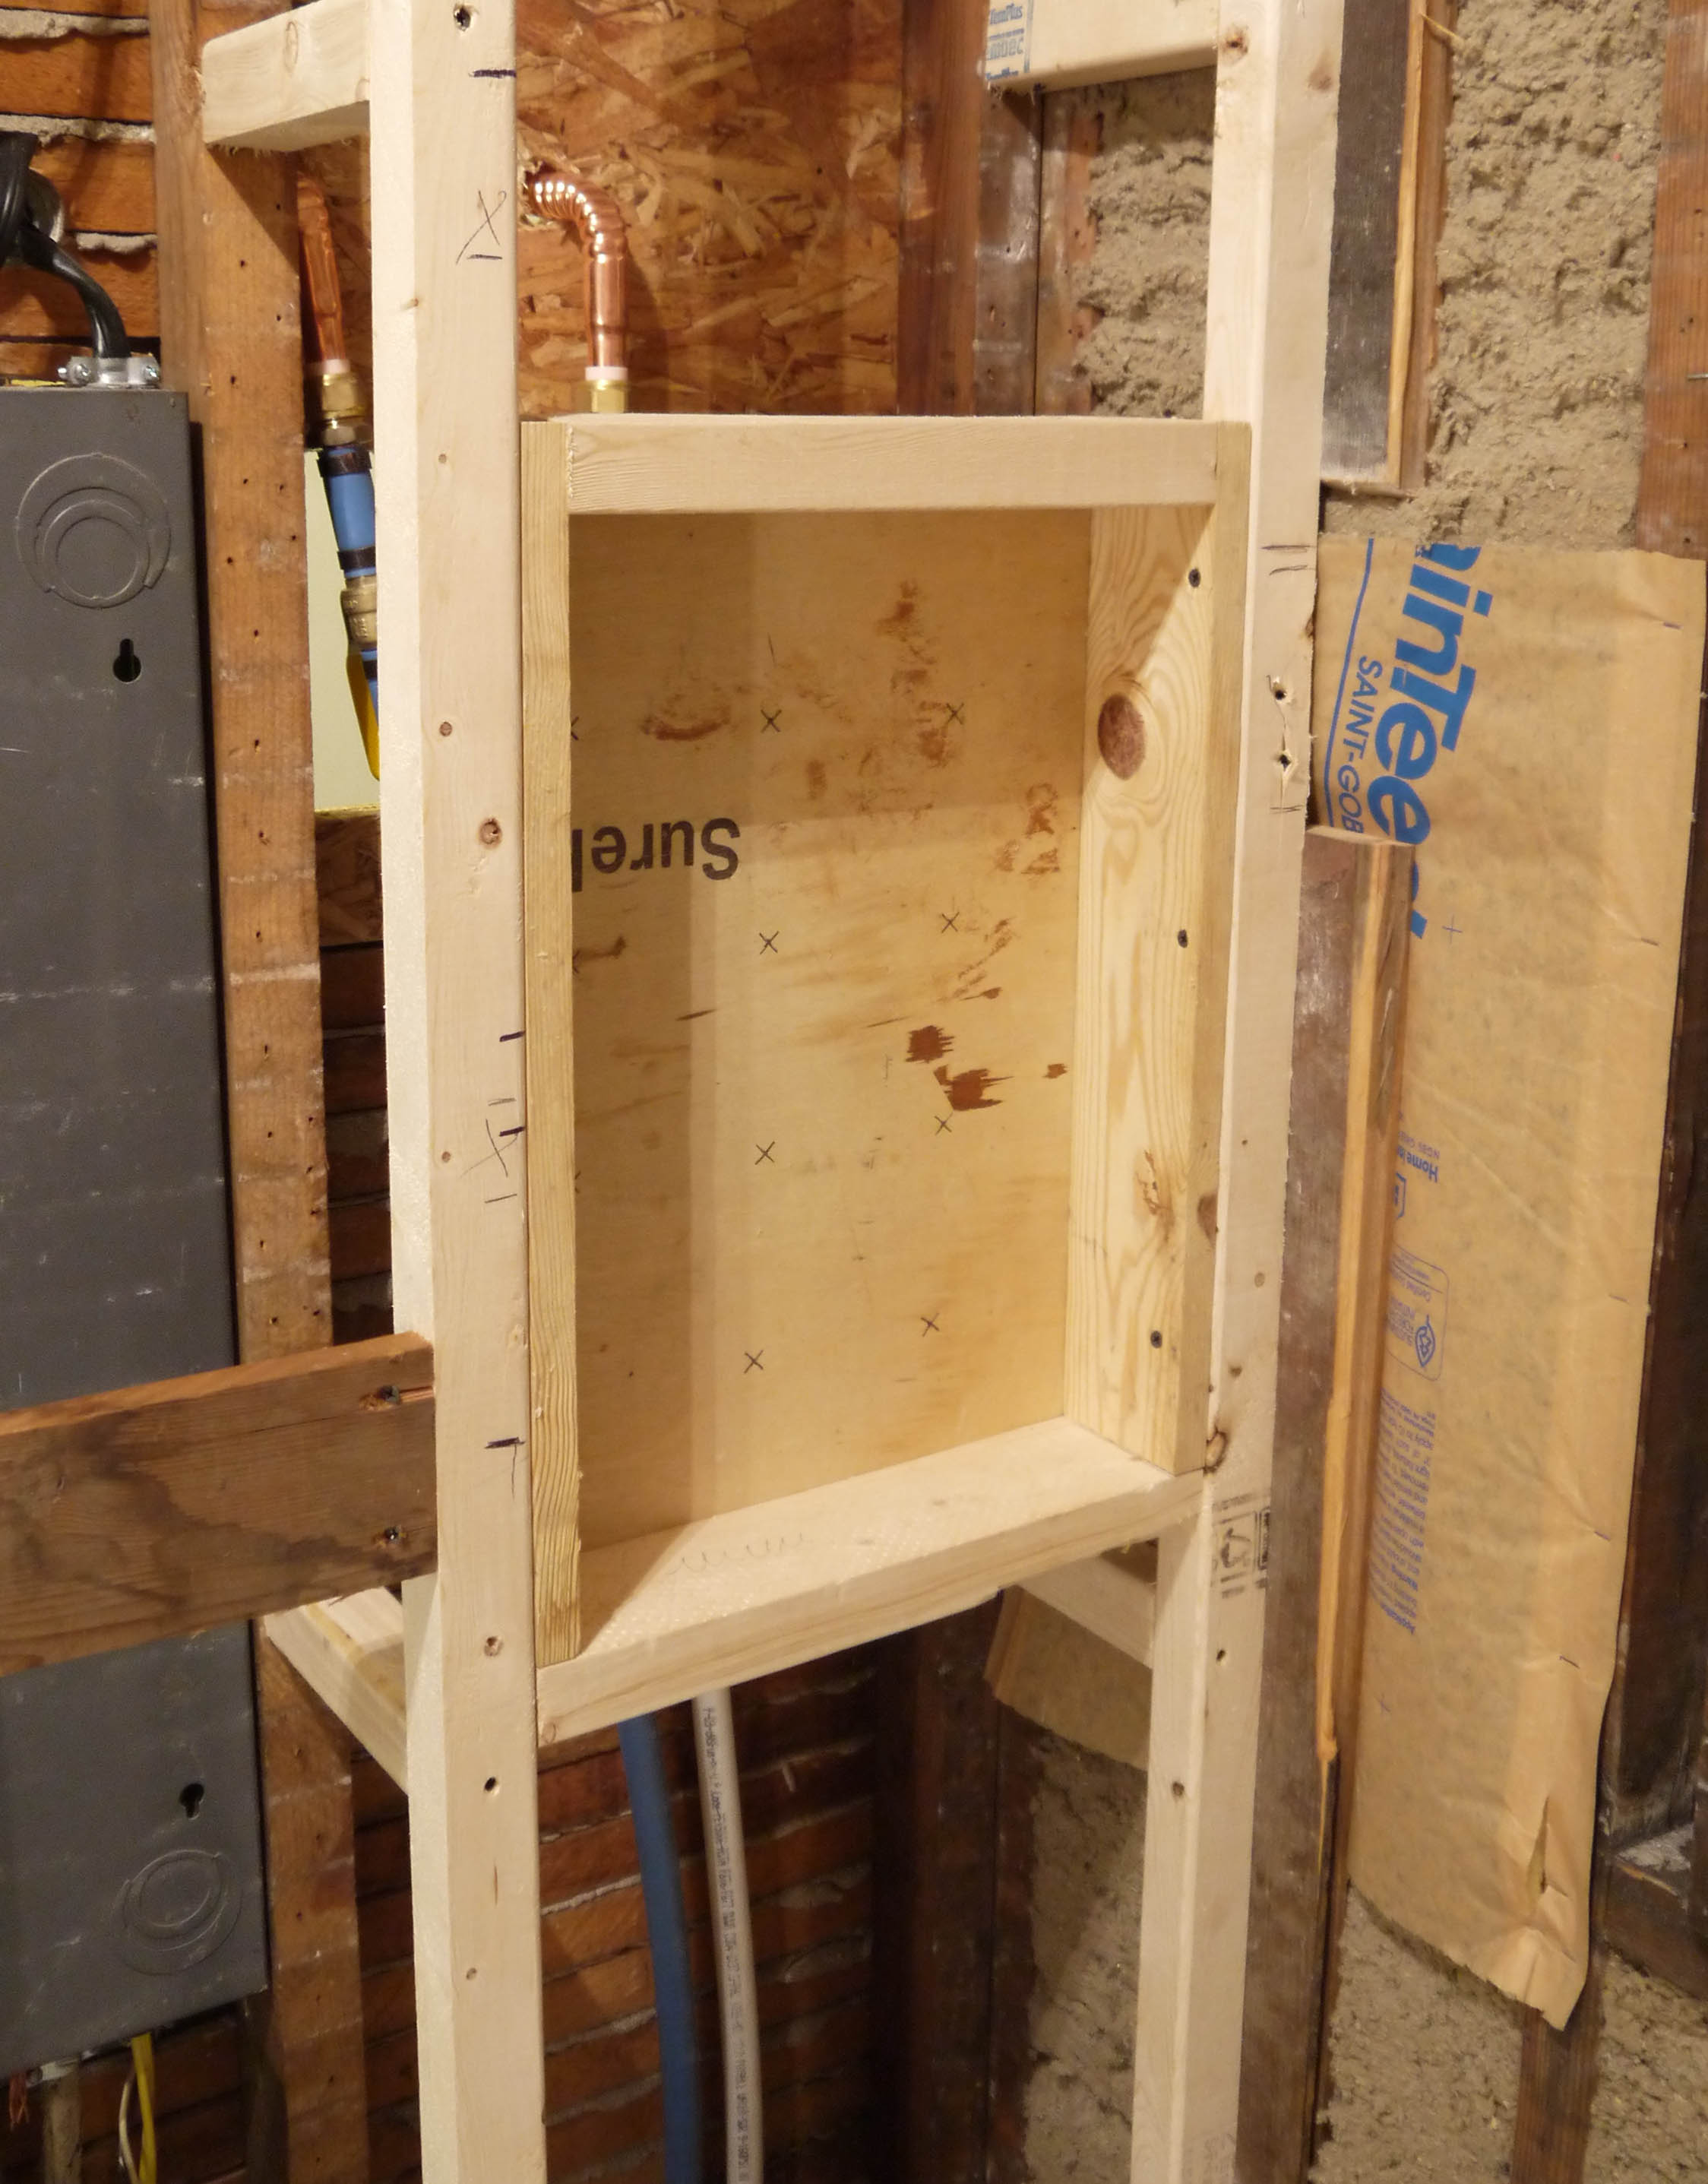
This is what I’m super excited about. It’s my shower soap & shampoo niche. I’m not a big fan of these old metal shower soap trays (although they are very appropriate for the time period look I’m going for – pretty sure I tore 1 or 2 out in the beginning). Instead, I wanted a built in niche, so I basically built a window frame and secured it into this wall space. It will get covered in cement board just like the shower walls, then tiled to look seamless like this:

Only I don’t like how far apart the two niches are, I’m going for more like this, with just a thin shelf for small bottles and a bar of soap:

So back to reality. Wall board goes up pretty quick, and relatively easy. The only bad part is lifting the 2nd sheet up to the ceiling and holding it while driving the first couple screws to secure it.

Oh, and don’t forget to pre-measure & mark the location of outlets, light fixtures, or pipes. That meant taking the one sheet back down to measure, and then lifting it up and securing it all over again. Marking the location takes a lot of the guesswork out of using a RotoZip to cut out for the opening.
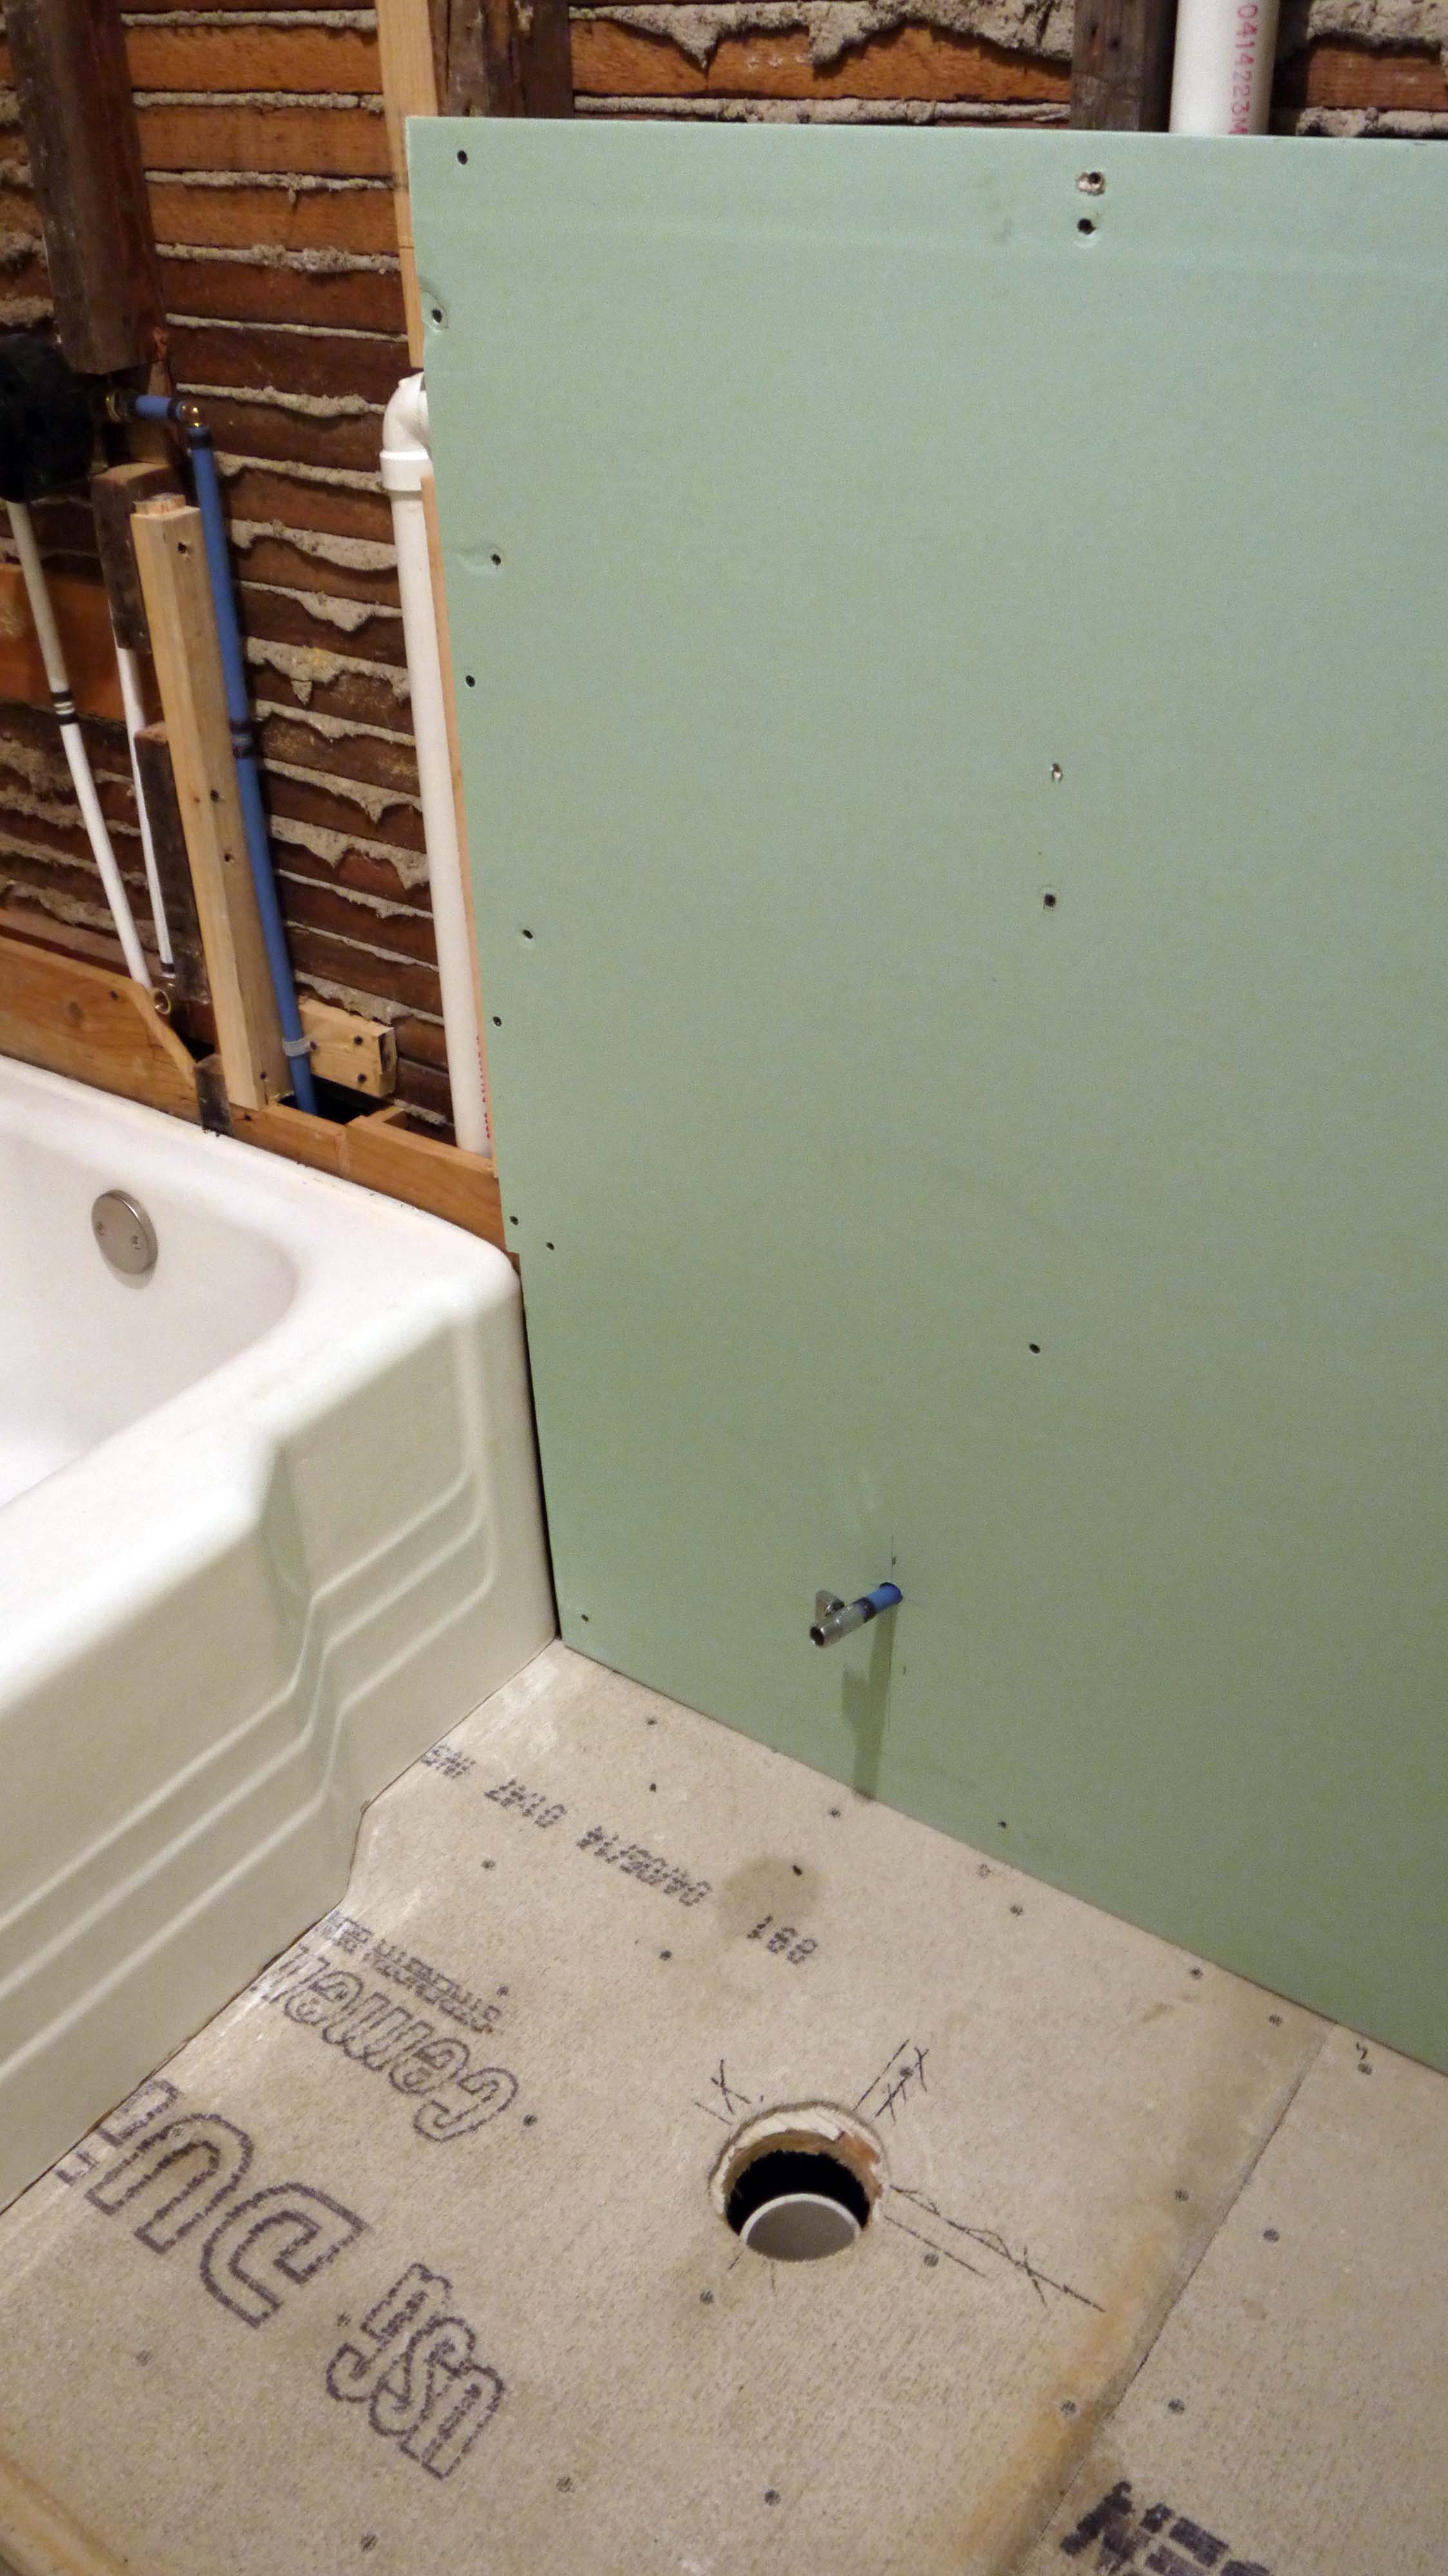
The cement board went pretty easy too. It comes in slightly smaller pieces (3’x5′ instead of a regular drywall 4’x8′), so it’s easier to handle and lift on and off of sawhorses.
Cutting the cement board is not as easy as cutting drywall. Instead of scoring with a utility knife and snapping it apart, I used a metal cutting blade in my handheld jigsaw. It did a little tearing out along my cut line line (after all, there are pieces of aggregate compressed into the board just like in cement), but it’s a raw edge so that’s ok. I didn’t have any trouble drilling holes for the tub and shower faucet or the mixer valve. I just used the matching size hole saw bit and it went through just fine. For attaching the cement board, the lumberyard sold me special ‘cement board’ screws that are recommended. They have different threads than drywall screws and a larger head, which prevents them from pulling through the surface too far. They barely countersink themselves and that holds the cement board tightly against the wall studs. Same as the floor, the shower walls are super string and rigid, and just about ready for tile!
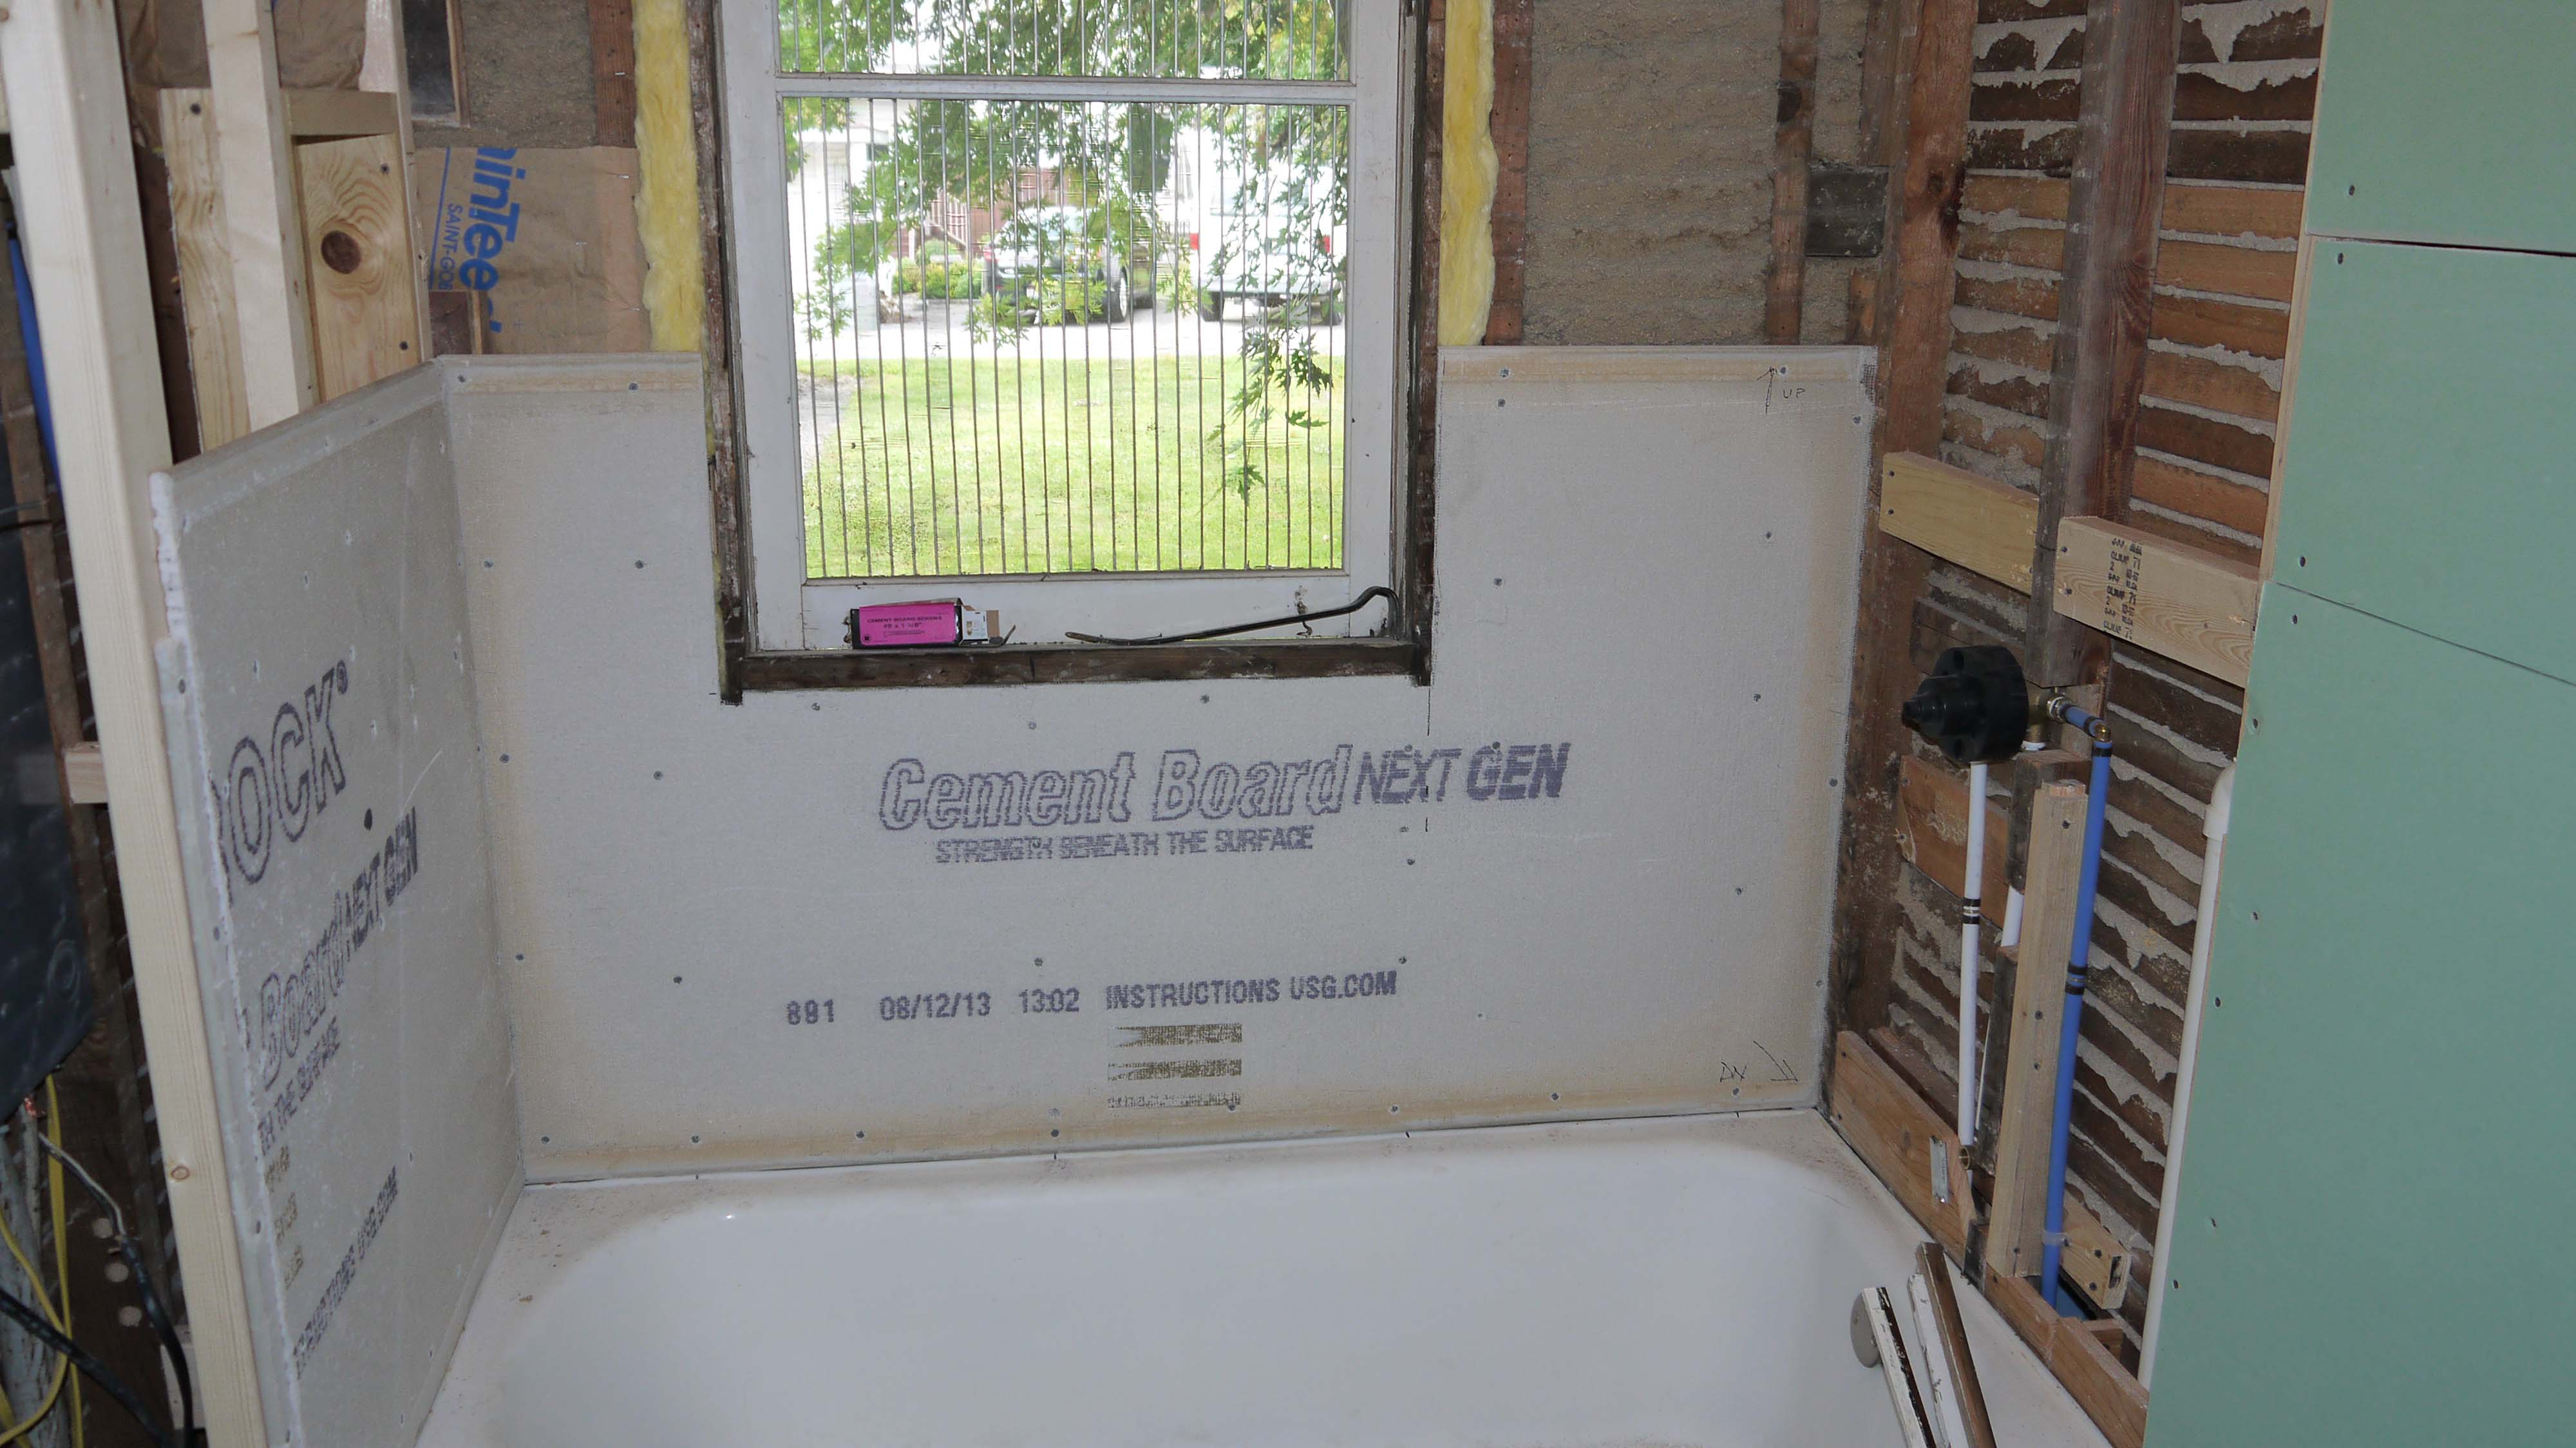
And here’s the bathroom all boarded up:

I can’t even begin to express how good it feels simply to have walls again!
Oh, except the niche. I still have to cut the smaller pieces to fit inside that area.

Don’t look for regularity in the screws. There isn’t any. I put a screw wherever I felt it needed one. And especially don’t count how many holes there are without screws. Screw guns are so finicky + extremely hard old-growth lumber wall studs = a lot of stripped out screws. But the next step should fill and cover all of those. Bring on the mud!
Going Tankless
Posted by Adam A. Ries in Equipment, Home Improvement on July 3, 2014
As in, tankless water heater! The house originally had a tank water heater shoved in front of the electric panel in the very tiny utility room. I remember the back door would hit it when fully opened, and I don’t think I could even open the electric panel completely until the water heater was carried out. And that alone proved interesting – my brother-in-law leaned the top toward himself (it was completely drained), and I went to pick it up from the bottom. Light weight, yes, and then my hand broke through the tank just from carrying it because the metal was so rusted. That’s probably a big part of why the laundry room wood floor is so discolored and sunken along that wall. Basically, if I wanted a standard washer and dryer in this room, there was no space for a conventional water heater.

I had already cleared the trash out when I took these before photos of the entire house, but you can see the rusted ring on the floor where the old tank sat. And leaked. Slowly. For a long time, or so the floor boards would say.
Well, not having a water heater isn’t such a big deal since I’m not living there yet. But once I got the plumbing finished and the kitchen sink hooked up, I was itching to get the tub cleaned and then also the leftover fridge which is pretty grimy inside and out. And technically I didn’t need hot water to do those things, but I wanted it. Cleaning is gross with cold water, but somehow not so gross when you have hot water.
After reading what must have been hundreds of online review of electric tankless water heaters, I decided upon the ecoSmart brand. The reviews were almost all positive from homeowners and even businesses that had purchased and used this brand. Any negative reviews were either customers who purchased too small of heating capacity for their home, or people who tried to do a DIY installation before reading the instruction manual and damaged the electrical during the install. (And then there were reviews where they had really bad grammar and couldn’t form whole sentences, which makes me think they also fall into the 2nd category. Word to the wise, if you sound like a backwoods redneck when writing a product review, any half intelligent person will probably disregard your comments as “operator error”.)
I decided upon the ecoSmart 27, which means 27 KW of heating capacity. It’s actually the largest residential unit they sell and should be more than adequate for my size of house with just 1 bathroom. But our winter this last year was record breaking cold and for weeks at a time, so I felt very comfortable steppin’ it up to the larger heater. As Tim -The Tool Man- Taylor would say, “More Power!”
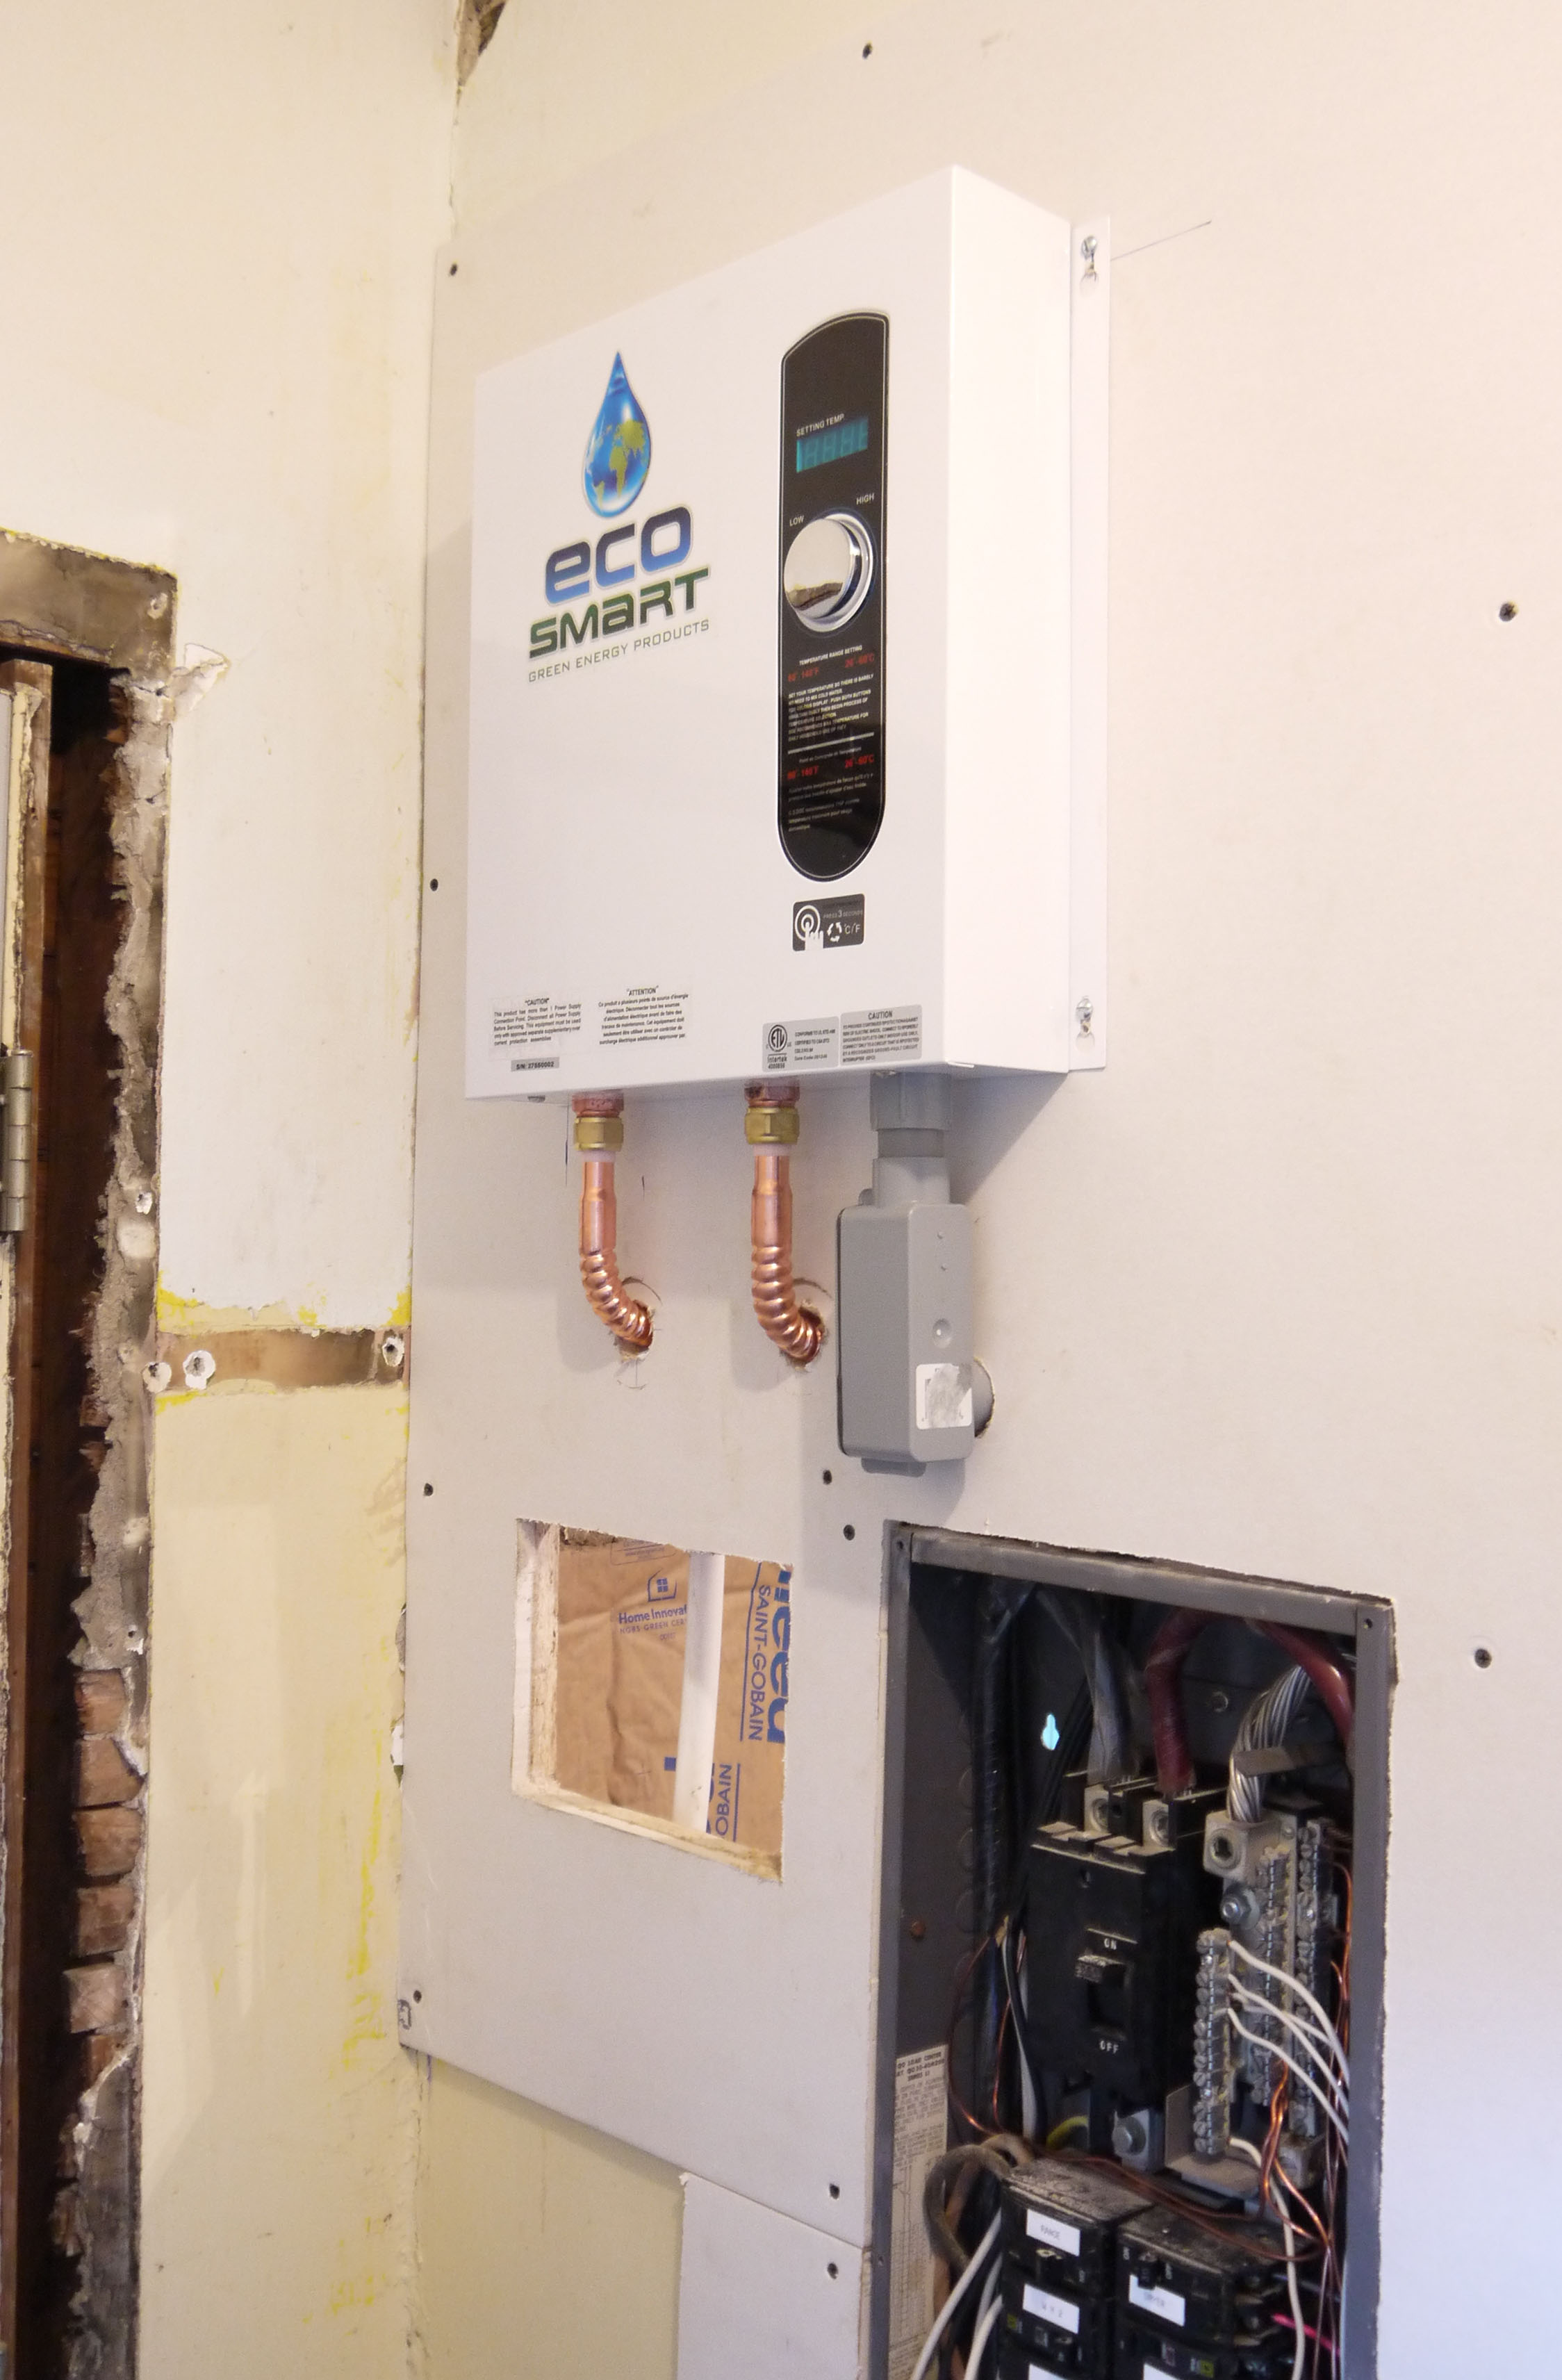
Here’s how the unit looks installed on the wall. I was able to order the water heater from my local Ace Hardware store (shop local is kind of my mantra – it goes with the job), and they had just 1 in stock at their warehouse. Ignore that the drywall isn’t finished on this wall, but I was in a hurry to get the water heater installed. It’s rather high on the wall, just about 2 feet below the 9′ ceiling. But because it’s opposite of a west-facing window, I wanted to make sure it wouldn’t be in direct sunlight and have that effect the multiple thermostats which control the heating elements. As the photo above shows, I used flexible copper water heater connections to transition into the wall, and then it transitions back into 3/4″ PEX. That was the round 2 decision.

I first tried fancy PEX fittings to make the 90 degree bend out of the wall, and then a PEX to threaded connection to join to the water heater. The only problem was that the threaded PEX fitting didn’t have a rubber seal inside, and the small garden hose seals you can purchase wasn’t enough to keep it from leaking. So round 1 resulted in a very wet floor. And wet me. And wet Dennis – unable to connect the electrical, helped me decide that I needed to find another type of connection. He found it funny. At the time, I did not. But looking back, if that was the worst leak I ever have while I own this house then I’m not doing so bad after all.
The photo above also shows the water heater in “sleep mode.” It probably has a more technical name (off?), but the LED screen is blank when the unit is a rest. The screen doesn’t light up unless I adjust the temperature wheel or until I turn on a faucet to use the hot water.
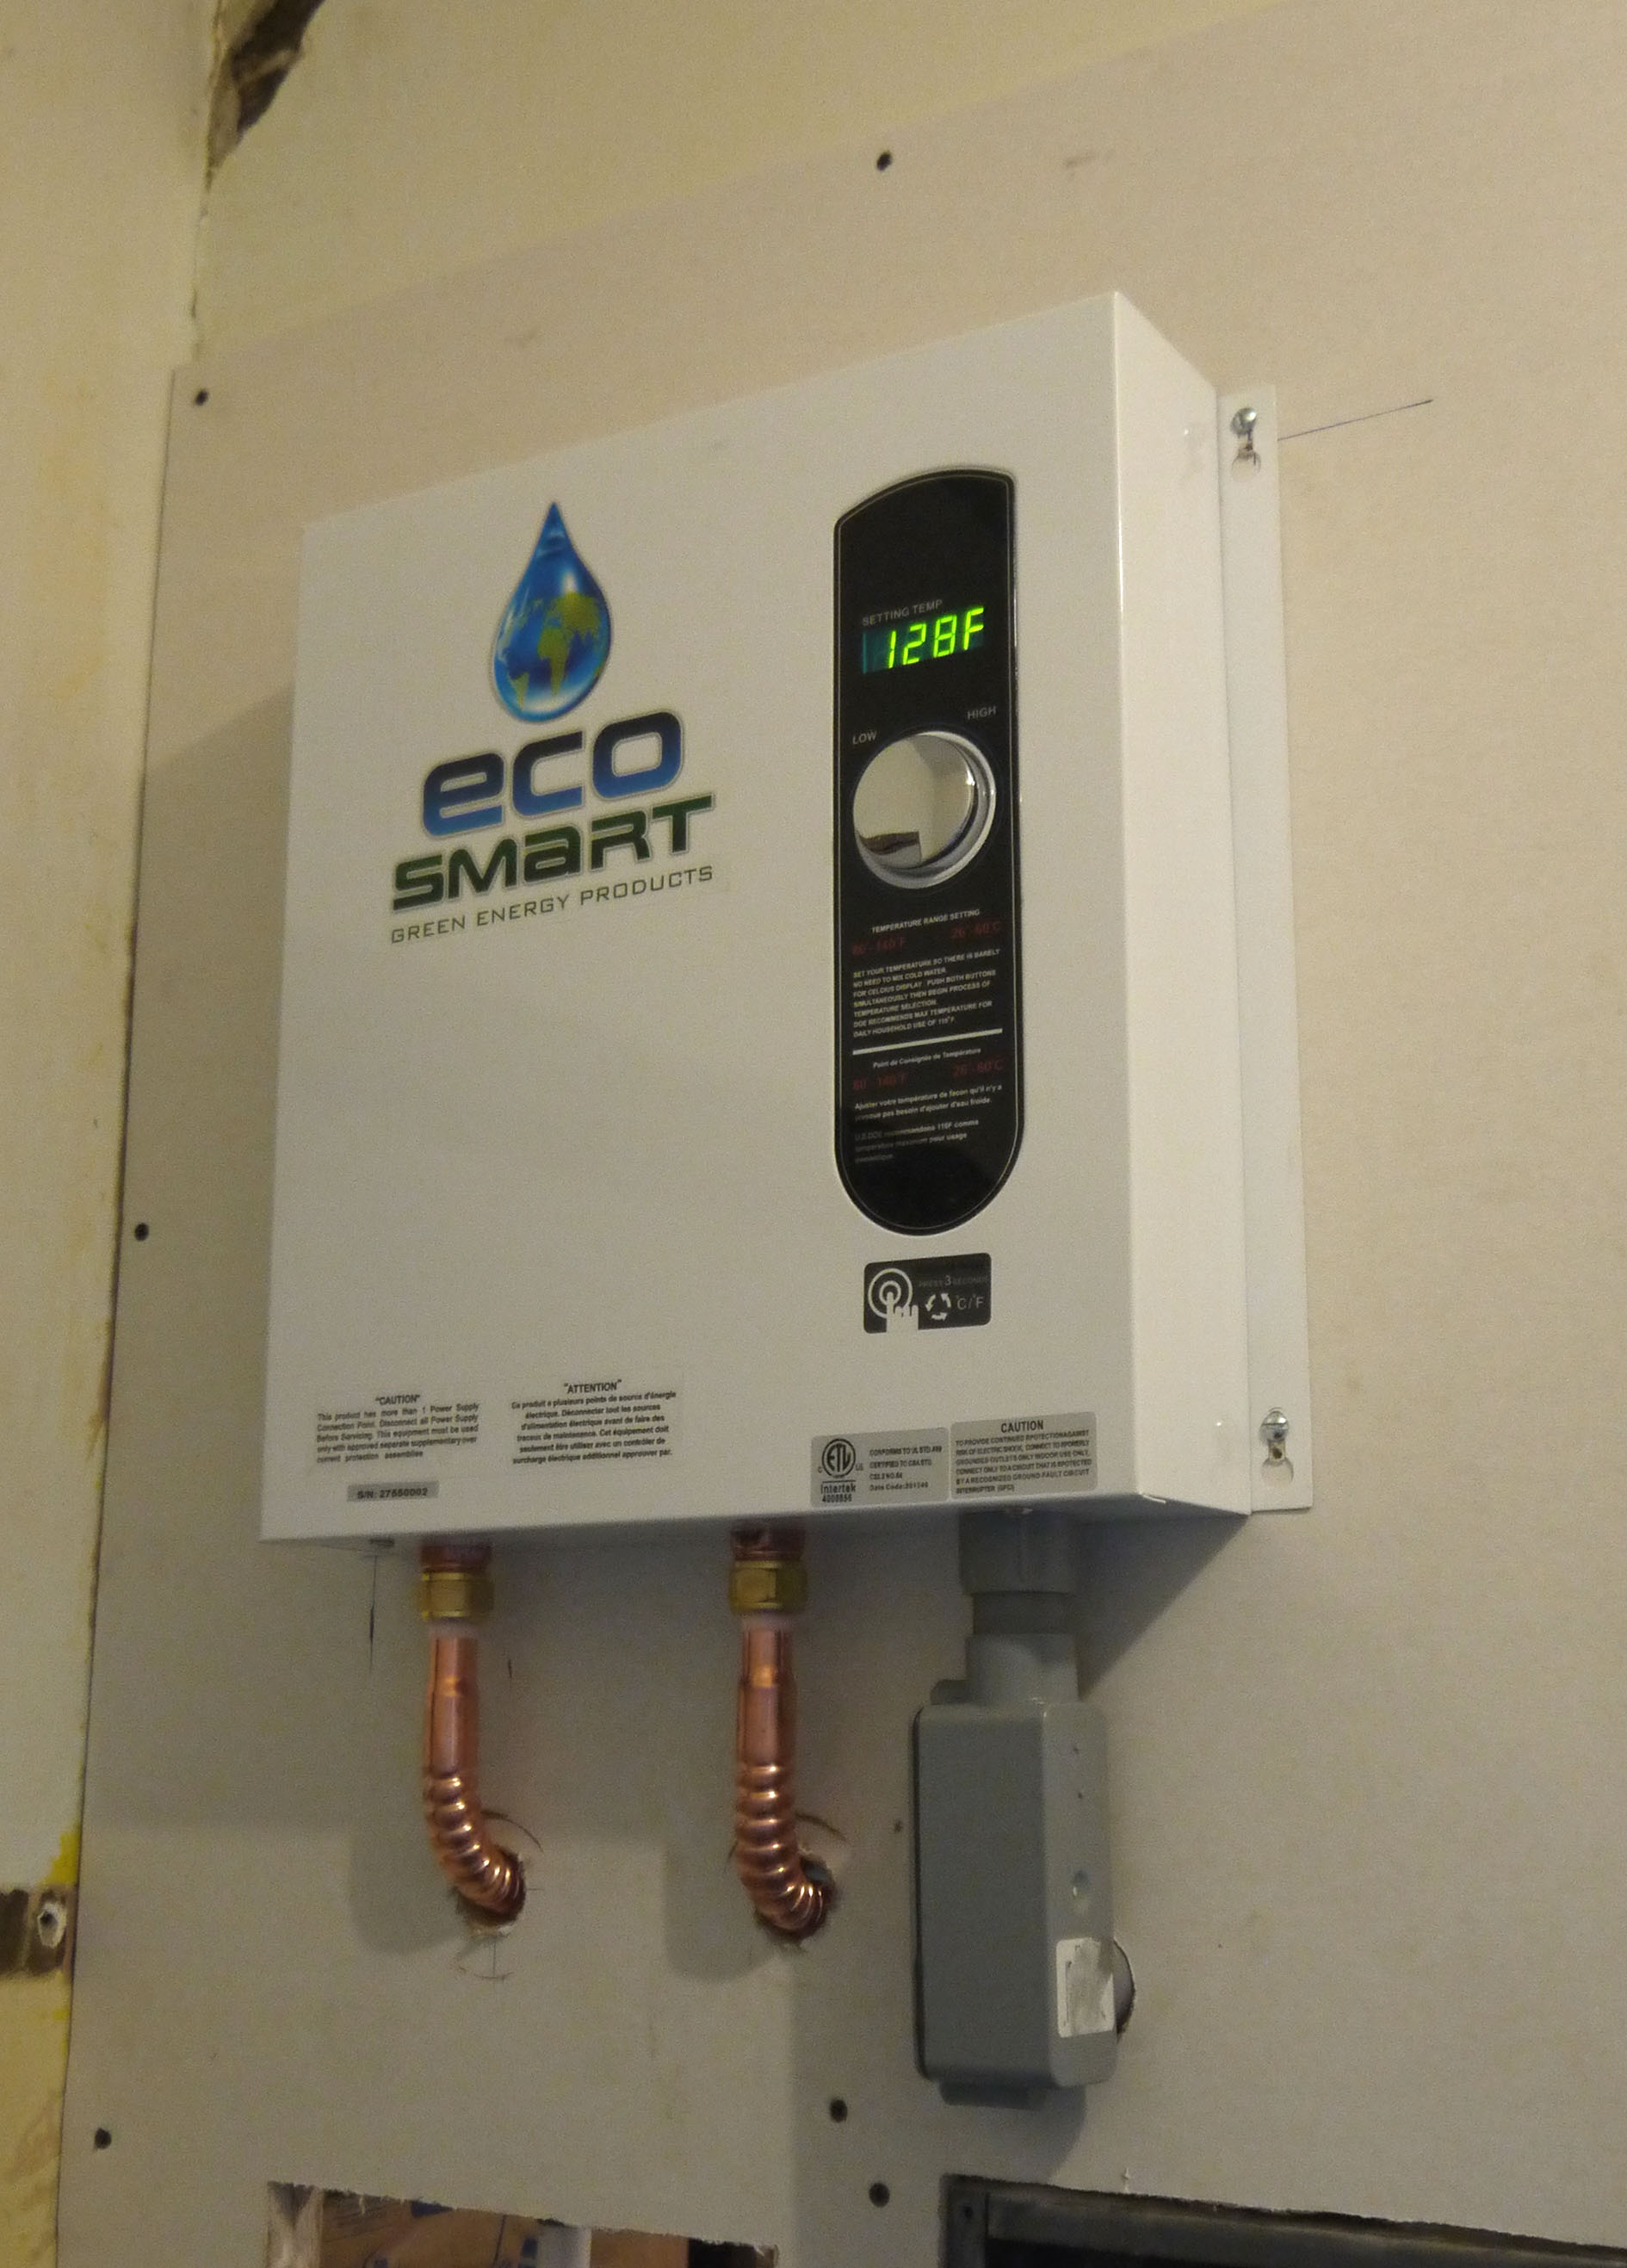
Then it’s lights on, displaying the hot water temperature setting. That’s why this unit is supposed to be such a dramatic difference in energy usage compared to a traditional tank water heater – it only uses electricity when I am actually using hot water. Unlike a tank, which uses electricity on and off constantly to keep the entire tank of water a consistent temperature. And even though it has a strong heating capacity, it knows how much water I am using and how cold the incoming water is, so it uses the minimum amount of electricity needed to reach a constant flowing hot temperature. I haven’t tested it with a thermometer yet, but I believe the numbers. 125 degrees feels normal to me for activities like washing dishes and showering. But for scrubbing the bathtub, I was filling gallon containers and pouring out a little at a time, so I had it turned up to 128 in the photo above.
To sum it up, use the correct parts and pieces when installing a water heater to avoid saying bad words and having a wet floor. And wet clothes. And wet electrician helper. It seems to be working great so far, the water is fast to heat up to full temperature, and it stays steady for as long as the water is running. I’m eager to see how it will do (and how much faster the electric meter will spin) when I have a shower head, washing machine, and kitchen sink all pulling hot water at one time. But I’m a little ways off yet from being able to test it that way.
The above product review is my own opinion, I am not being compensated in any way by the manufacturer or retailer to review this product, nor am I endorsing any manufacturer or retailer claims with this post. I simply want to give an honest review and state the facts of how I experience this product to work for me. Although I wouldn’t turn down compensation… but I would still be honest with my review 🙂
