Give a House a Cookie — err, — Some New Plumbing
Posted by Adam A. Ries in DIY, Home Improvement on May 7, 2014
I’m quickly learning that there is no such thing as a small or contained project. A relevant example:
I’m in the midst of a bathroom renovation. One bathroom. But the way it keeps escalating reminds me of the well known children’s story, “If You Give a Mouse a Cookie.”
If you decide to gut a bathroom, you will probably decide to upgrade the plumbing.
If you need new plumbing in the bathroom, you should probably just replace the plumbing in the entire house.
While running new plumbing, you realize it’s the perfect time to replace the outdoor spigot and add a second spigot to the opposite side of the house.
When you want to run pipes to the kitchen, you realize the kitchen sink cabinet is actually metal, and the floor of this cabinet is nearly rusted away from years of leaking pipes. So if you are gonna re-plumb a house, you should probably tear out the deteriorating sink cabinet. Which means first lifting out the beautiful but extremely heavy cast iron sink.
And when you get to the laundry room with it’s somewhat “soft” floor, you should probably tear up the multiple layers of linoleum and punky plywood.
And once you have the bad flooring tore up, you realize that the original wood floor is too damaged to hold the weight and vibration of a full washing machine. So thats why if you are renovating a bathroom, you will probably need to replace the laundry room floor.
That is where the cute children’s story ends for tonight.
I finally have all of the old plumbing completely tore out, including the kitchen sink. I didn’t tear out all of these pipes right away, because it was kind of nice to use the old pipes as my straight line when running the new pex hose. The existing plumbing was a crazy labyrinth of galvanized, copper, pvc, and cast iron. And from how easily some of the connections came apart, I promise you it would have been leaking if the water was turned on.
For the new plumbing, I’ve got almost all of the new supply lines run. I now need to purchase a roll of red pex (for hot water) and run those lines to carry heated water to each of the shower, kitchen and bath sinks. The red and blue hose are entirely the same except color, but the color keeps things well organized.
I also need to make a decision on a new water heater. I’ve been researching tankless models, and I think I’ve decided on the ECO Smart brand. The prices are consistent with tank units, the reviews are good, and it seems very user intuitive. I can connect the water lines myself, but for the warranty to be valid, the electrical component must be wired by a licensed electrician.
And of course, supply lines are only half of a house’s plumbing. The other half is the drain pipes. The former mixed PVC, copper, and cast iron sections of drains had sections that had come unglued and weren’t sloped properly. Most of this I know how to do with new pvc, including traps and the correct pitch, and adding air vents for each the kitchen sink and washer drain. But the sewer stack that takes all the wastewater out of the house is the original cast iron. I’m not sure the best way to transition into this. So I’ll try asking friends for help, and if they don’t know, I wouldn’t be against hiring this part to make sure it is done perfectly correct, but it probably won’t be cheap.
House Tour
Posted by Adam A. Ries in About Me, Home Improvement on May 5, 2014
I told myself the full house tour would be the first post about the new house. I took photos of every room the first week I had the keys. I even asked the realtor not to remove the “Sold” sign too early, until I could get a photo outside on a blue sky day. But then I got so excited about ripping out and tearing into the bathroom, that I never organized and posted the photos. So without further ado, won’t you please come in!
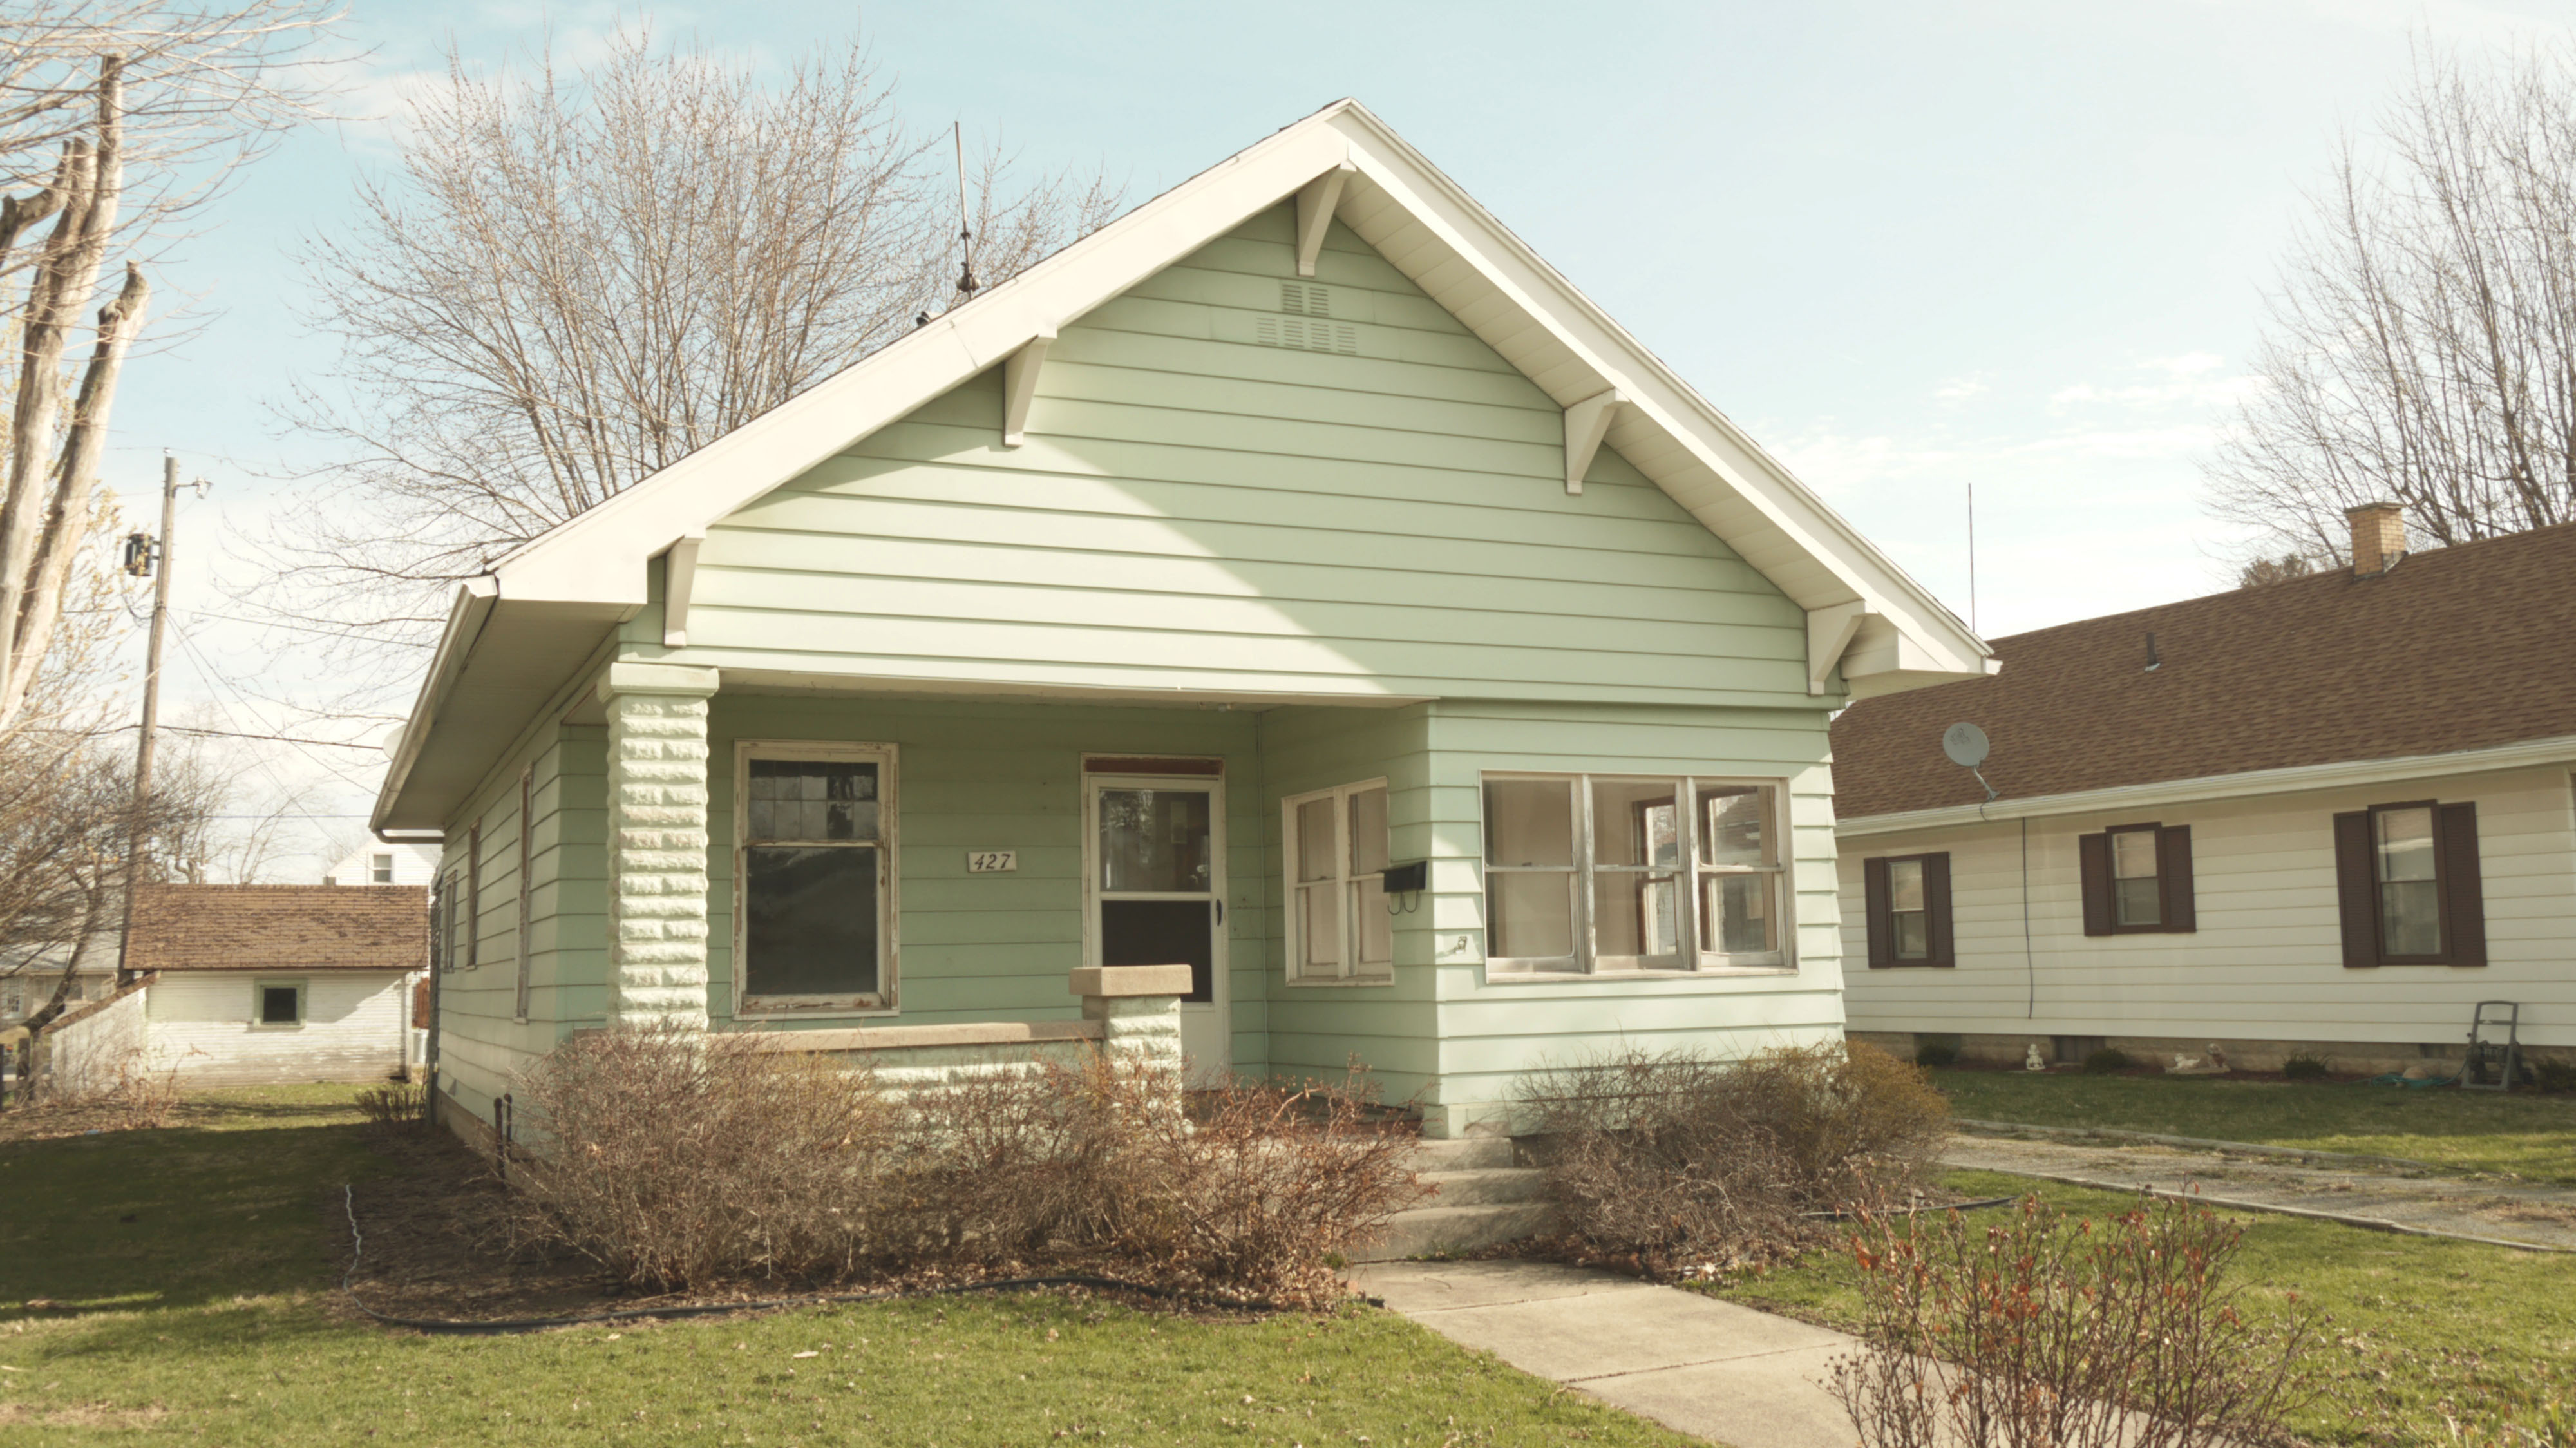
From the street, it has a nice size covered front porch, just begging for refreshed flooring, lush planters, and a porch swing.
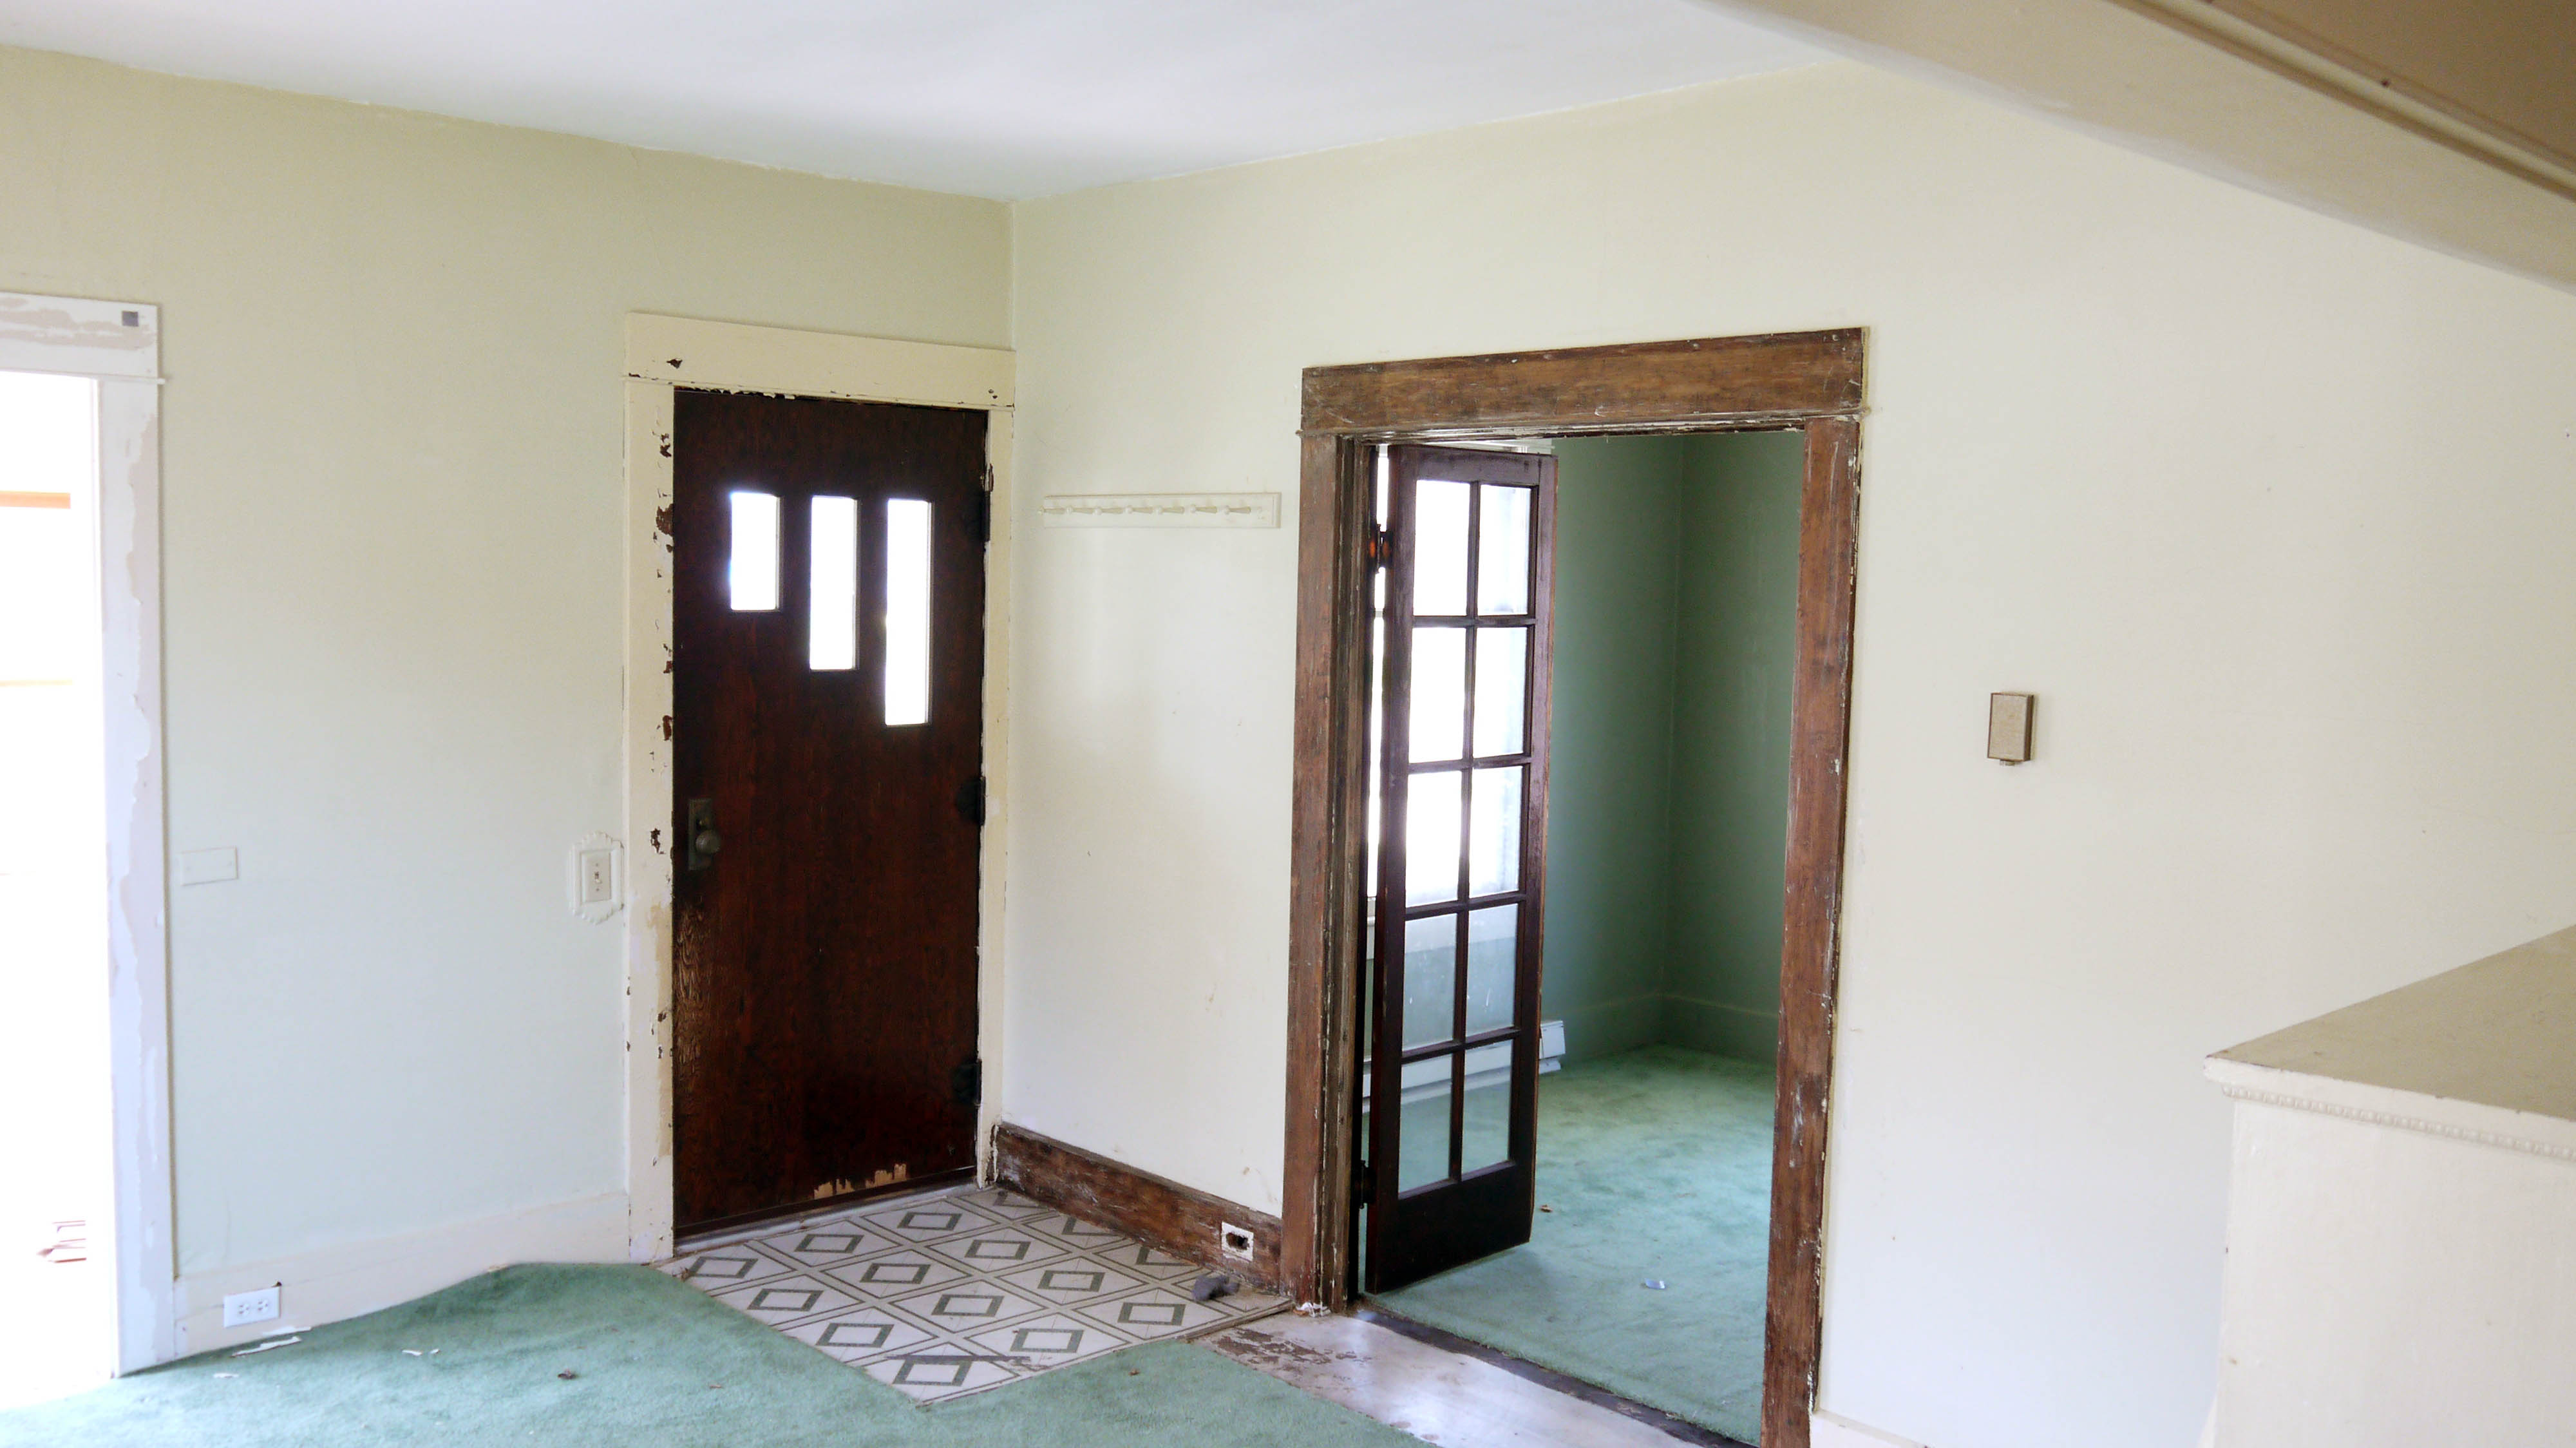
The front door is probably not enticing. It’s old, yes, but the style doesn’t match the other Craftsman qualities about the house, especially because it is veneered. The door handle is pretty cool, but the latching mechanism or spring must be broken, and the inside handle is about to fall off.

Through the front door is the living room. Very square, but with a nice large window looking east, and built-ins creating some separation from the dining room. As you can see, the woodwork is painted as far as the eye can see.

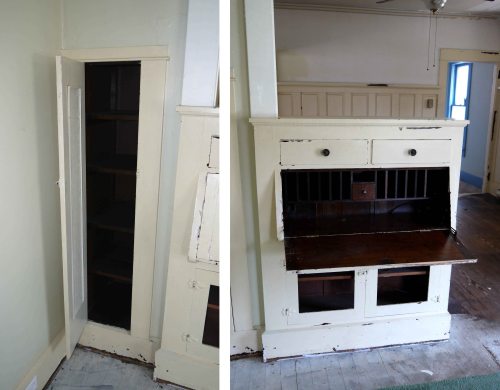
I especially love the little nook cabinet in the corner, and then this fold down secretary! How awesome that it is still in the house.
Decent size windows in the house fill nearly every room with ample sunlight. I didn’t yet have the electricity on when I took these photos, and it was super light inside. I’d like to say bright and cheerful, but I’ll stick with just bright. I’m gonna have to restore the cheerful.

From the living room is also the doorway into the closed-in side of the porch.

With lots of windows, this will be a great cozy space to drink coffee in the mornings and get some plants growing.
Back to the west, a set of double French doors open into the first bedroom.
From the inside, the door trim is just a little bit fancier: this is the only room where the woodwork above a door has this cornice or cap at the very top. My guess is every room had these at one time, and they either broke or they wanted to tone down the Victorian influence so they were removed.

Once again, it is the original details throughout that sold me on this house. Can I please have a full house of door handles & escutcheon plates to match this one?

Two large windows in this bedroom.

And some details I could do without, like this ceiling fan. The electrical box was probably not originally for a fan, which must be secured tighter. So what happens when the wiggling of the fan makes the plaster start to crumble? Just tape and staple up a piece of plastic, that will fix it.
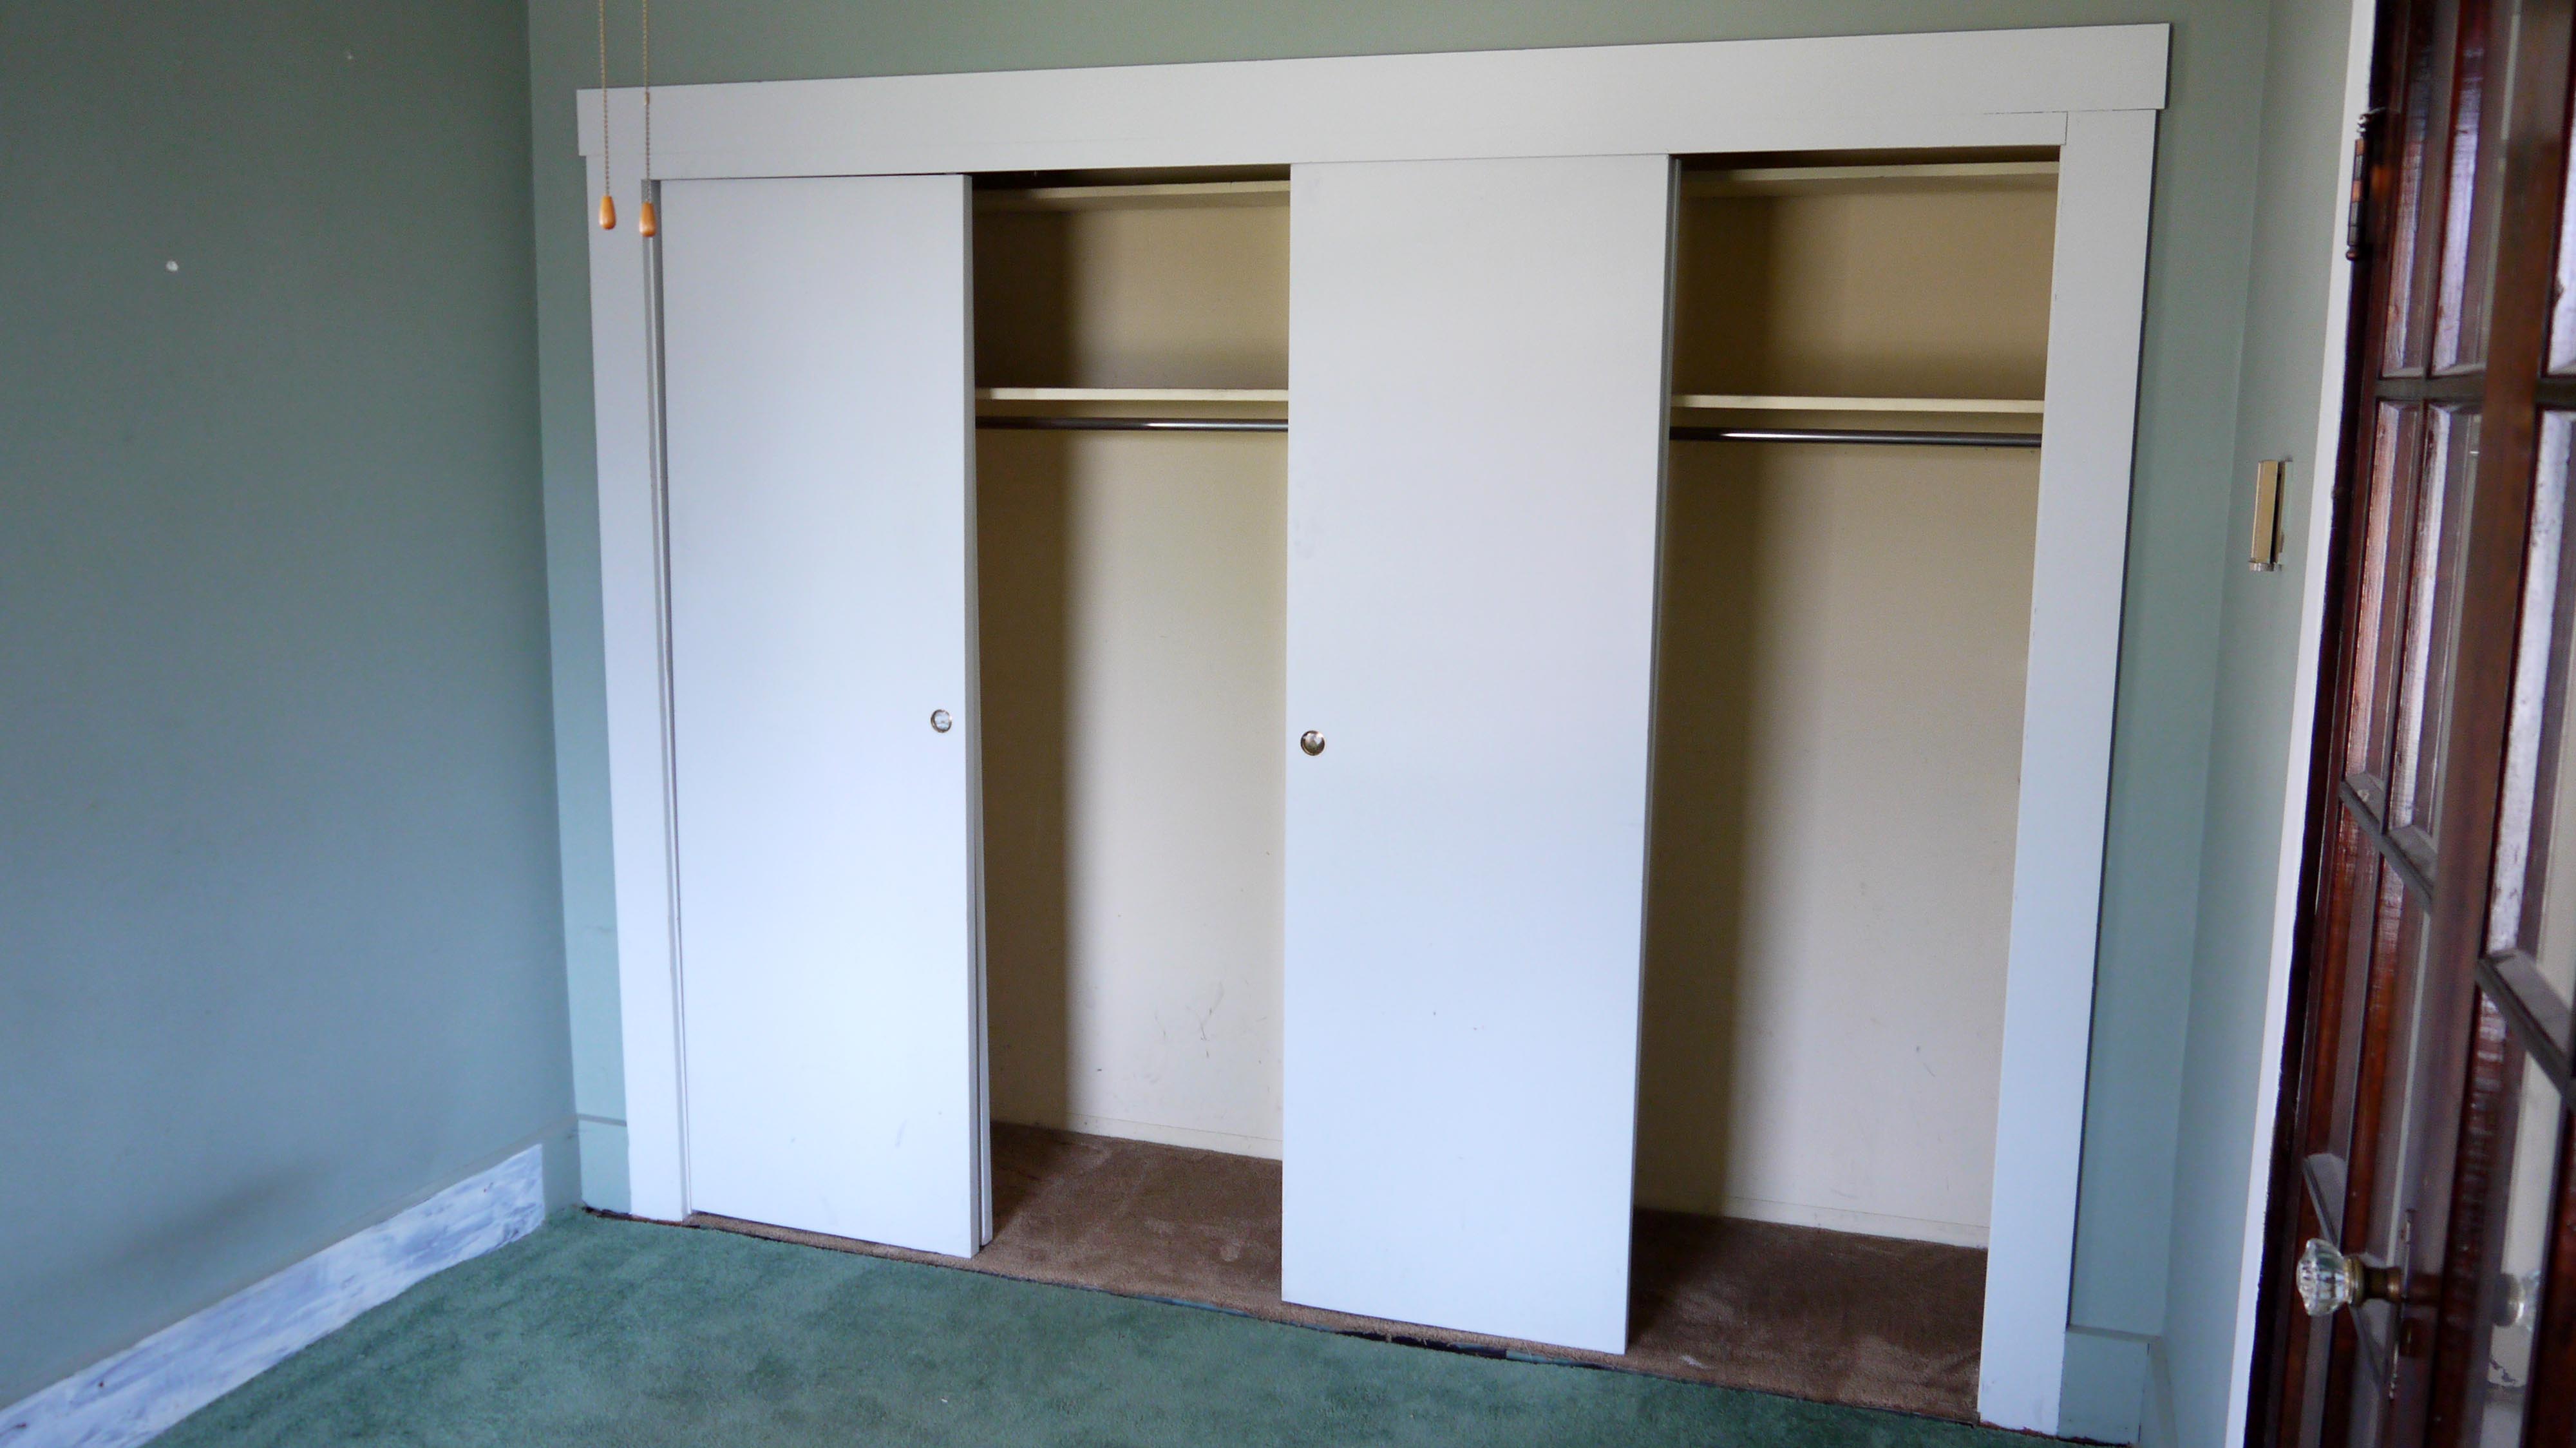
This bedroom does have a nice double wide closet. The trim suggests that it was added later, as they are just flat painted boards, along with the sliding hollow doors. I have a great idea to make this closet look more original, using salvaged trim and doors (that are nearly a perfect match!) from a commercial building that was demolished earlier this winter.
Back through the living area, we walk into the dining room. This is the room that sold me on the house. The cabinets, paneled walls, and built-in buffet are just screaming for me to strip them of their layers of paint. And now a glimpse of the wood floors too, which are in every room either under carpet or linoleum. And we also get a sense of how beautiful the woodwork is under the dingy carpet and paint.

Who would paint these paneled walls?

And what a nice air conditioner unit… not.
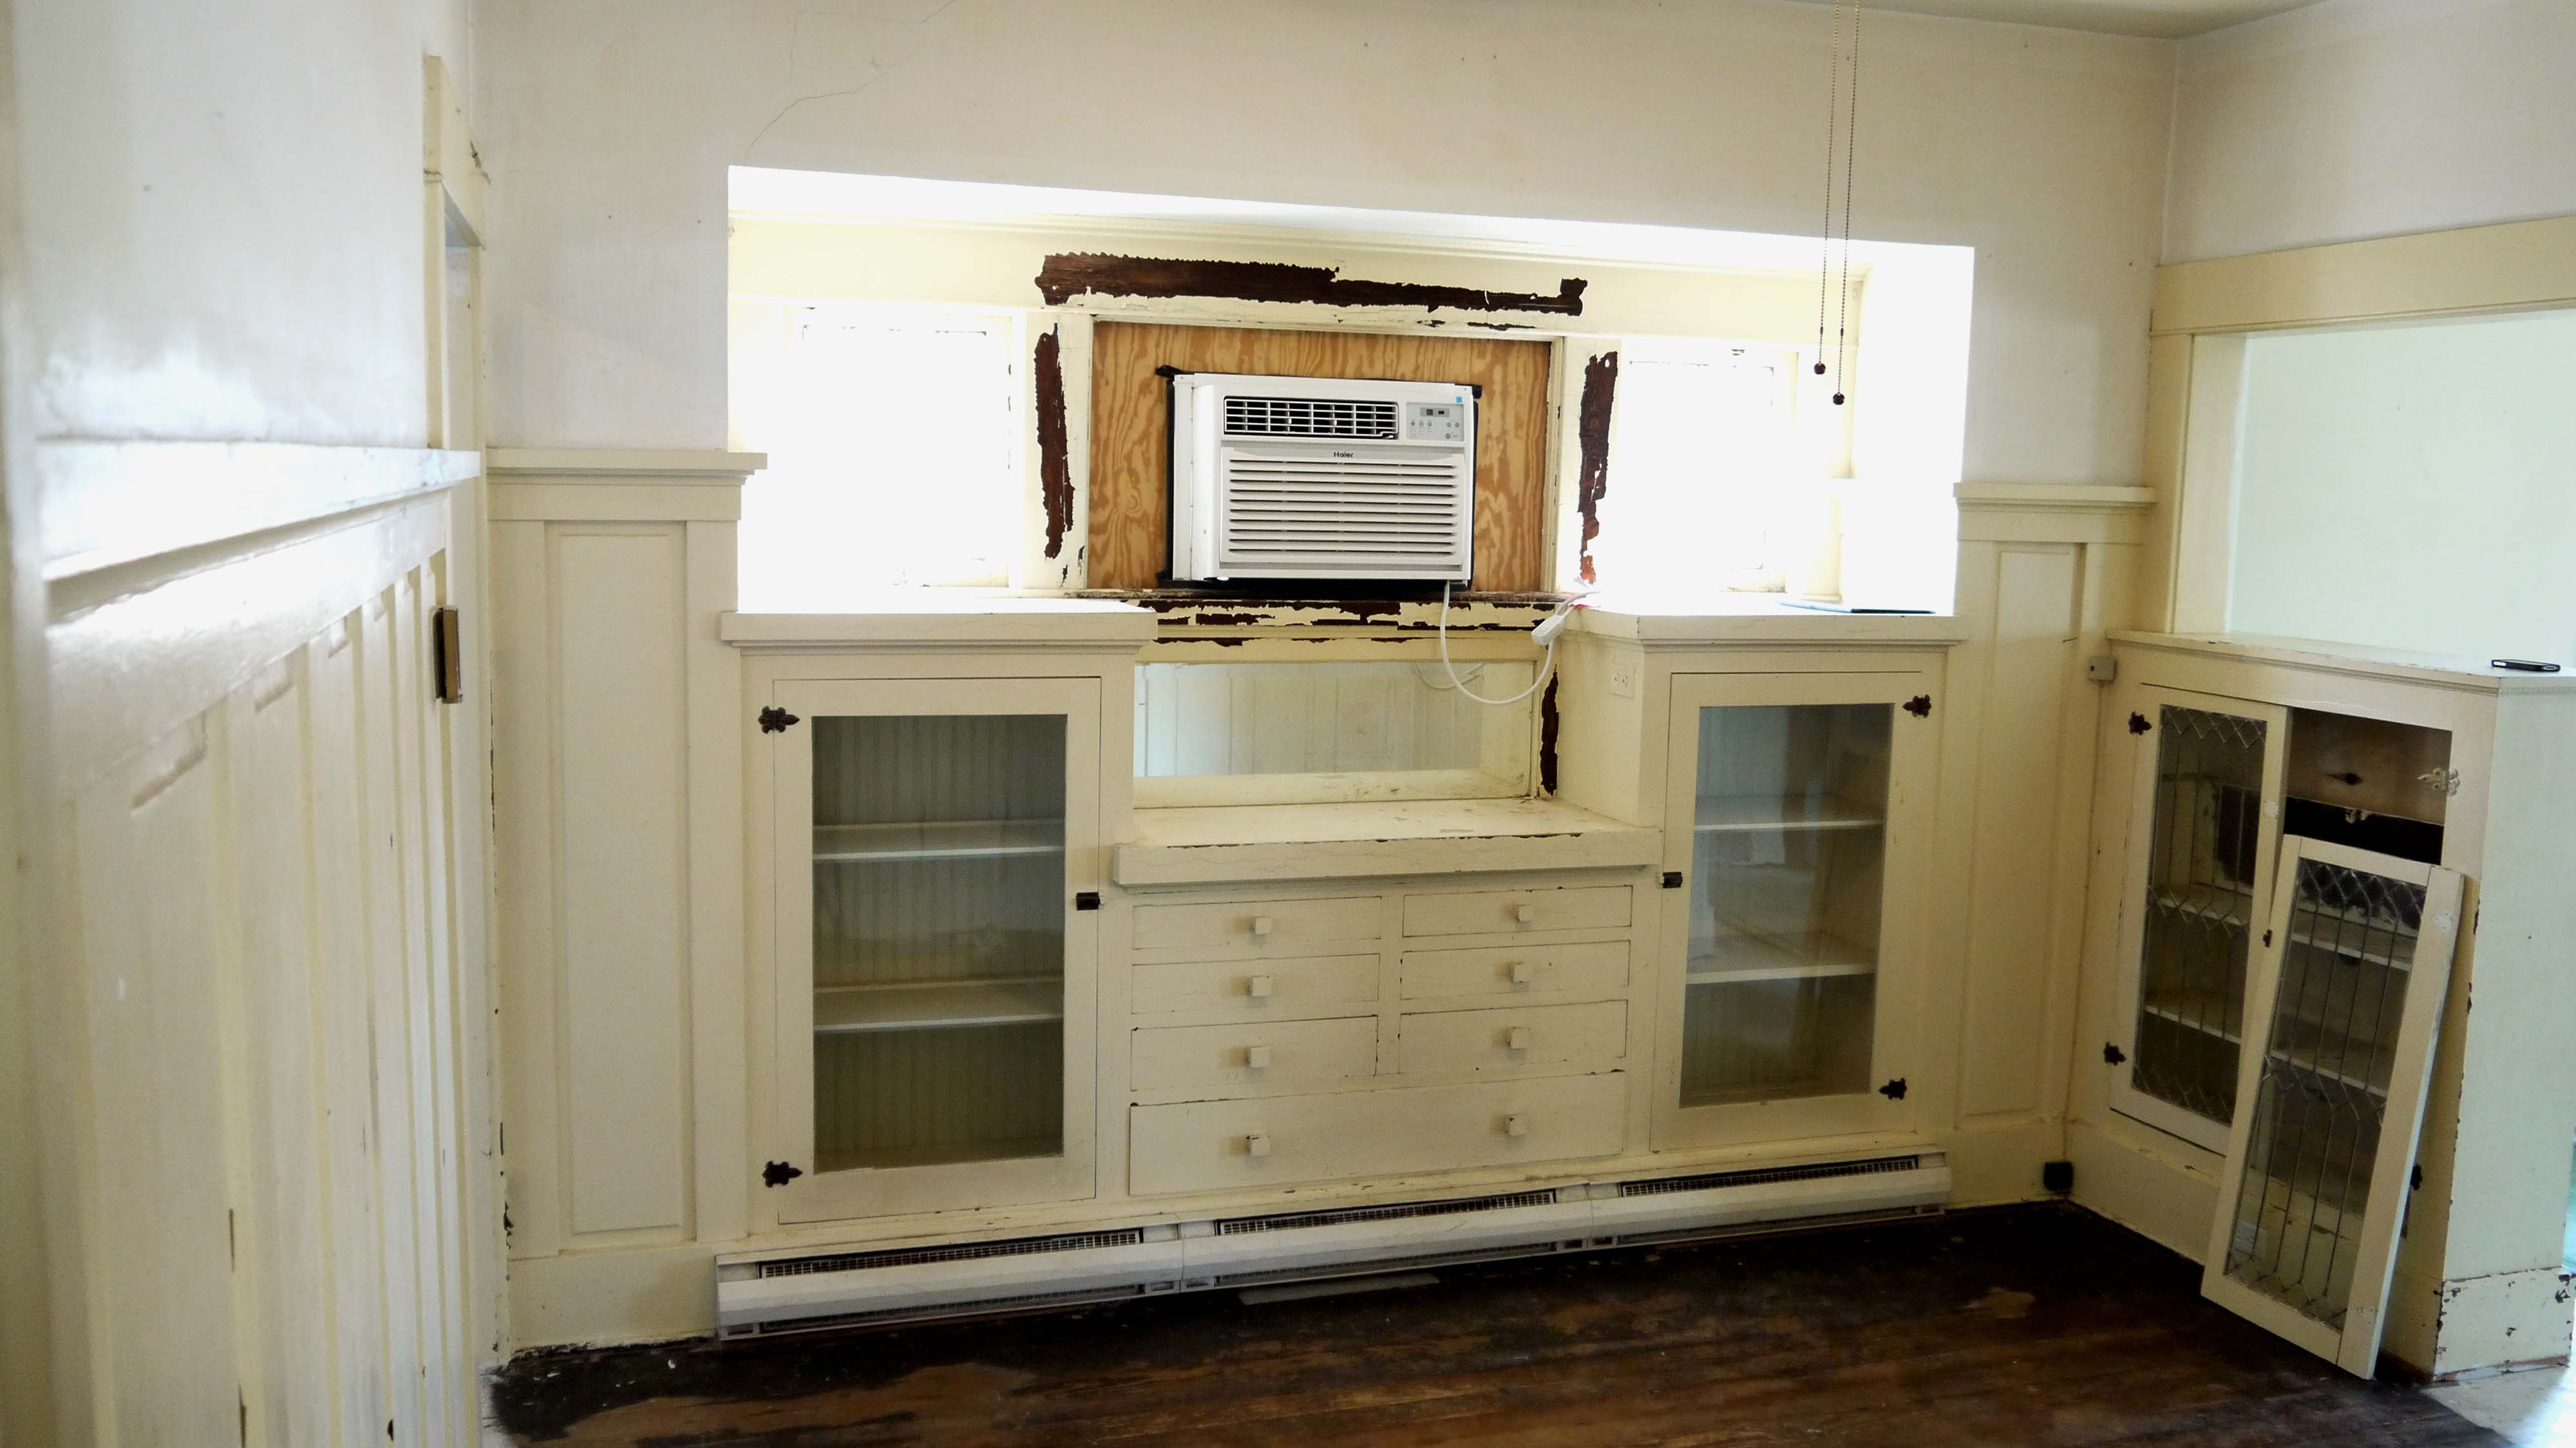
I can’t help but think that the center window must have been leaded glass like the two on the sides, and it was removed for an air conditioner. I’m still hoping to find the original window in the attic somewhere.

And the doors to the left bookcase are leaded glass too! The frame on the one is bad, it has come unglued and the glass became loose, which is why it is off of its hinges. But at least it is still there, and wasn’t trashed at some point. It’s easier to fix something broken than replace something not there.
The dining room leads first into the second bedroom, or as I have been calling it, the blue room. Overall, it feels a little more private than the first bedroom. Not only is it in the back of the house, but is has much smaller windows which makes it a little darker. There is no closet, but a built-in wardrobe from floor to ceiling.

The window to the back yard is half as tall as any others in the house. The large blank wall to the left will work as a space to center a large bed and headboard, with room for a nightstand on either side.

This window faces east and, although it is too bright to see out, actually shows the detached garage. Unfortunately, the cardboard piece covers a broken corner of the window. So terrible, because all of the windows in the house are original, and they show it. They are wavy and full of lines, bubbles, and those imperfections that show they are panels of hand blown glass. Made by hand. Not rolled on a glass machine and perfectly flat. They show the signs of how they were made, and looking through them they slightly distort the view outside. The light coming in is also refracted a bit, making neat patterns on the walls, like little sunbursts that move on the walls in each room.

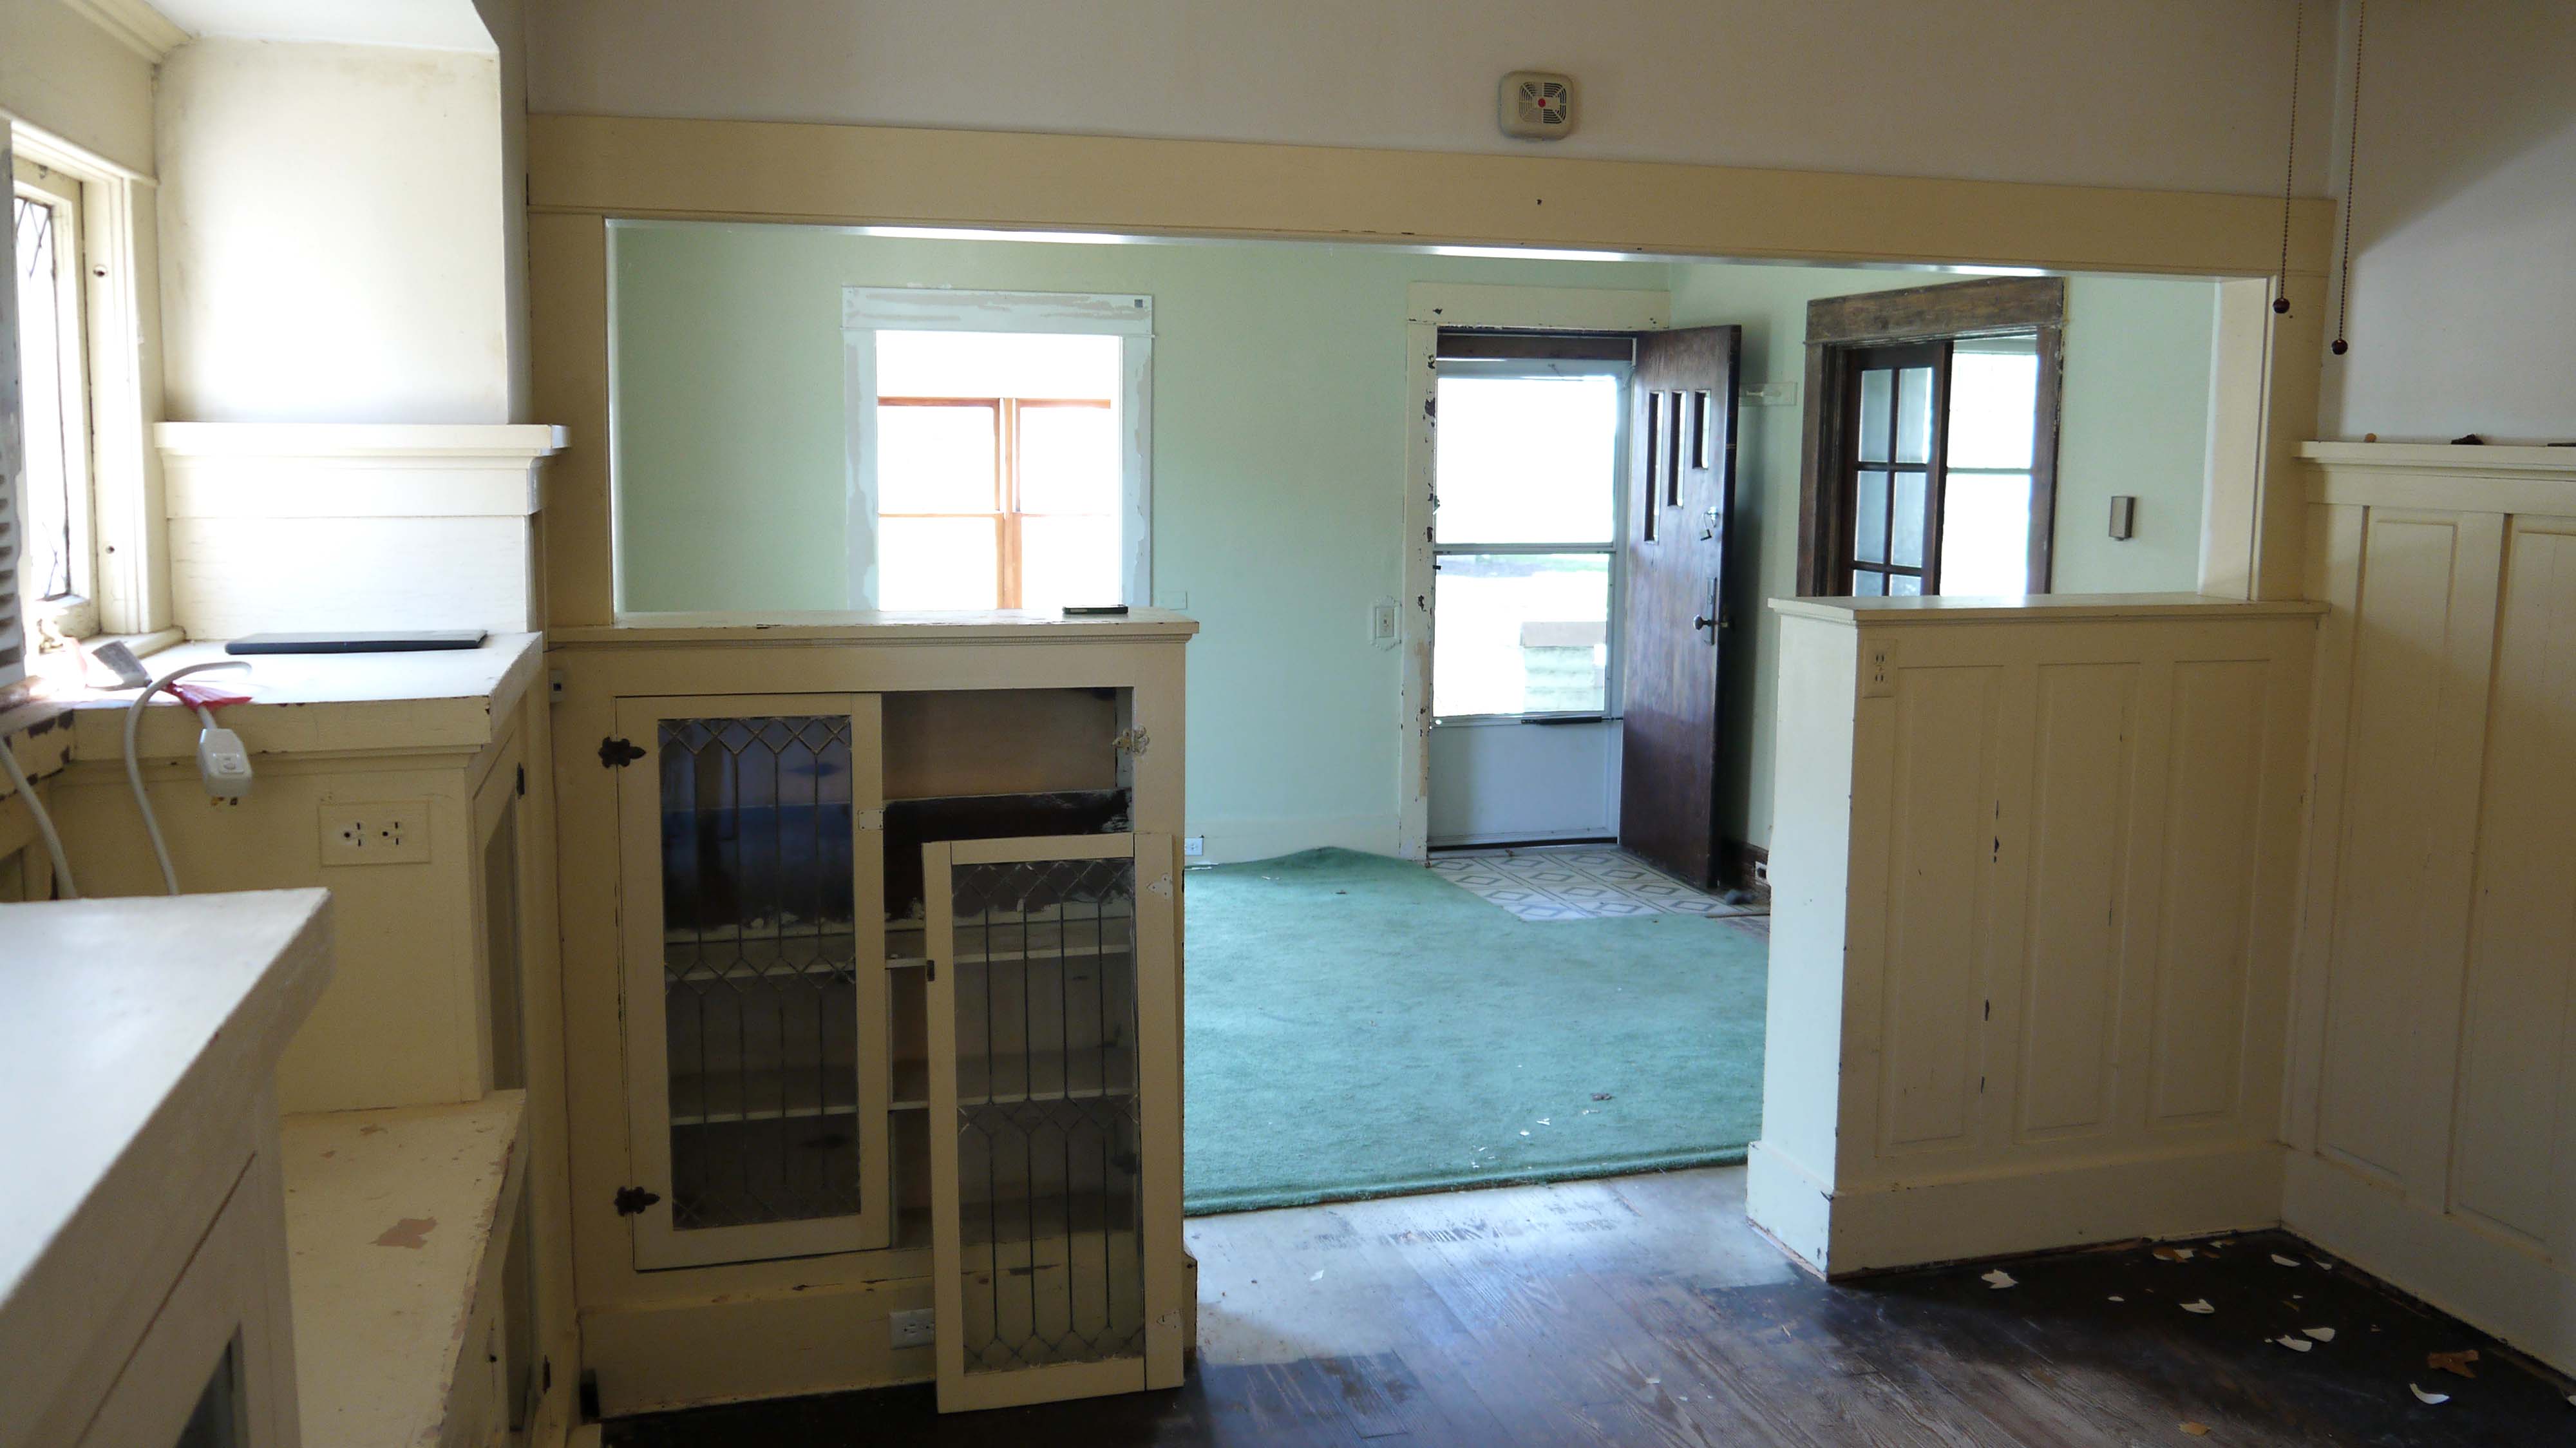
Walking back through the dining room, this doorway to the west leads into the kitchen. There are just a few spots on the ceilings where the paint is peeling like this. There doesn’t seem to be much evidence of water damage, so I have to believe the drastic temperature changes from no heat this past winter is what made the paint start to peel. This photo also gives you a sense of how tall the dining room paneling is.

It’s by far not a glamorous space yet, I will not be hosting any dinner parties in the near future at least. But it is a nice square room, and I’m hopeful that I can pull up the old linoleum and reveal wood floors to refinish.
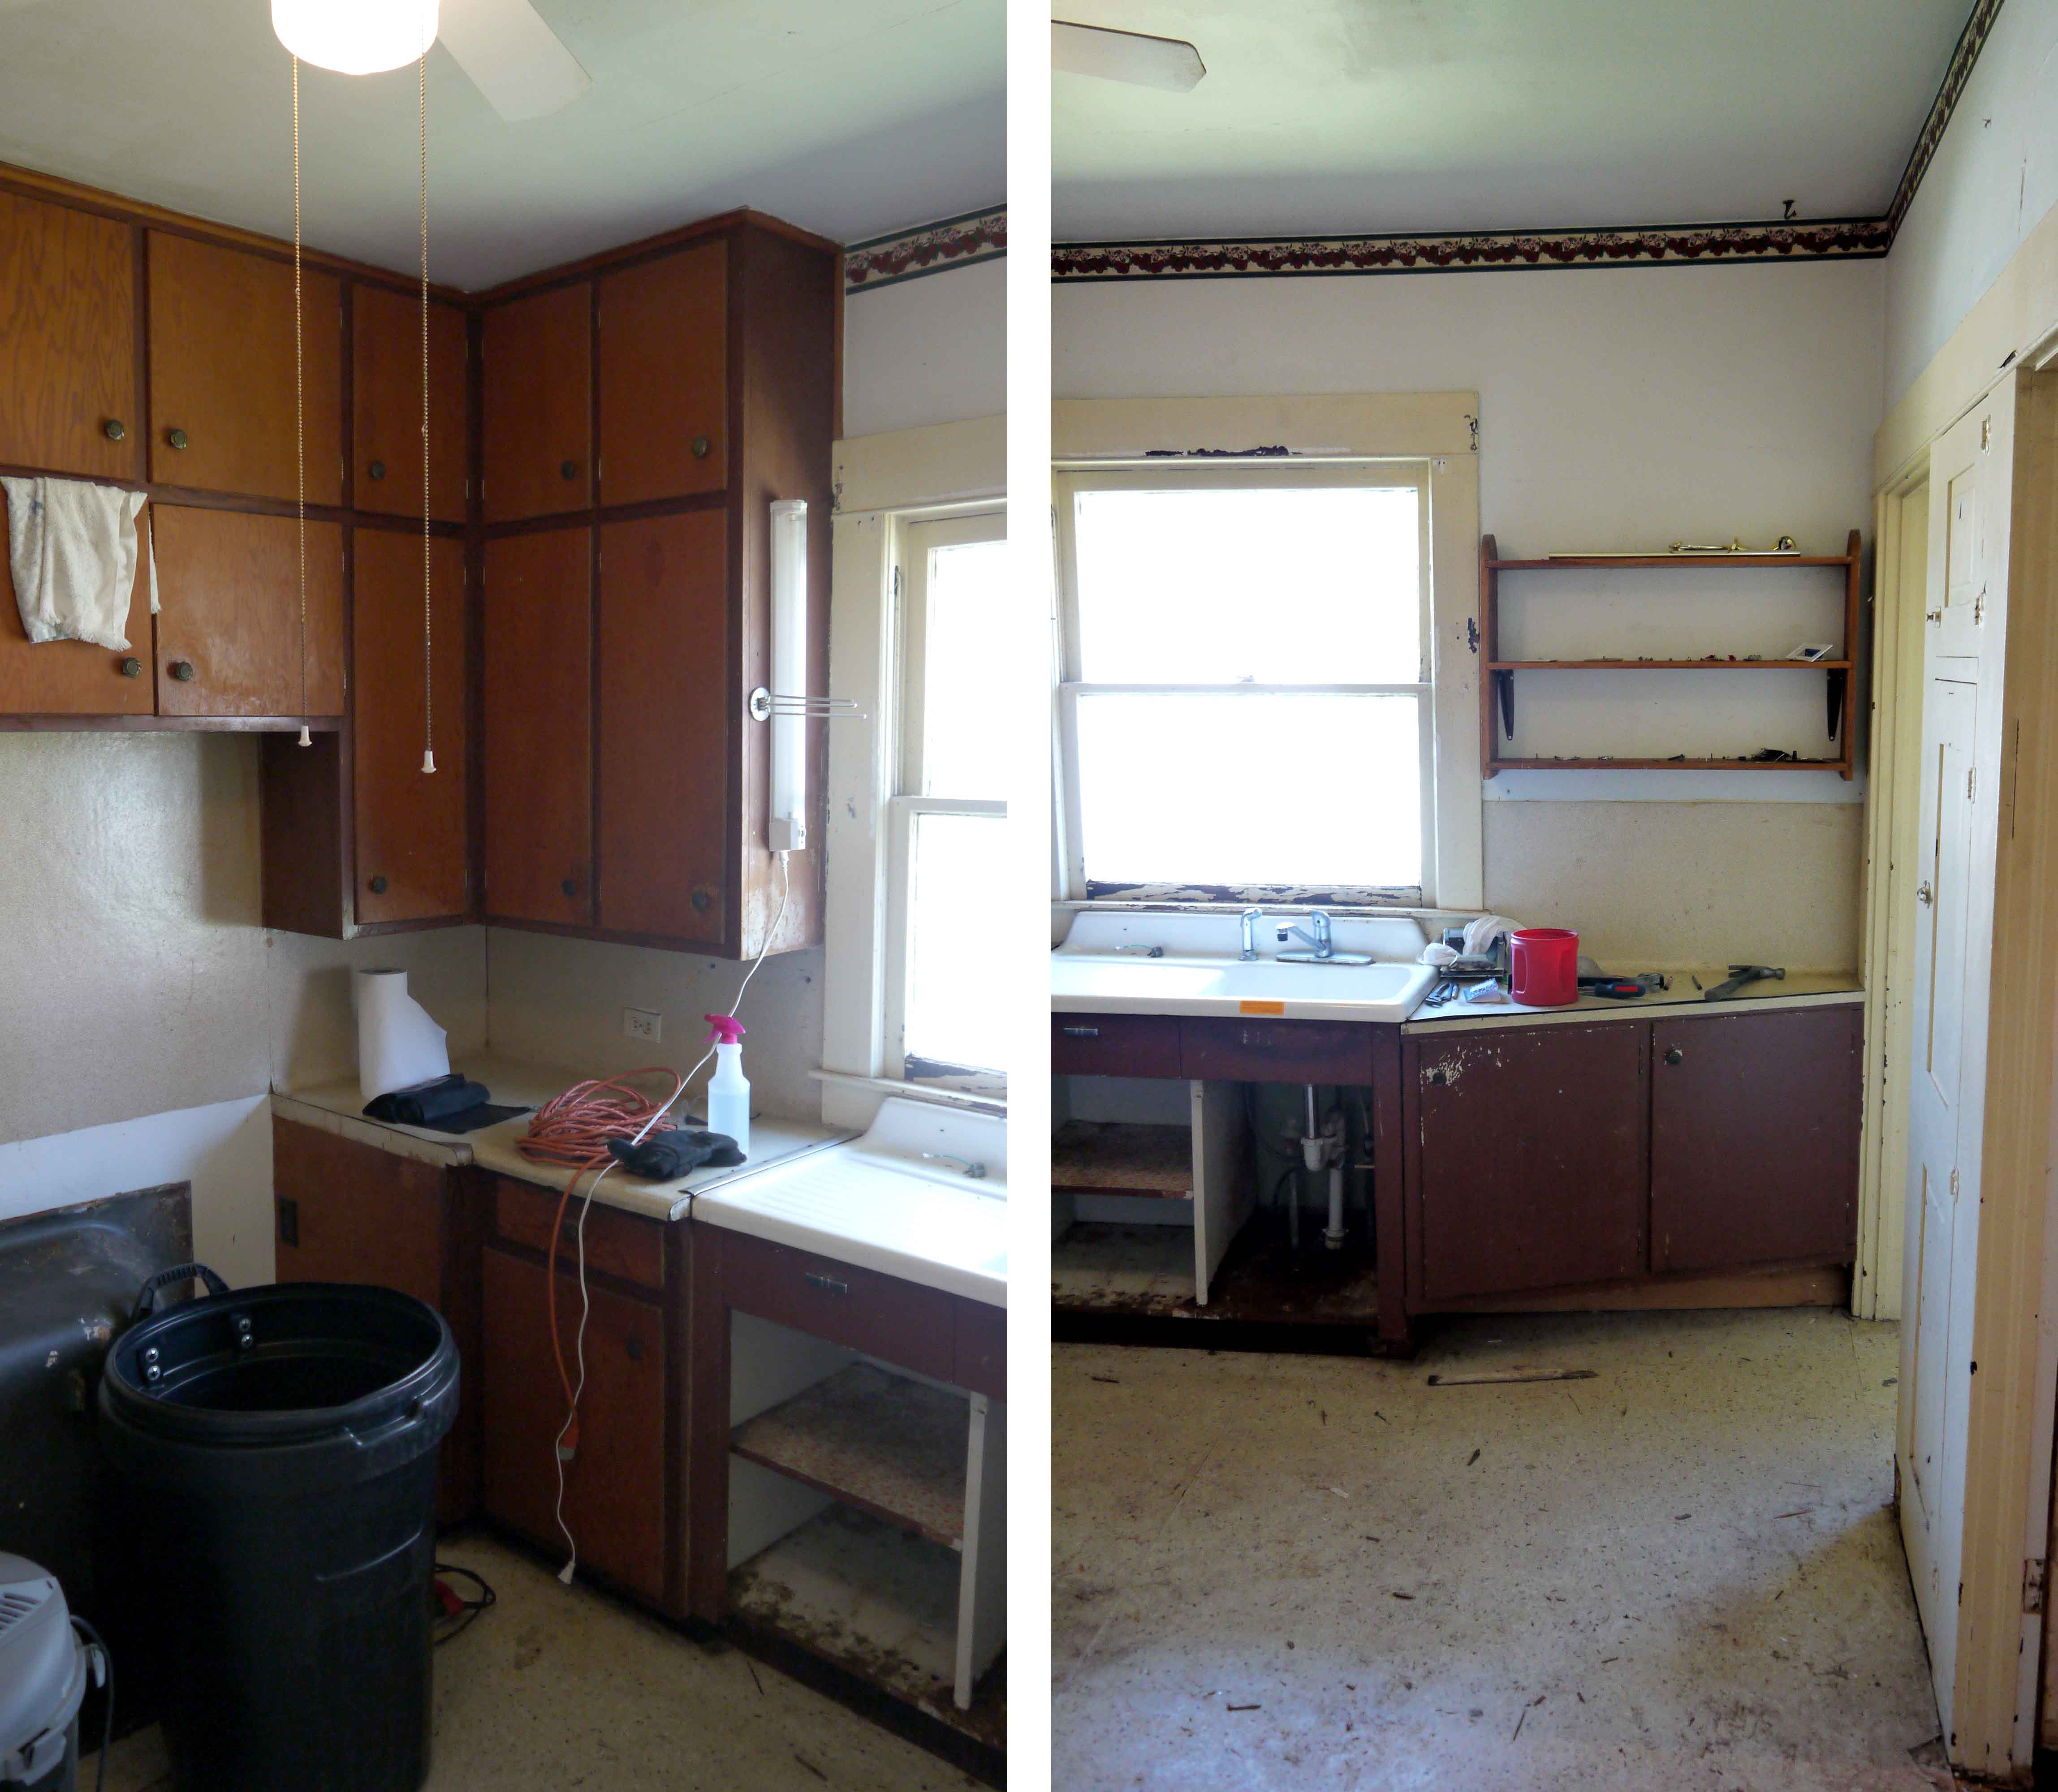
In the mean time, it just needs a thorough scrub-down. The tall cabinets are a good start! And yes, as I mentioned before, you can see how the stove and fridge are on the left, and in there place is the underneath side of my tub.

The best thing about the kitchen is the porcelain sink! What a statement piece, enormous for this size of kitchen, with its built in drain board. This is staying! Or, rather, it will get tore out, scrubbed top to bottom, and then put back in.

Standing with the sink at my left, this shot looks into both the laundry room and bathroom. I already detailed the bathroom “before” condition in this post. And in the space between them is another shallow wall cabinet, it looks as though it originally held a fold-down ironing board (like this one), but it’s been removed. I wonder if I could ever find one to replace it? Or perhaps build one to look original? Can you tell I love these little cubbies? These Craftsman home builders thought of everything. Why buy so much furniture; instead just build a house with a wardrobe, bookcases, buffet, and wall cabinets all as part of the design. Form meets function? I think so.
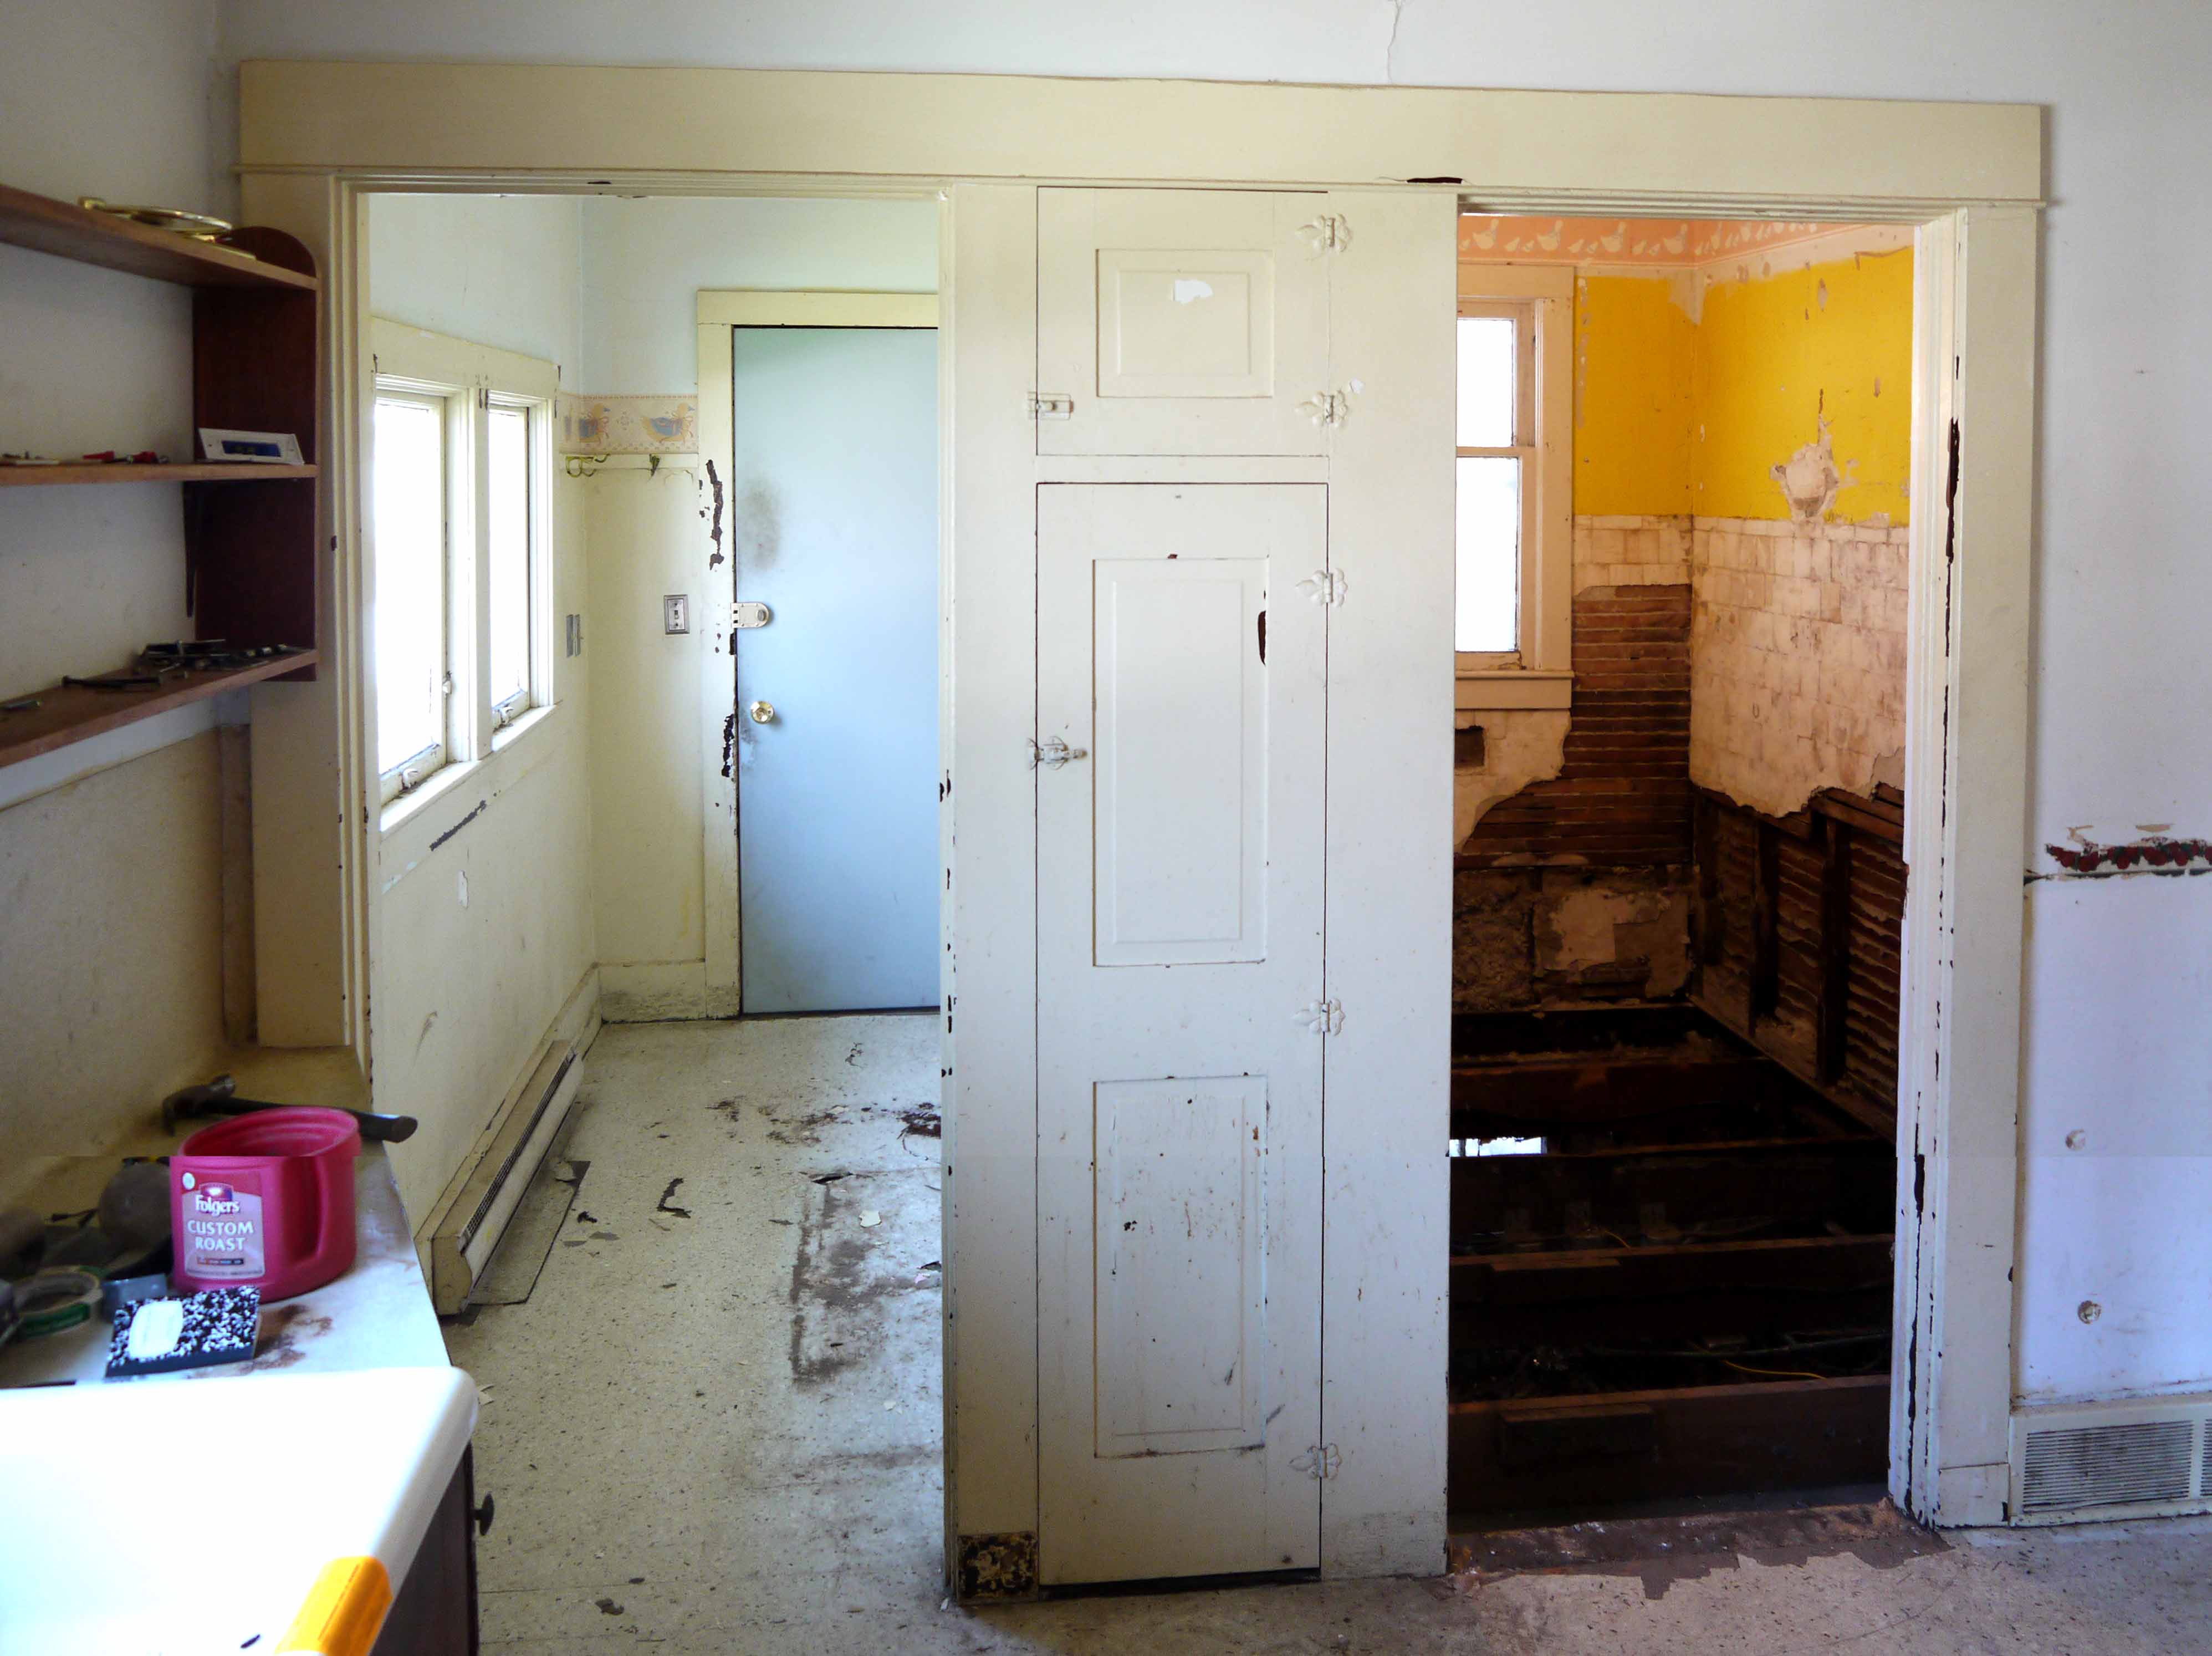
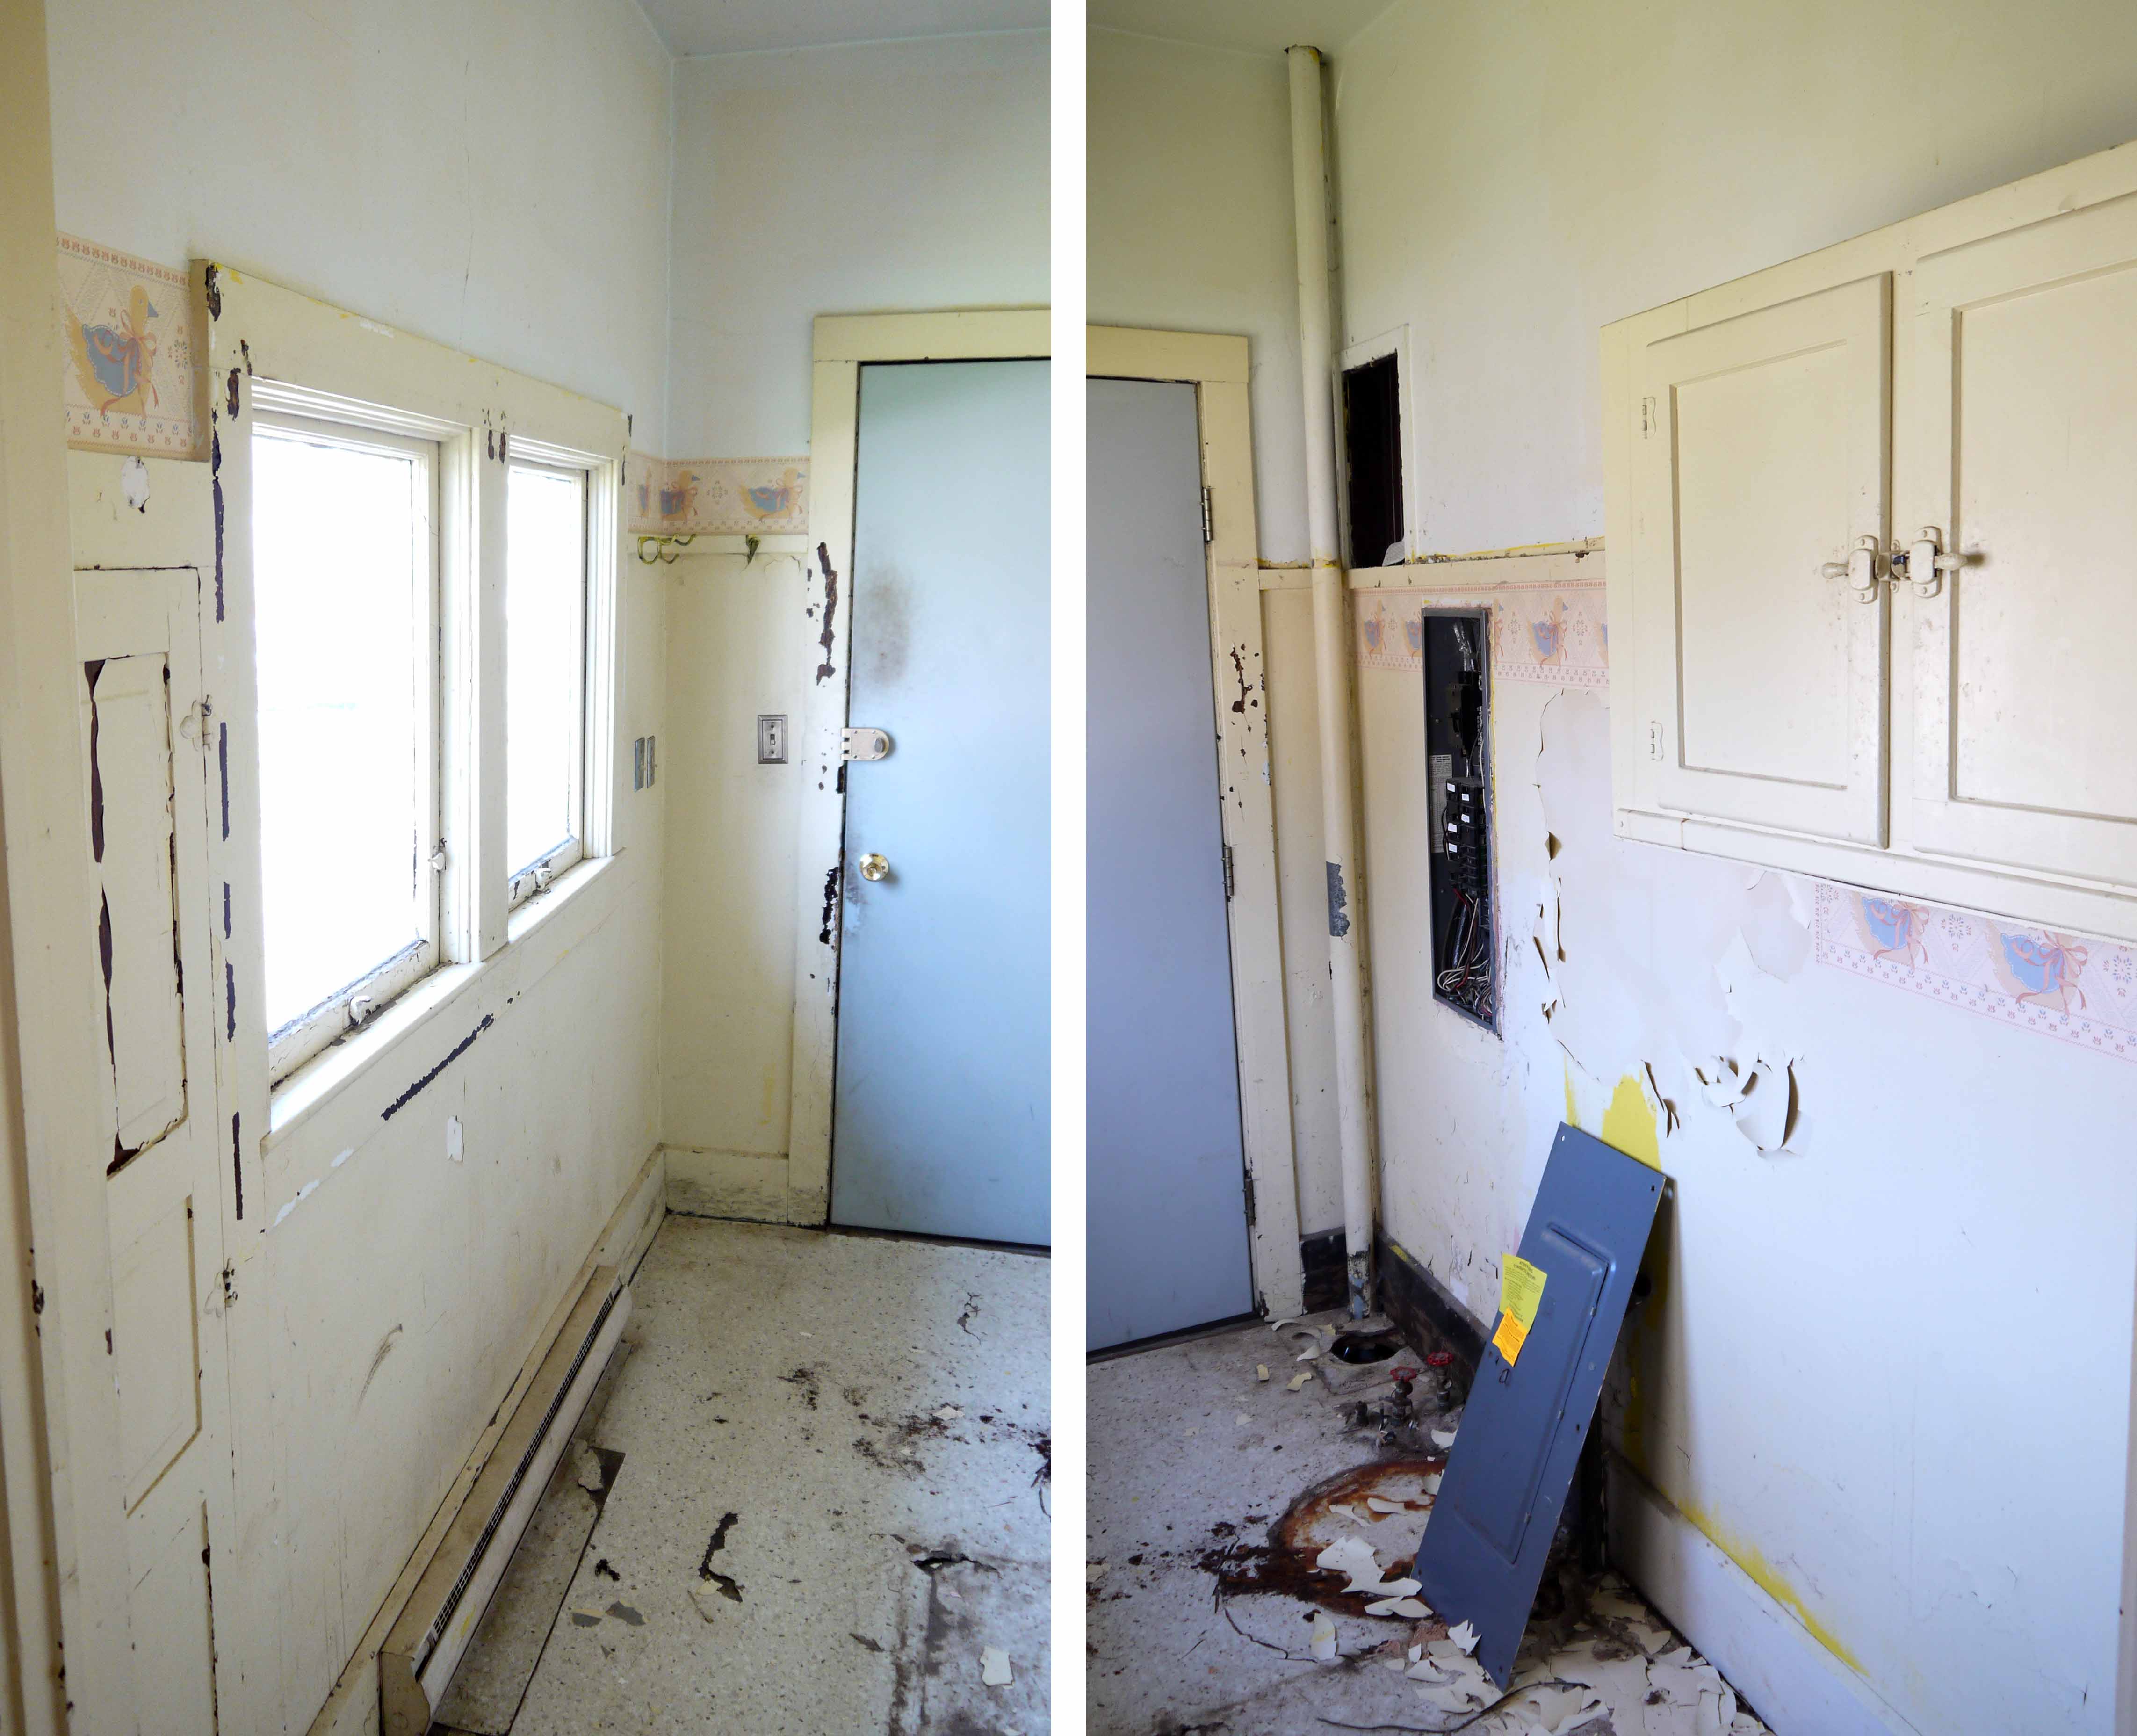
And then through the doorway, you see the narrow but bright laundry room. Another shallow wall cupboard on the left is perfect for a broom closet, and the double window floor floods the room with light. On the right is the drain plumbing vent and electrical panel (with door sitting on the floor). I hope to run the plumbing vent through the wall, but the breaker panel is staying. It’s 200 amp, and has empty breaker bays for expanding.
The rust circle on the floor shows where the water heater was, I carried that out the first week (and my hand went right through the bottom it was so rusted). I am researching tankless water heaters in hopes of saving that much floor space, as this is really a small room. Under the cabinet is where the washer and dryer go, and the steel door leads to the back yard.
So that’s the tour! I didn’t think to take photos of the outside of the house, including the garage and outbuilding, so that will be next. My family helped last weekend to do some yard clean-up, raking, planting a few perennials and trimming the overgrown shrubs.
Still gutting the bathroom
Posted by Adam A. Ries in DIY, Home Improvement on April 29, 2014
Well, following the last post, the bathroom looked like this:

By Sunday the entire wood floor was gone, as well as a little more of the plaster. So much for thinking I had knocked it all down. Now you can really see the mess in the crawlspace. And all of that mess needs to come out!

Because I know I will be doing some electrical work and need to maneuver all over for the plumbing, I want the crawlspace to be super easy to navigate and work in. No, it will never be on the cover of Better Homes & Garden magazine (I can see it now: “This Season’s Coolest Crawl Space”), but I don’t want it looking like a trash dump either. And apparently that’s exactly what a previous owner thought it was. Or was he hiding from the prohibitionists…

But seriously, that is most of the bottles I took out. Must be close to 100, almost all are Bond & Lillard whiskey, but along with buckets and buckets full of vintage beer cans (apparently not aluminum, because they are all but rusty pieces now – but I can tell he enjoyed Drewry’s), and a few other bottles of various sizes and proofs. I’m not tossing these all just yet, I see some future Pinterest projects down the road for the outdoor patio in my head.
The amount of crazy wiring under the bathroom floor had me concerned at first, but my contractor friend assured me it’s not uncommon. The amount this floor was leaking should have been a concern to the previous owner, but I plan to make sure the entire floor is watertight by using a waterproofing membrane before laying the tile finish floor. Upon heaving the 38th bucket of bottles and cans out of the crawlspace, I came to the conclusion that the previous owner MUST have been drinking whiskey while wiring. Most of the wiring is Romex, but it’s a crazy example of unorganized chaos – wires overlapping wires, hanging down between floor joists, wrapped around concrete support pillars, and not a straight line to be found. And was there a shortage of wire staples that year? Geesh! My OCD wants to tear it all out and start over, but I realize I cannot afford to do that and for the most part, its safe wiring, just confusing. I do plan to trace each wire to the corresponding room or piece of equipment, and then trace it to a breaker in the electrical panel. This is for two reasons; first, I want to know which breakers are responsible for which rooms/fixtures; second, I want to make sure there are not too many fixtures on one breaker. I’ve lived in a house where I might have on the tv, computer, and vacuum cleaner and then the heater kicks on and, click, the breaker trips. I’m gonna try to avoid that by calling in the the help of a friend who’s father is an electrician. And this book I picked up at a yard sale last fall. It might be vintage, but so is this house. And so much of the information in here still applies; the basics haven’t changed.

I also want the the trash out now because I need to begin running the new plumbing if I’m ever gonna get this bathroom finished. Even the nicest looking bathroom is no good without running and flushing water. And talk about metal scrap: the amount of galvanized metal, lengths of old copper, and cast iron is just stupid. And even the entire old steel furnace, which is a hulking piece of steel and cast iron (not used for what looks like decades). I’ll be keeping it all in a pile in the garage, and then hauling it to our local cash-for-scrap recycling center. I love when Earth friendly puts cash in the bank! But these steps aren’t so glamorous, and for fear of the dust in the camera, I probably won’t snap many photos of the trashing and plumbing steps. I do think it’s about time for a photo walk through of the entire house, to document the true “before” status.
