Posts Tagged Windows
Winter’s End?
Posted by Adam A. Ries in Exterior, Home Improvement on March 1, 2014
Nearly a 1 year hiatus. Yes, and although I’ve often considered updating, I’ve been learning how to manage my full time job, living with family, and keeping friends on the weekends. With quite a few projects in between also. What have I accomplished over the past two years, since I got really lazy journaling about home improvement projects? Let me think:
- Primed the entire house exterior
- Painted the entire house exterior
- Painted front & side entry doors
- Install all new window trim and moldings through entire house
- Stained or painted new window trim (the bathroom, laundry, and kitchen have painted woodwork)
- Ordered raised panel vinyl shutters (not my favorite material, but inexpensive and zero maintenance won this time)
- Primed & painted vinyl shutters (4 pairs)
- Hung shutters on front & side windows
- Blown cellulose insulation into attic (insulation value at R-60, baby!)
- Painted main living room (boring white was getting old)
- Hang living room curtains on new sturdy drapery rods
- New laminate countertops & tile backsplash in the sister’s kitchen
Most of these steps I didn’t document, but I can highlight the finished outside of the house!
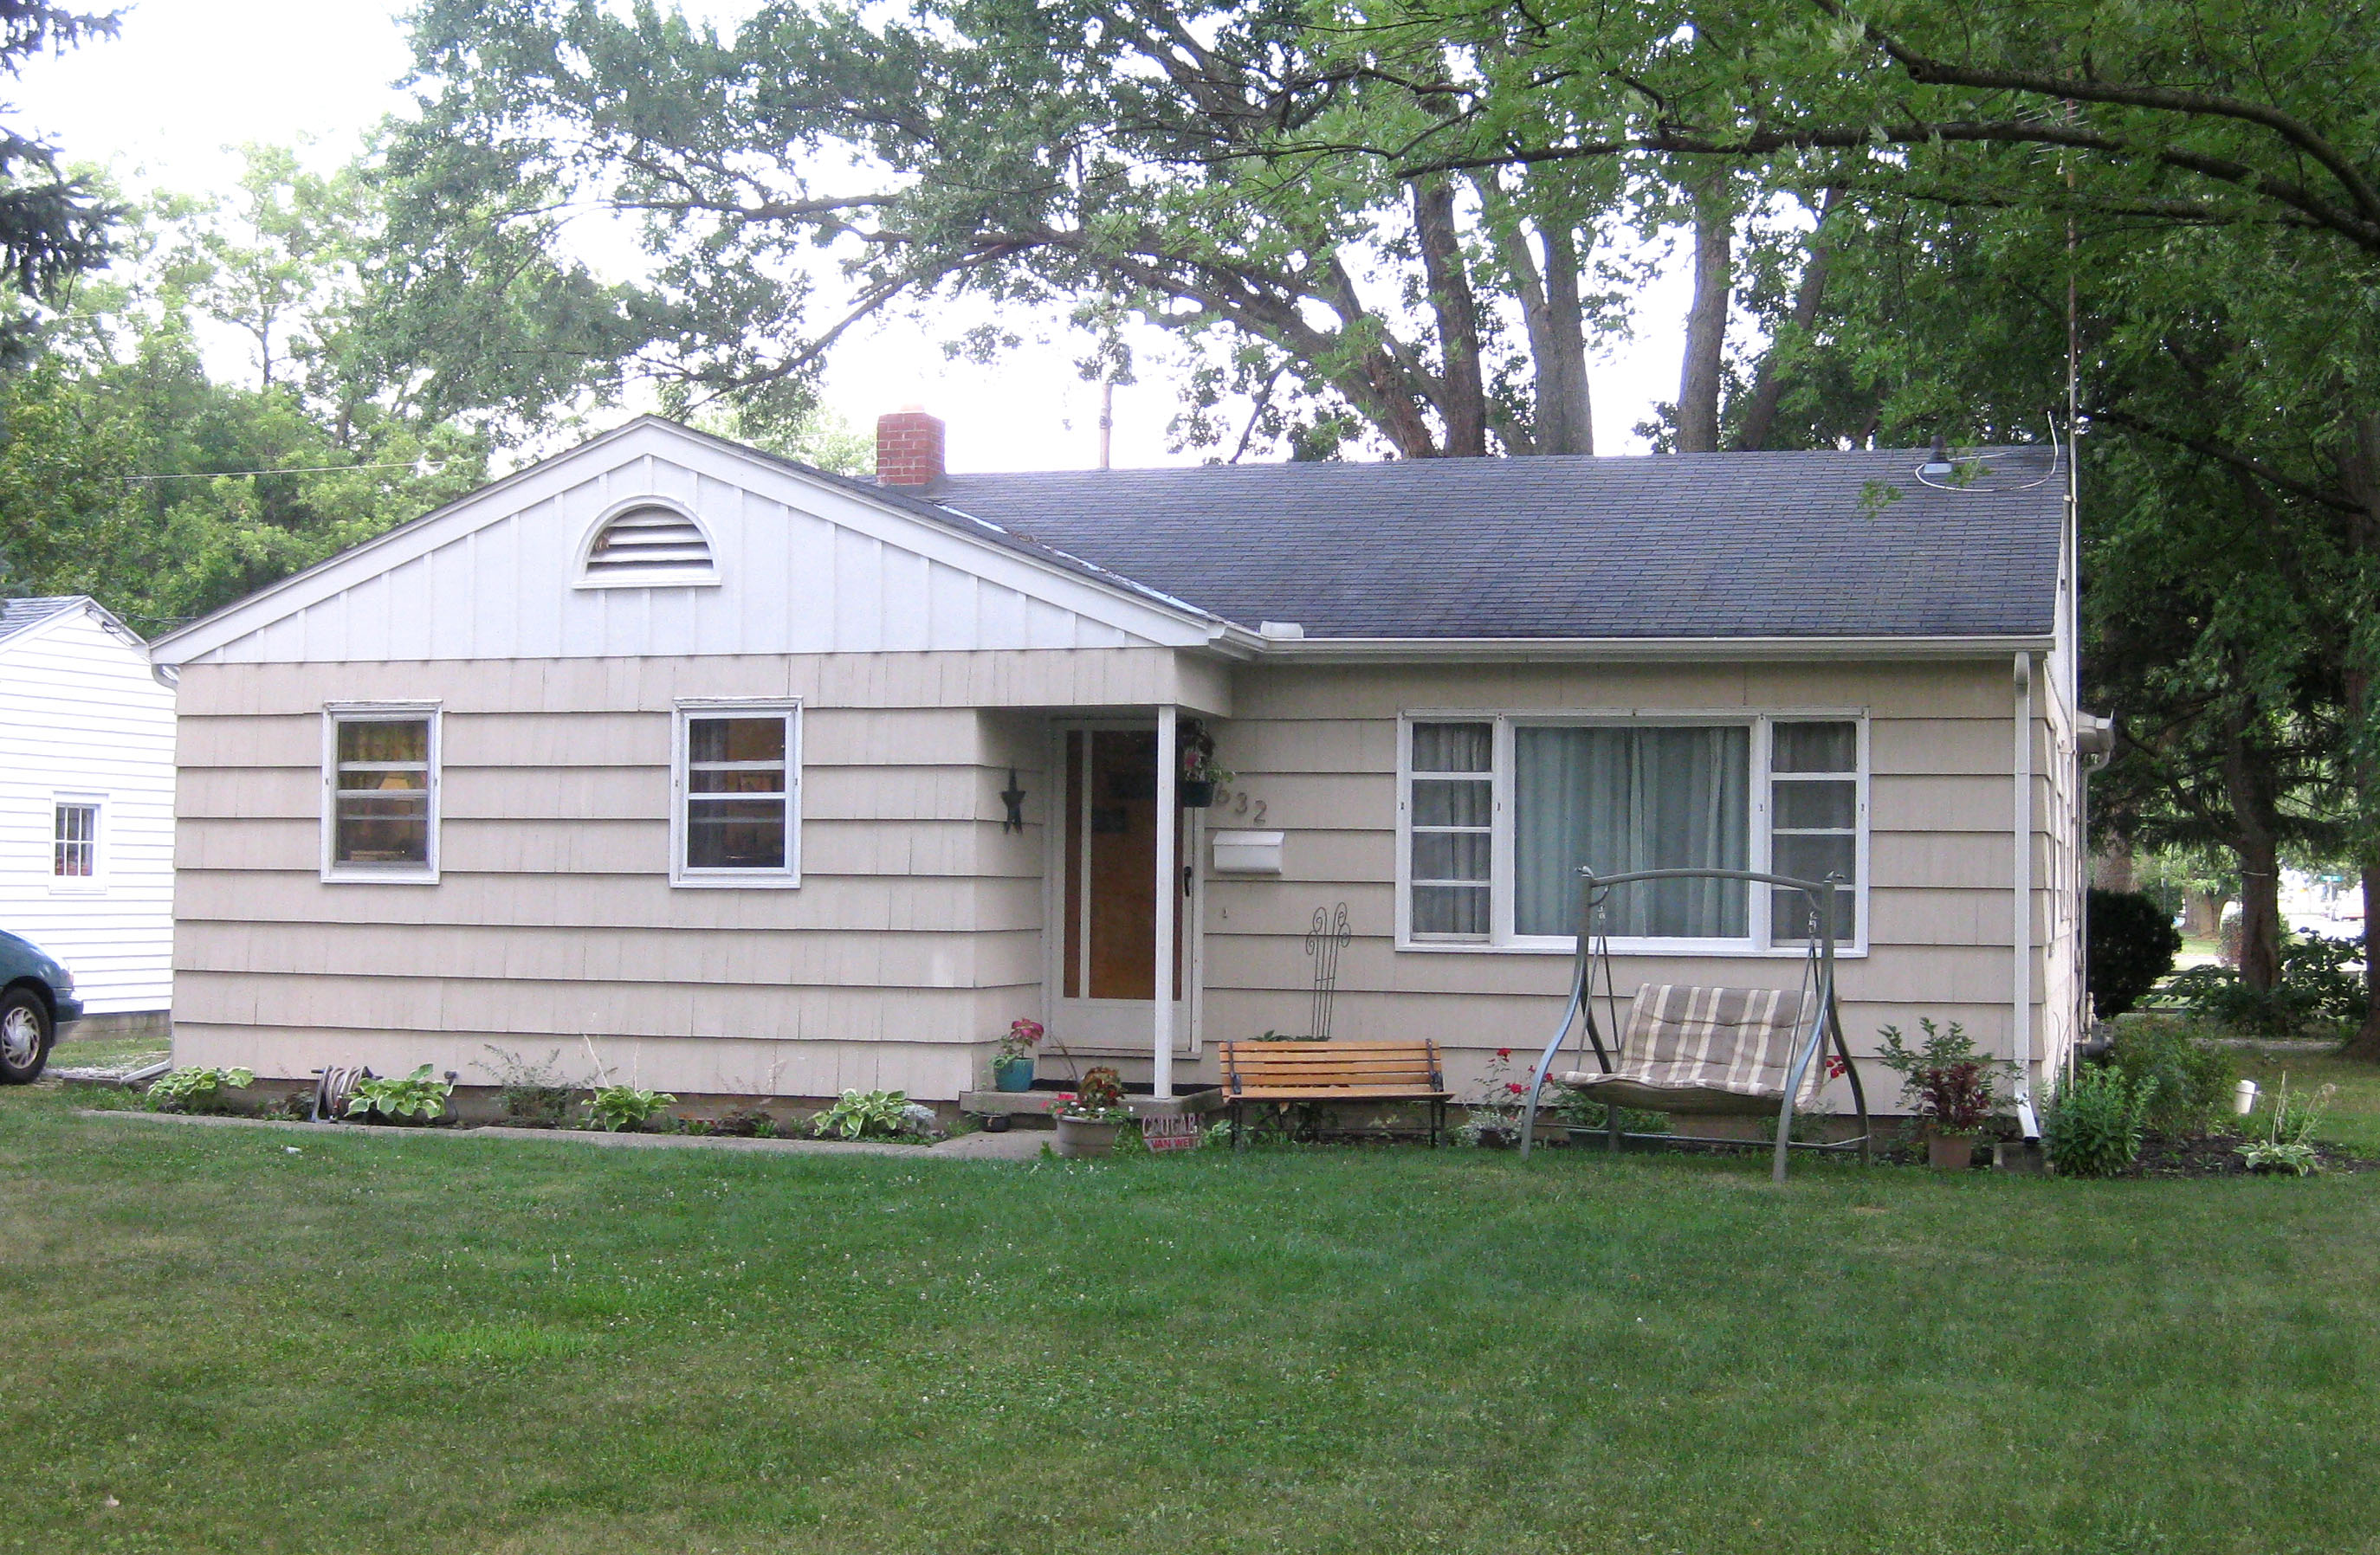
Below is the completely untouched “before” picture. Other than maybe a few plants and the park bench, this is how the house looked before I started working at all. Complete with rotting windows, vintage door, and fading bland paint job.
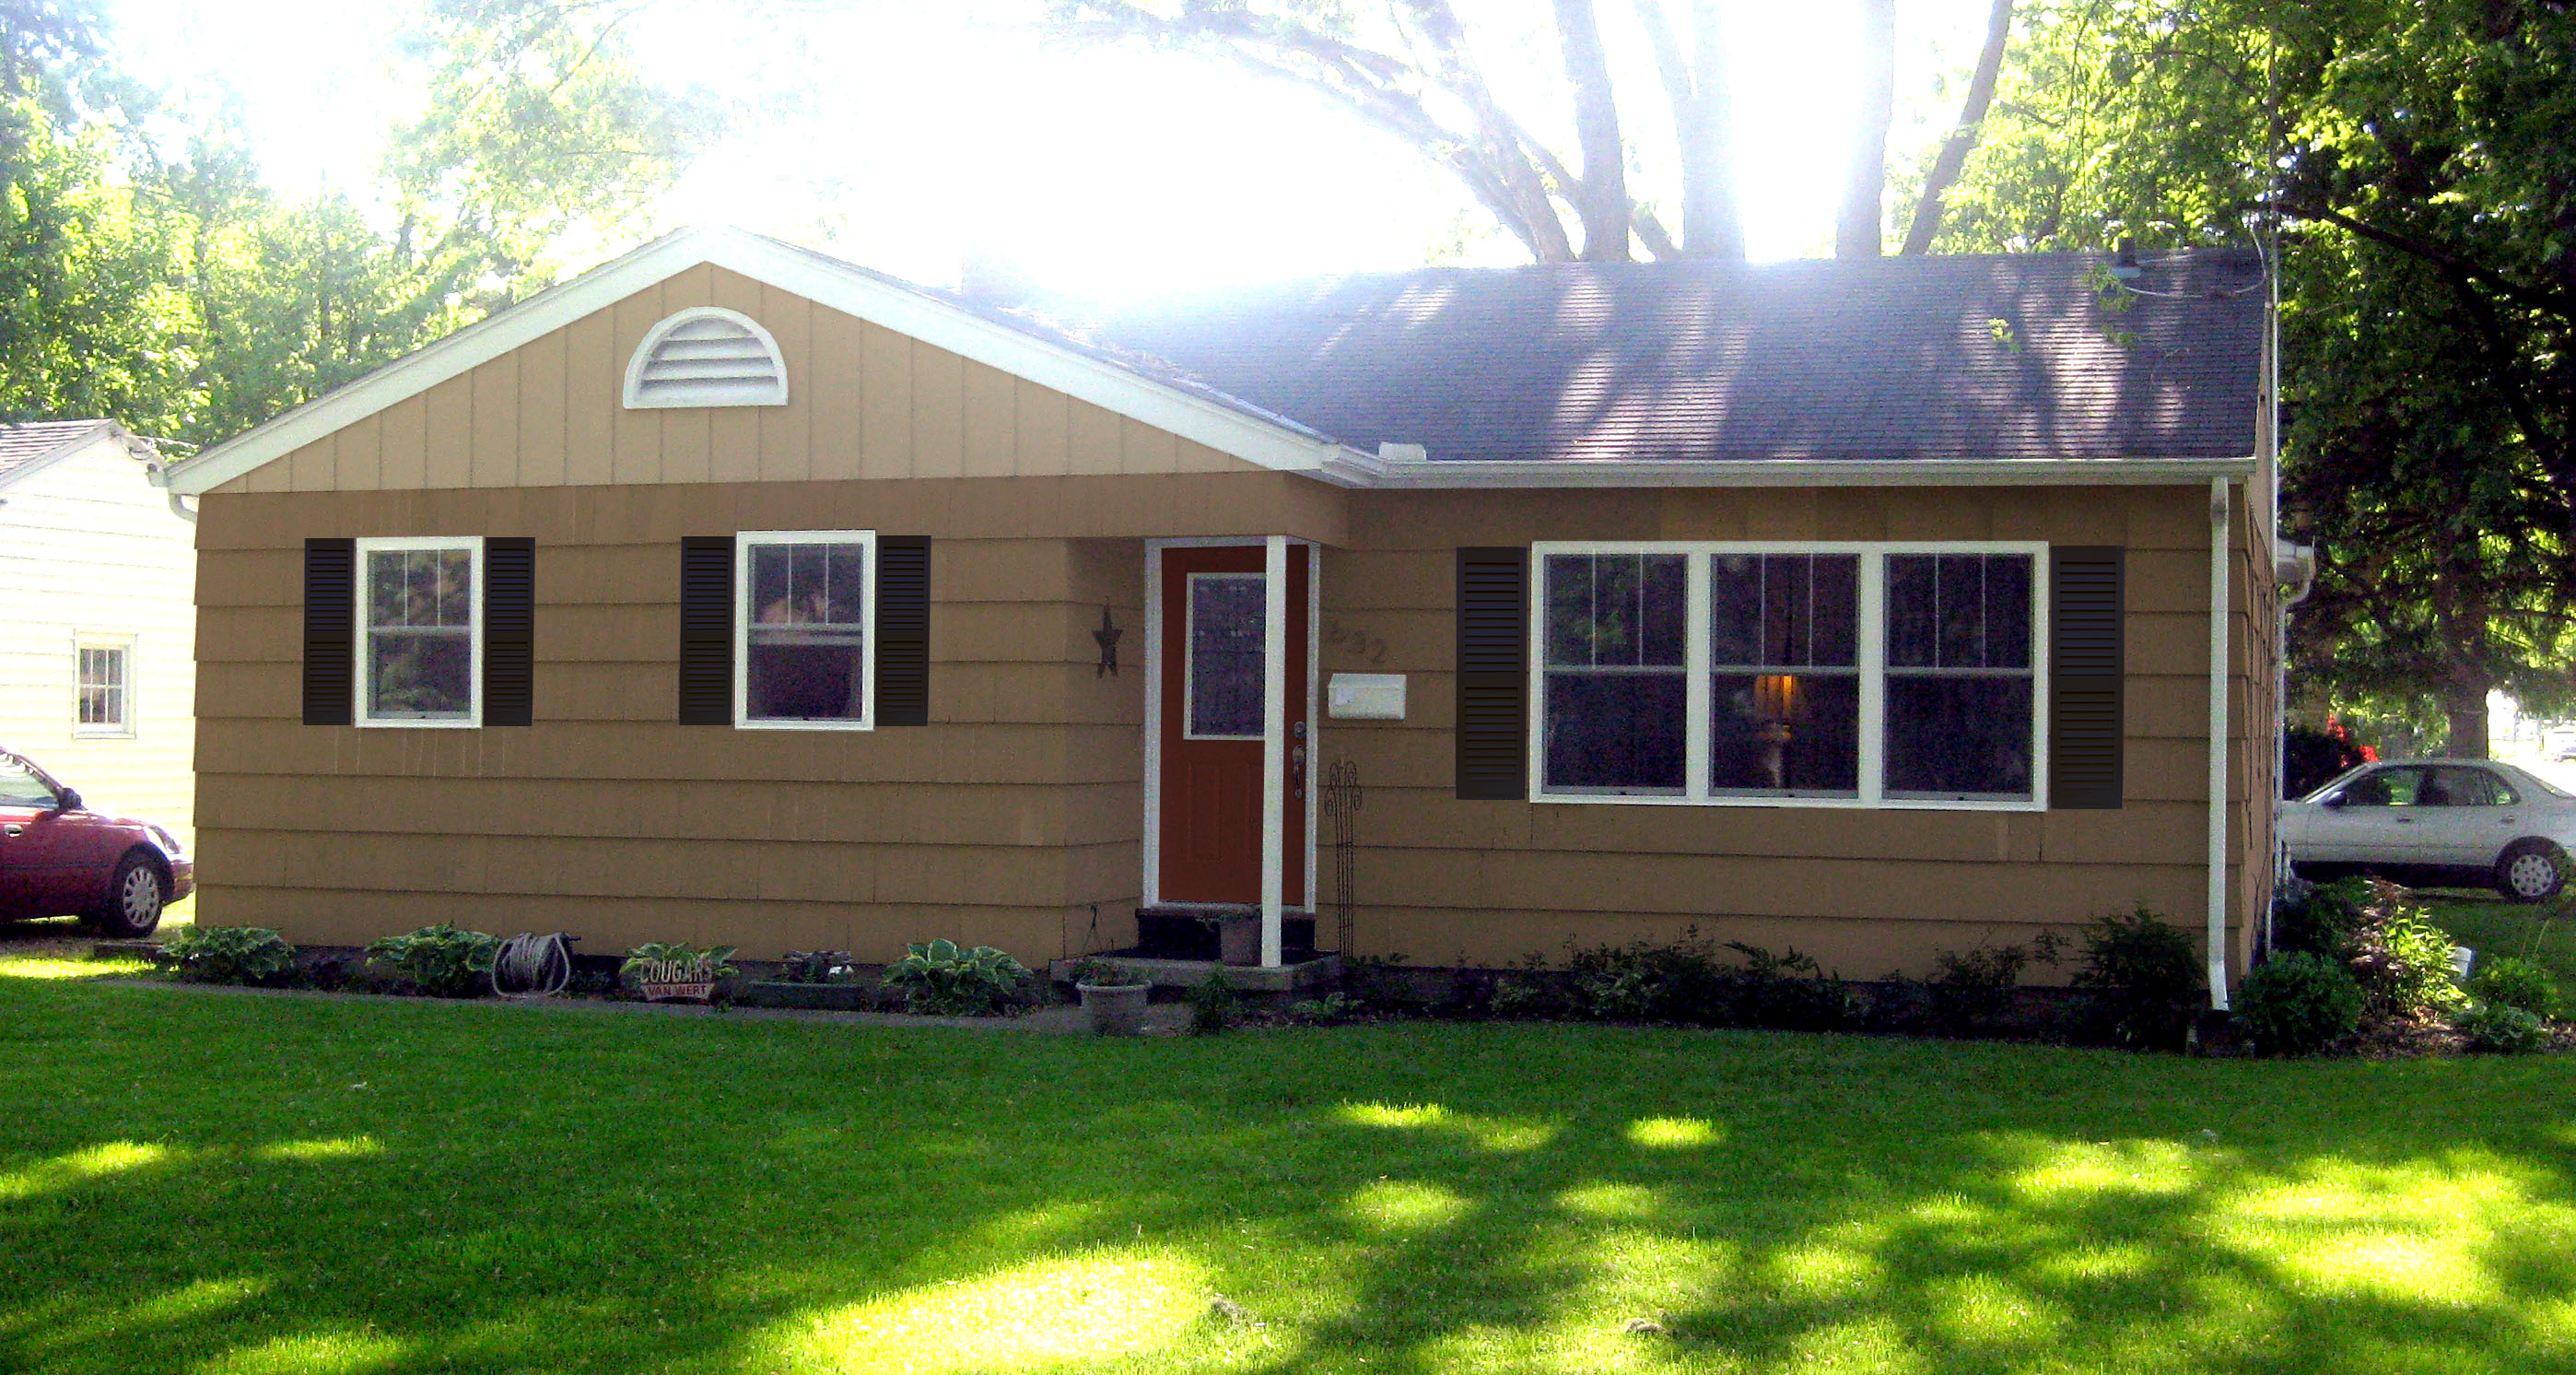
Here is my rendered “after,” with the intention of all new windows, doors, shutters and a new and noticeable paint scheme.
And here is the “after!” All the work I mentioned is complete, it’s only taken a little more than 2 years!
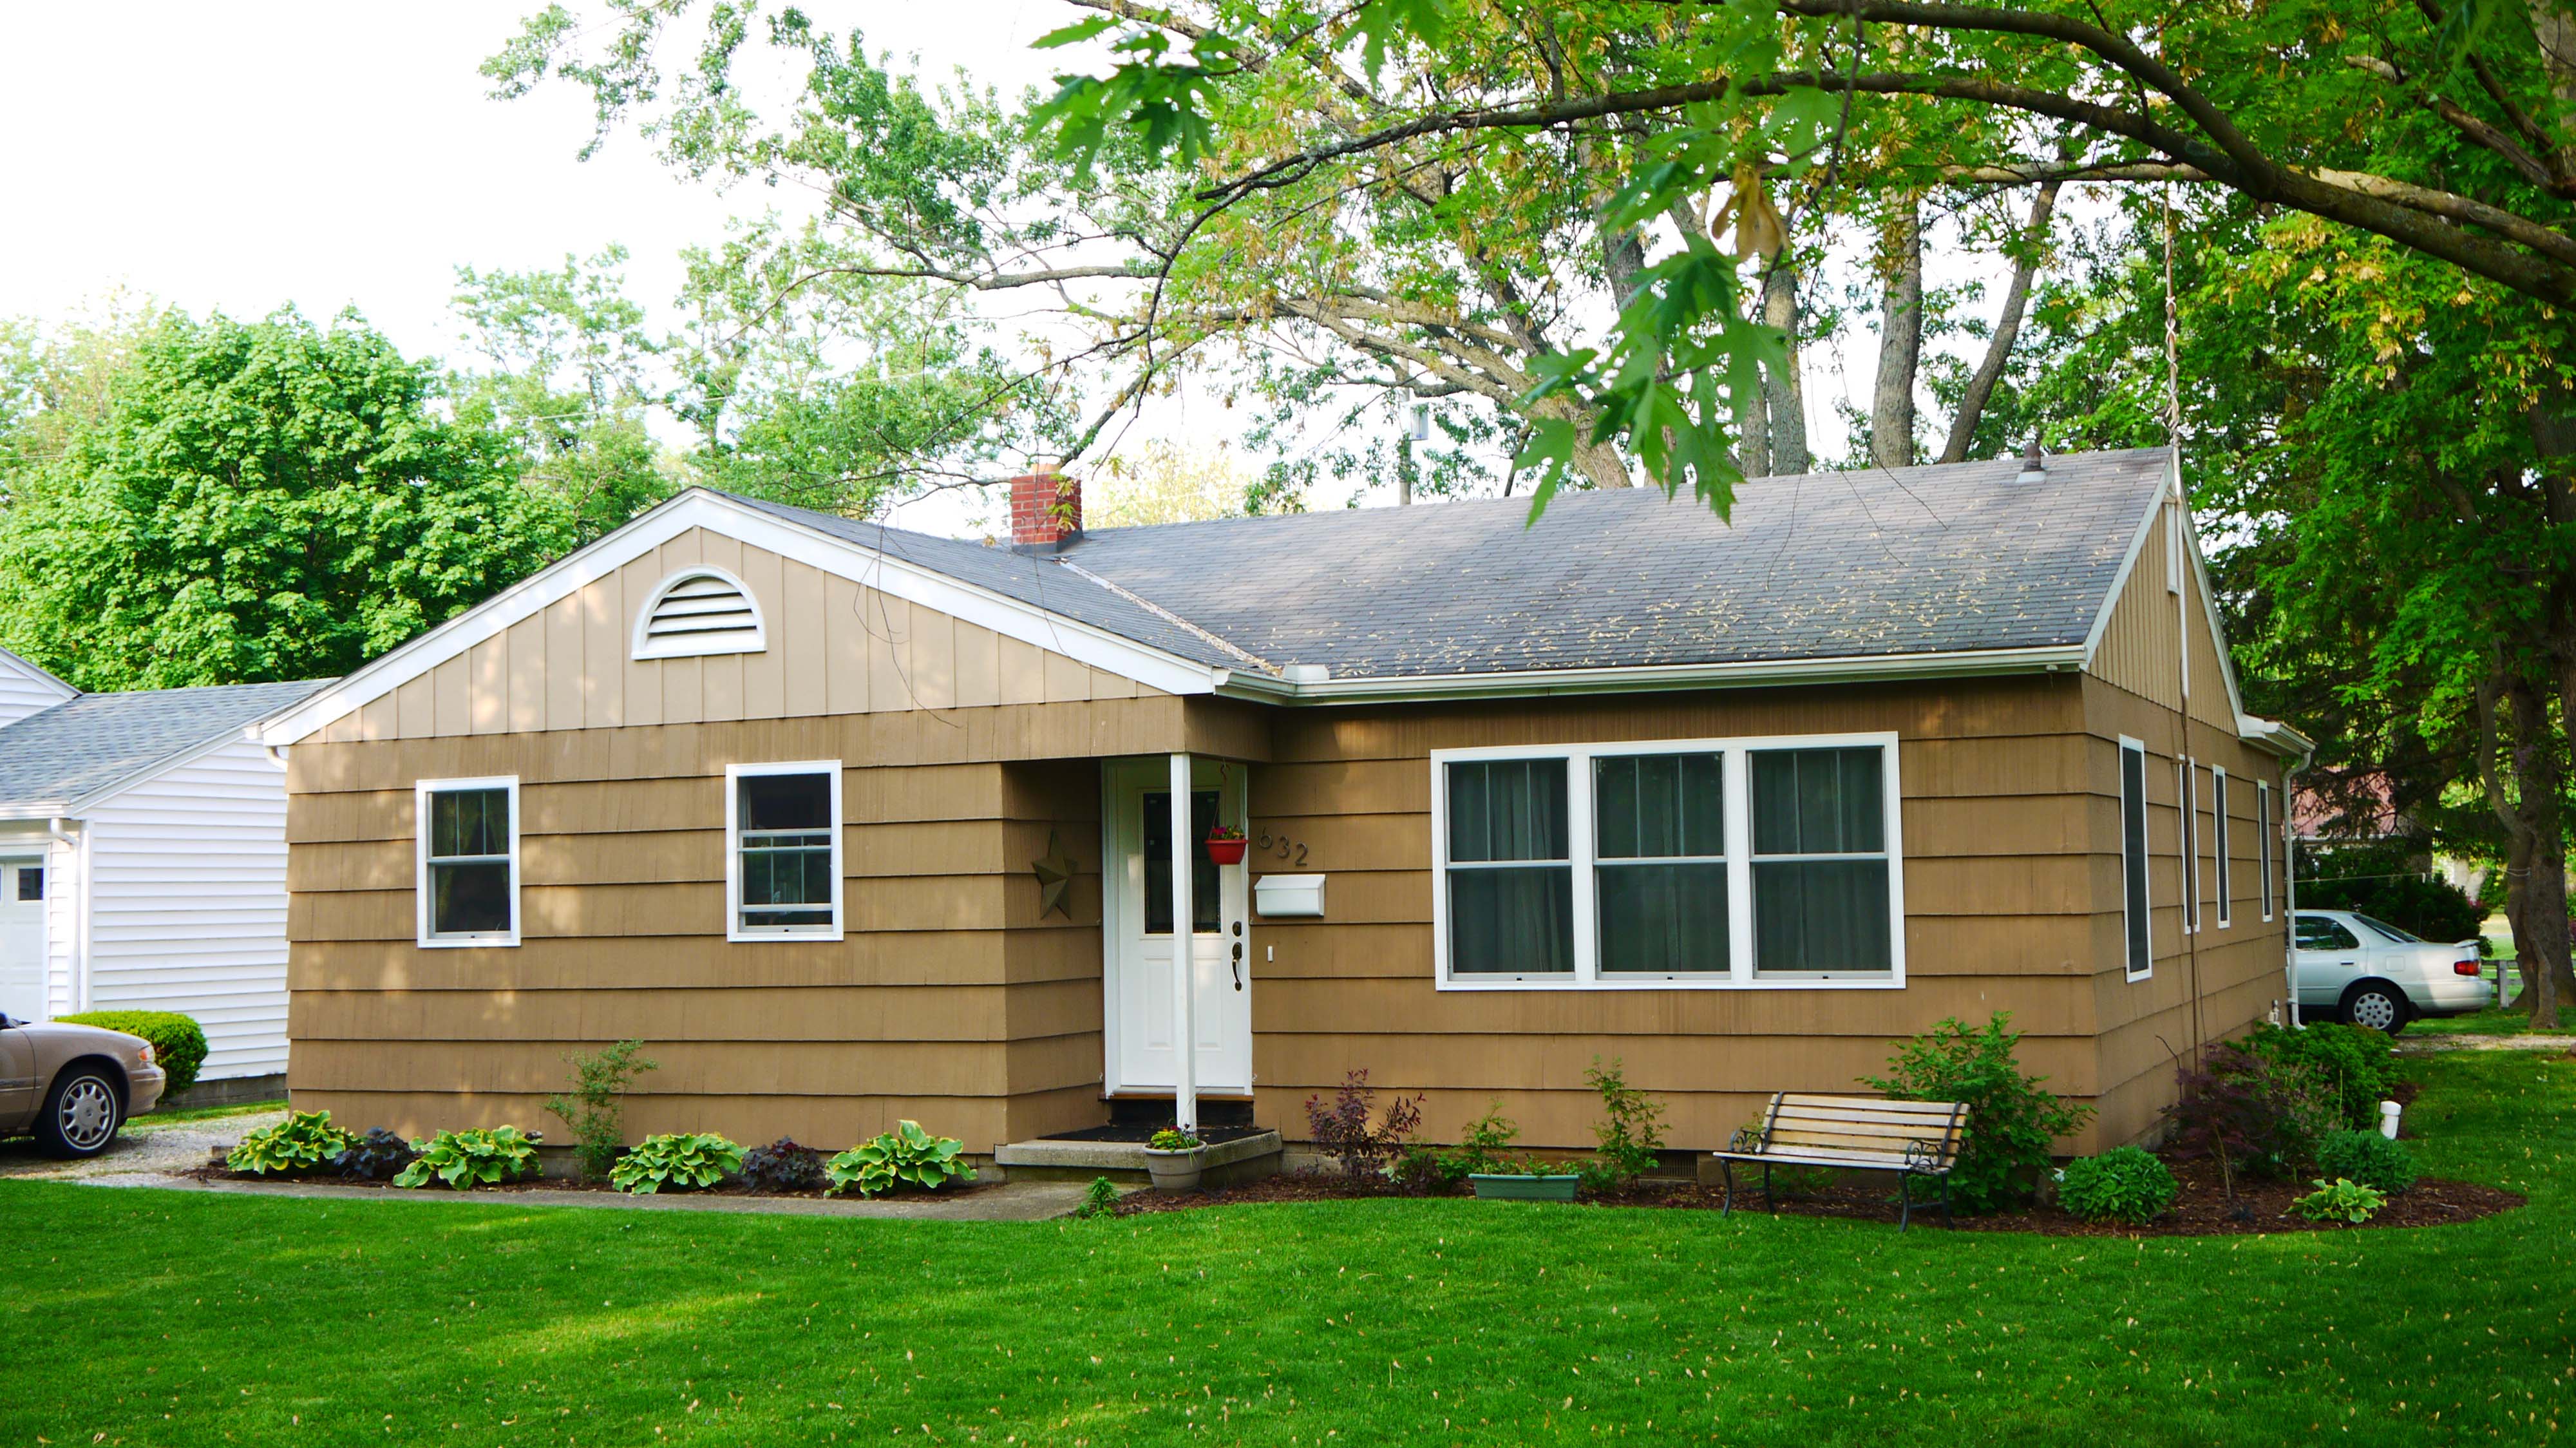 Oops, apparently this was before the shutters went up. But you can see how nicely landscaped it looked last summer, with fresh mulch, plenty of rain, and such a beautiful shaded green lawn. It has definitely spruced up the entire corner. What was before an almost unnoticeable little house is now a home that just looks loved and well maintained. And a little bit of personality thrown in there too.
 I really liked how the landscaping with its large radios curved edges has really softened the strong horizontal and box-like lines of the house.
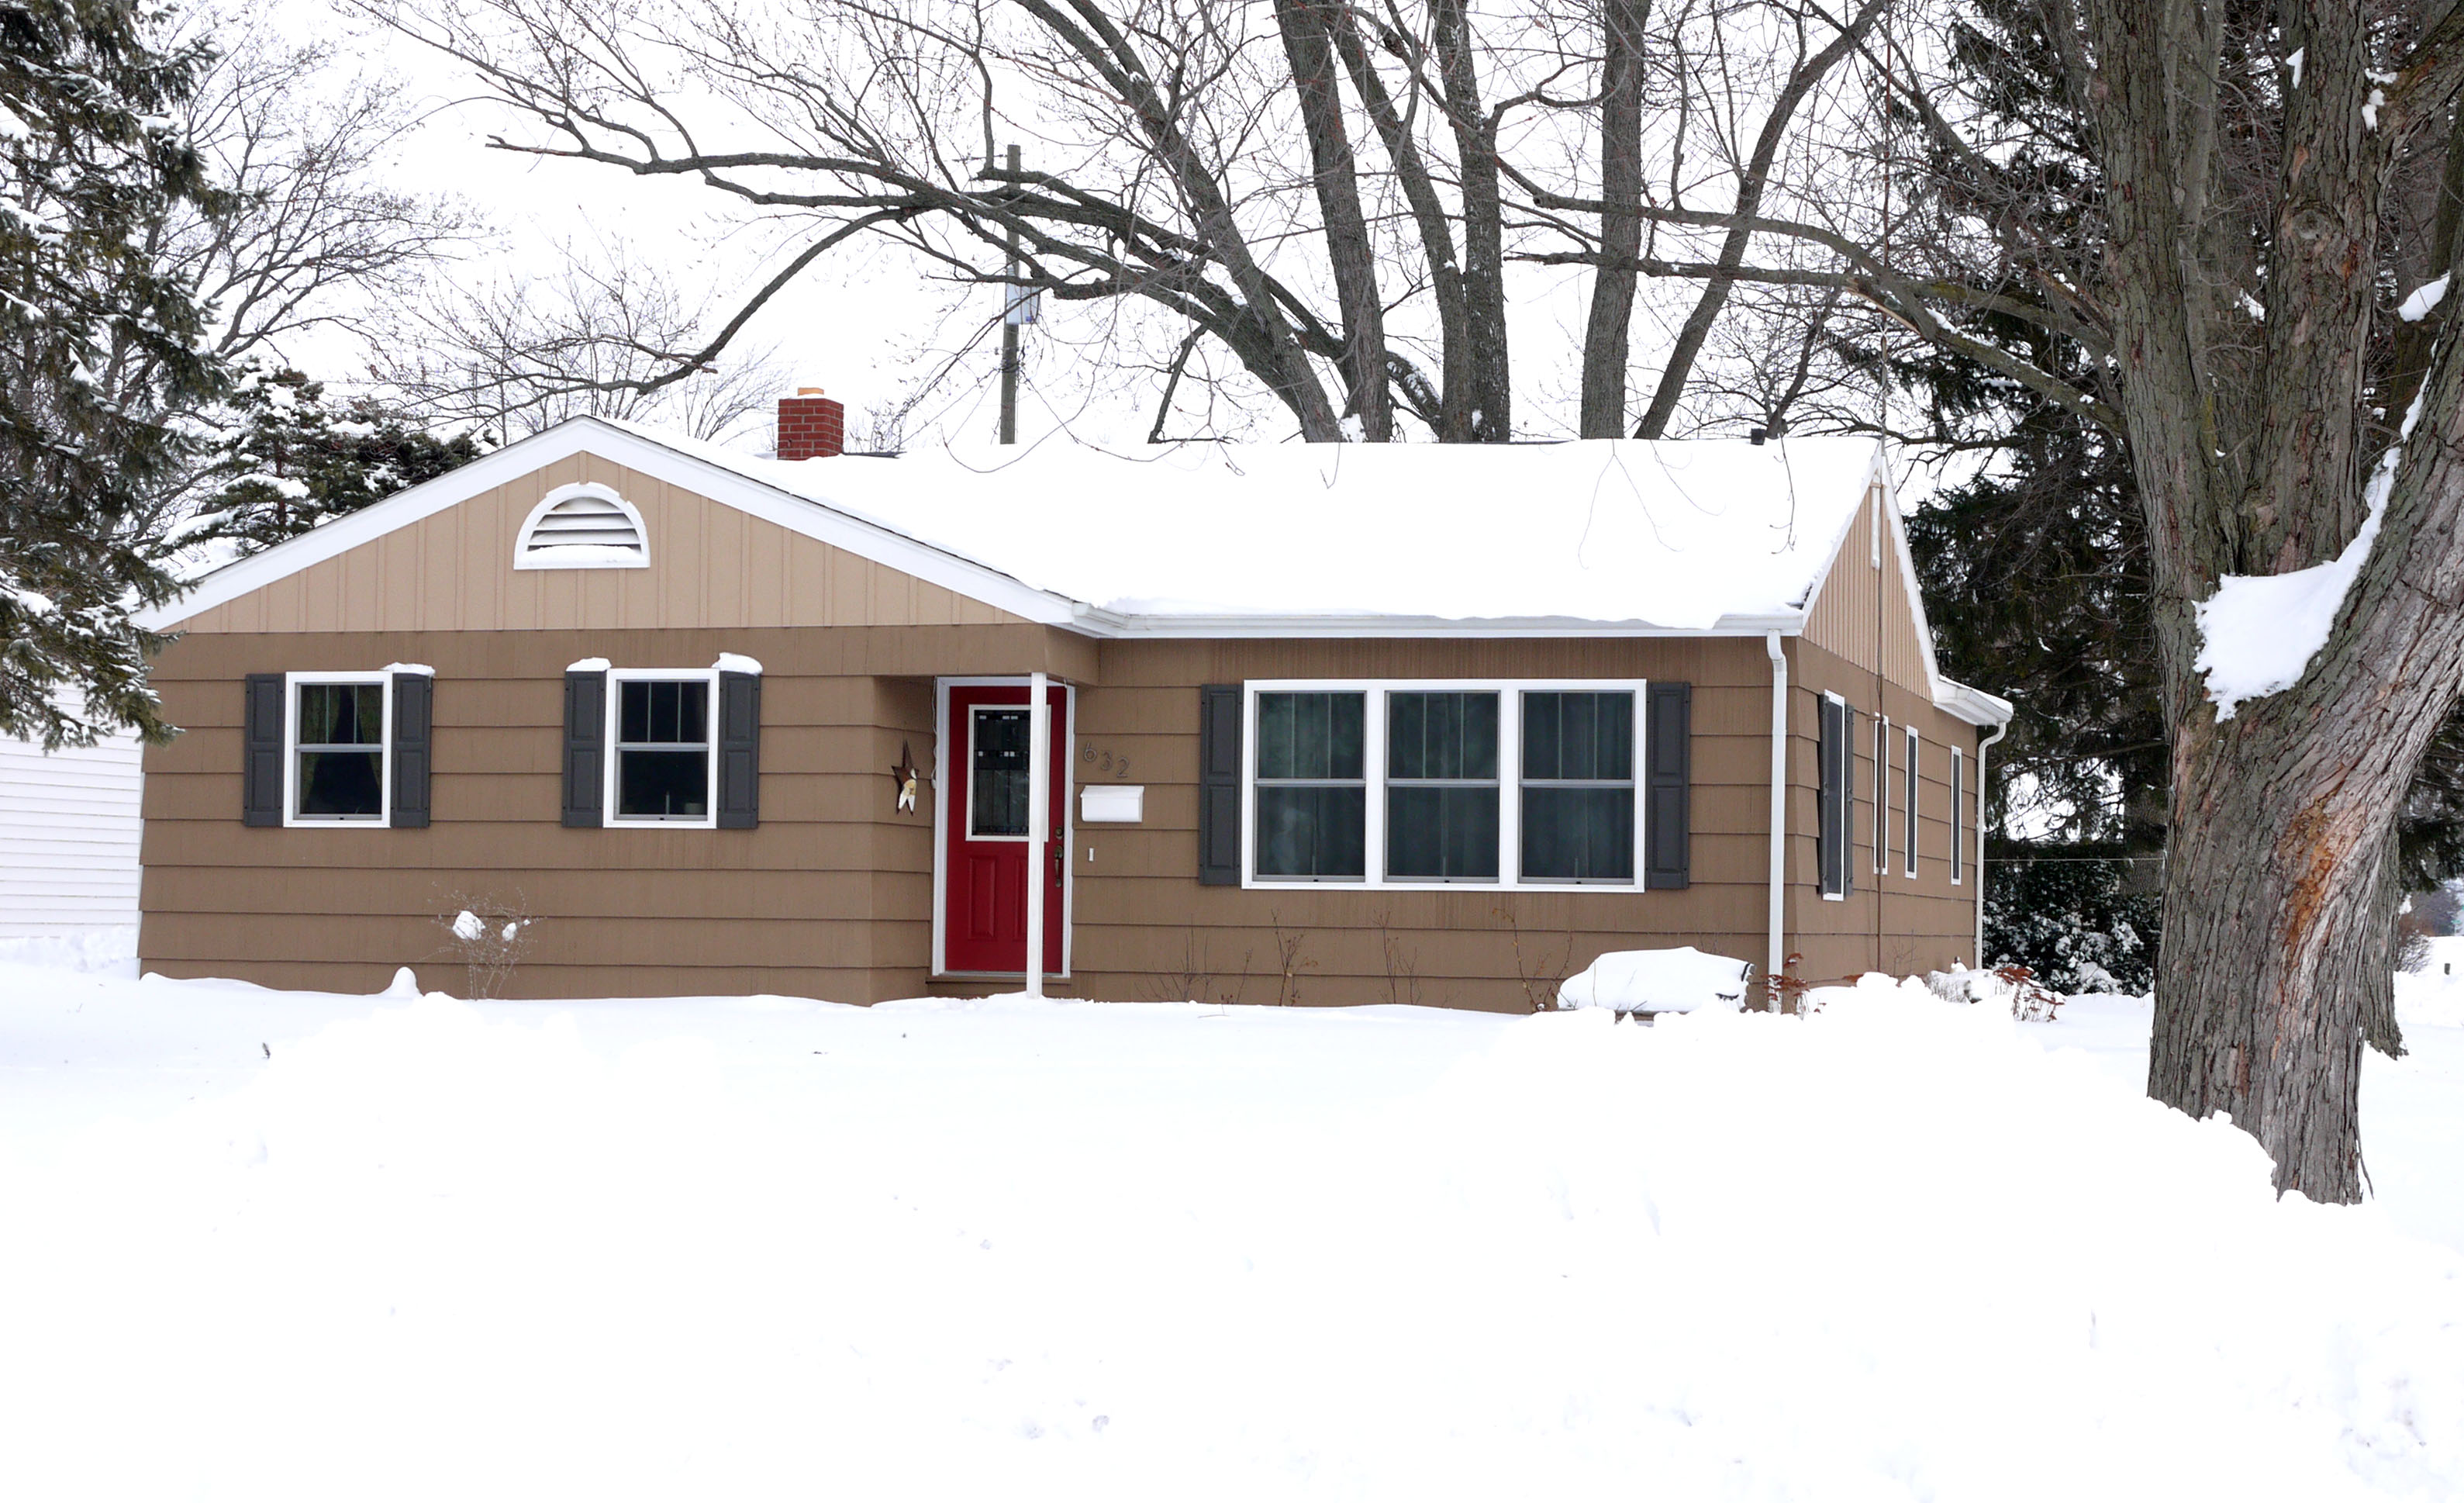
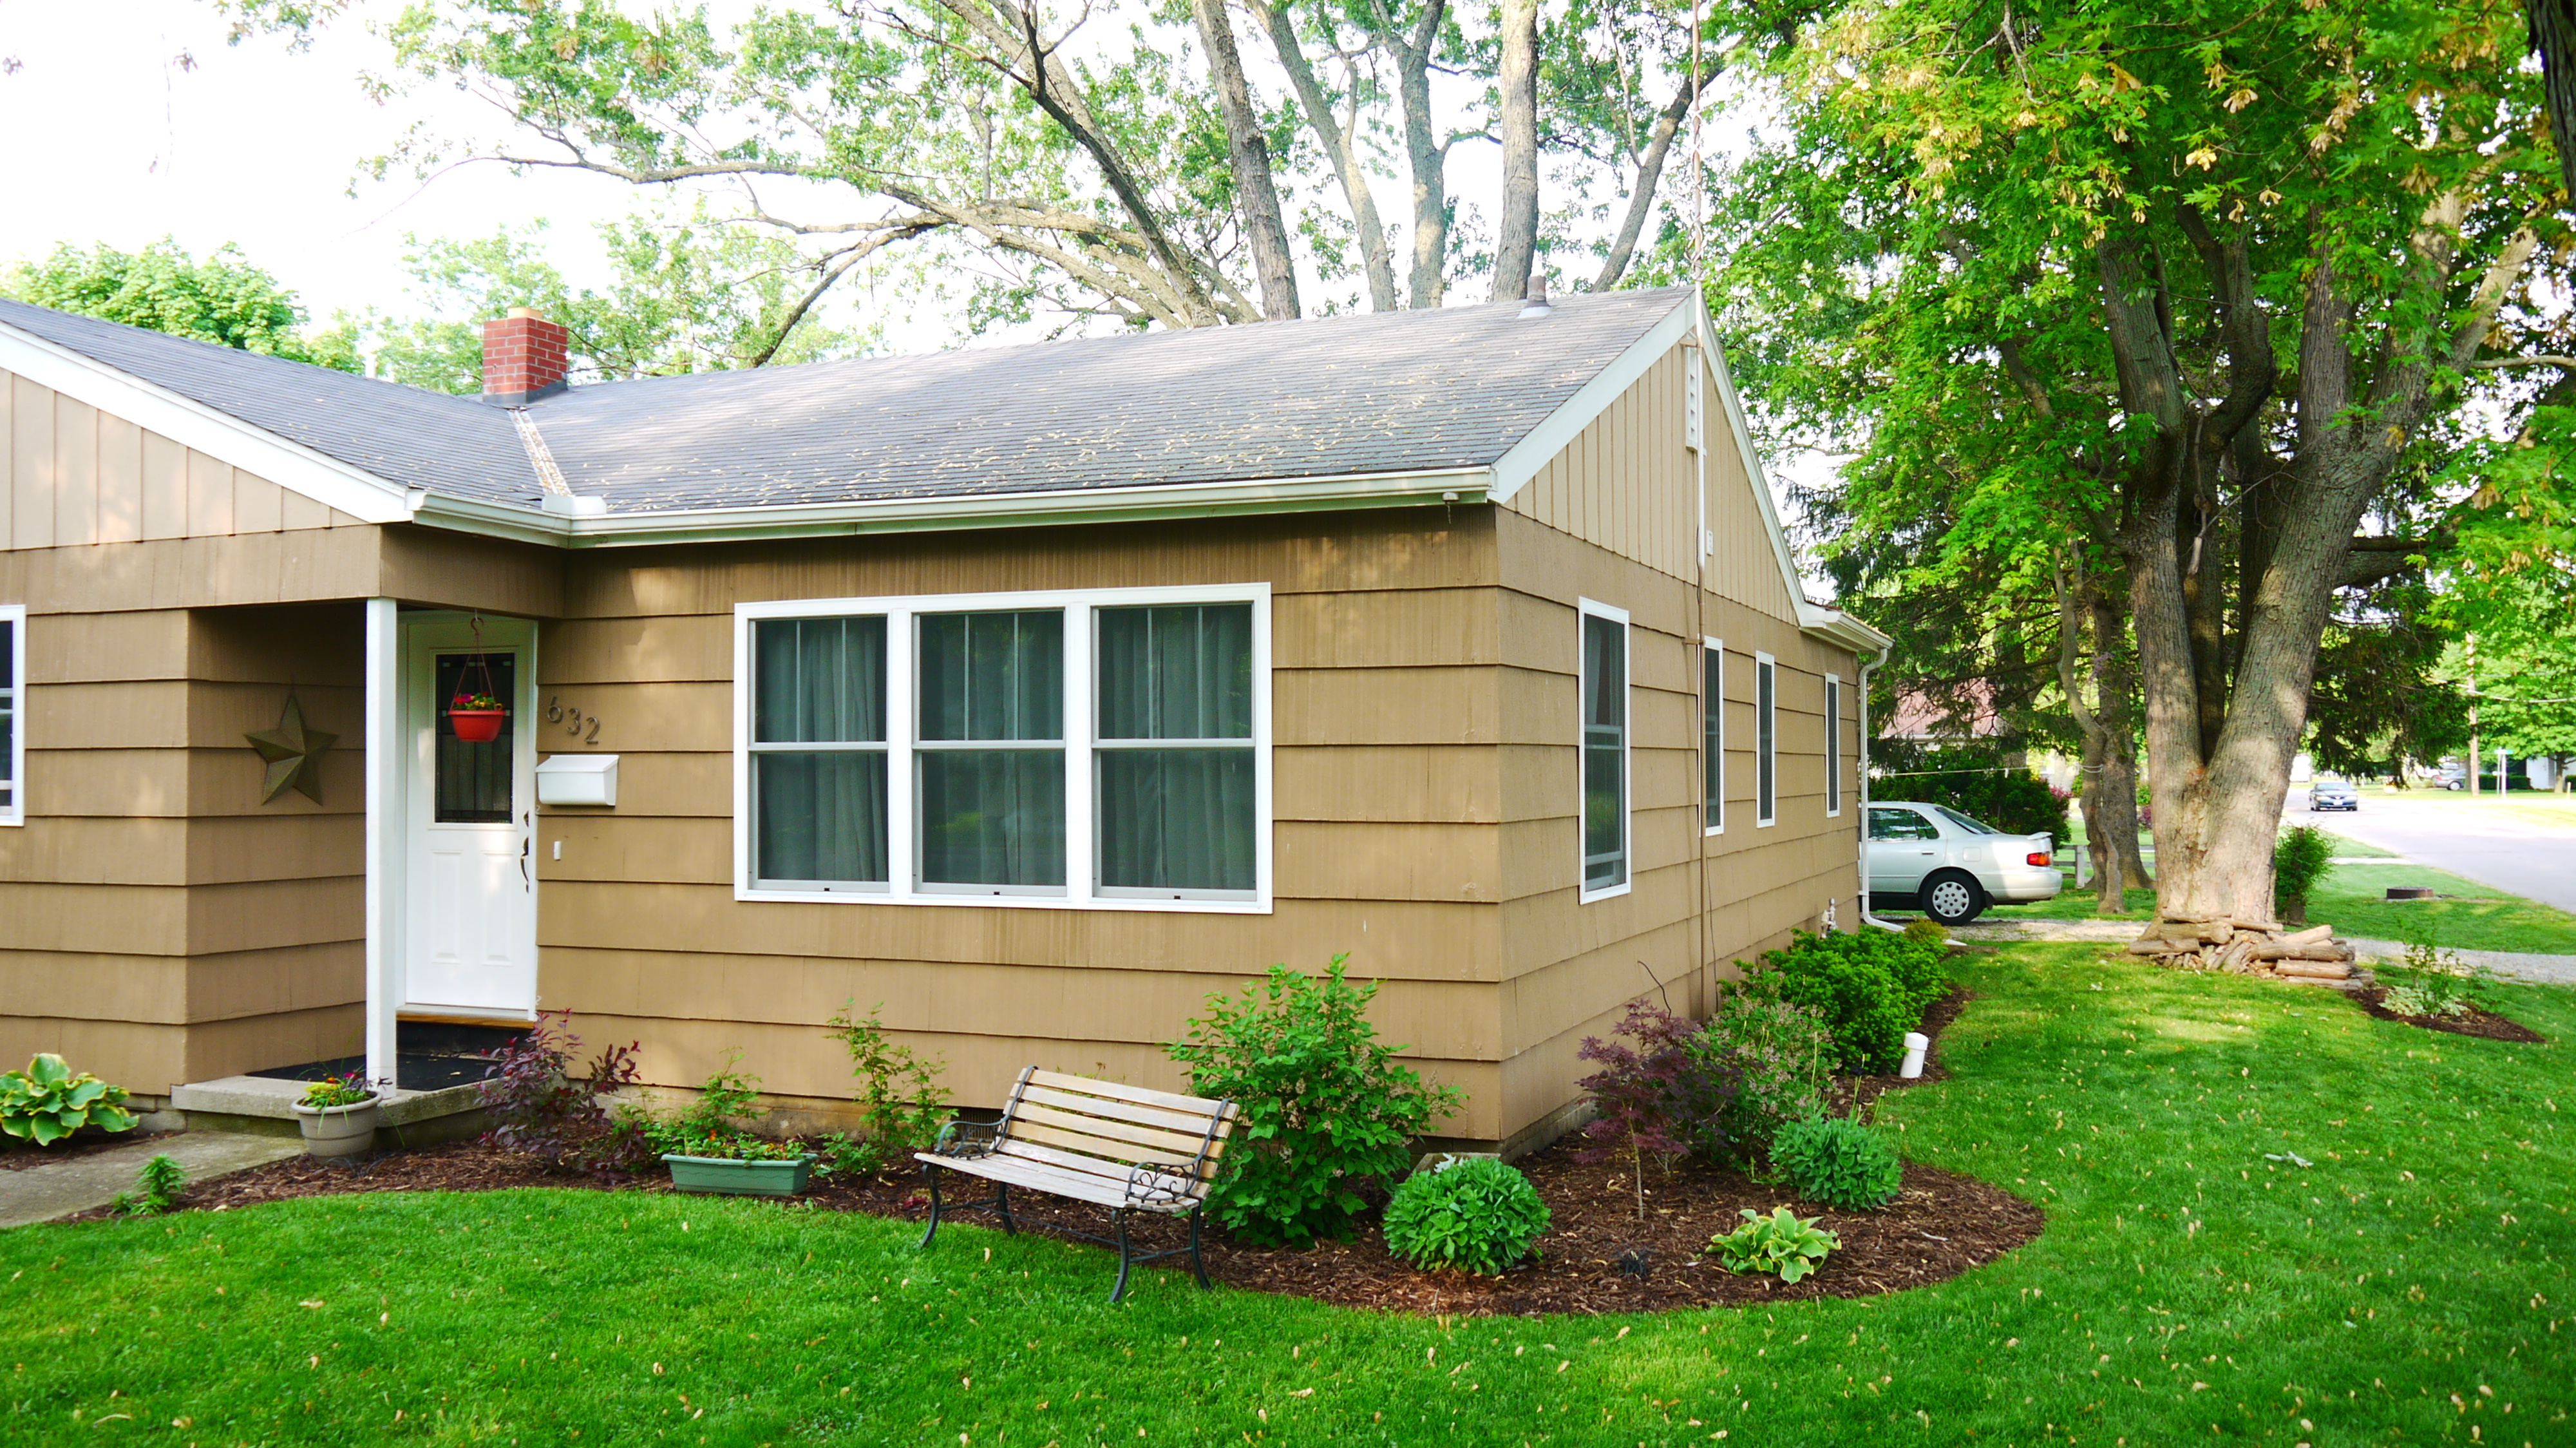
And here is the house (with shutters) earlier this winter, about mid January.The shutters are actually a color called Urbane Bronze (Sherwin Williams), but it is a strange color. Some days they look brown, some days they look black, and in the photo above they look blue gray. Since we didn’t replace the dark gray roof, I thought a gray/brown shutter color would help tie in the dark roof and brown paint scheme. And I think it accomplished that.
Although you cannot tell in the above photo, thanks to all that snow. NW Ohio has gotten in excess of 52 inches of snow this season, more total snowfall since the Blizzard of 1978! But the fancy Nest thermostat and medium efficiency furnace kept up just fine. Although I can’t compare until the winter is officially over (yes, I do keep utility bills each year so I can document the homes energy usage and compare it after I complete energy upgrades), I would dare to say the energy usage this winter is probably lower still than any winter before this thanks to the energy efficient and air-tight windows and doors. And you can also see how, thanks to the attic insulation, we have very little heat loss through the roof, as the heat from the house doesn’t escape from the ceiling to melt snow off the roof.
Live and Learn, and then the Consequence
Posted by Adam A. Ries in DIY, Home Improvement on July 6, 2011
What in the world could that title mean? Well, I try to do as much research as I can before I undertake any project. I can’t tell you how much I read and gleaned from other DIY’ers before attempting to install new windows myself. And the windows installed great and still look wonderful. But because this house has cedar shingle siding, I had to butt the shingles up behind the J-channel on the new windows. Ok, the world’s most annoying jigsaw puzzle, but I did it. The shingles didn’t fit together as tight as they did before I tore them off, so I decided a thin bead of silicon in the gap would help make the siding around each window that much better waterproofed. And yes, they are waterproof. However…

What I didn’t realize is that there are two types of people silicone caulk in this world. Those that can be painted and those that cannot. Guess what. I used the wrong stuff. I have tried multiple primers and nothing sticks to 100% silicone caulking.
I have found some tips online for getting paint to stick better to the unpaintable silicone but none of them are long-term solutions. (Why can’t they just print UNPAINTABLE in large red letters on the tubes of caulking? And maybe one of these built it handshake buzzers so you know you’ve picked up the wrong one.) They all report that the paint will begin to peel in just a few short years. Not what I want after purchasing expensive paint that should hold up for at least 10 + years. So I got a professional opinion from the friendly folks at our local Sherwin-Williams store. That’s where we are purchasing our paint and primer from so they already know about the work I have been doing on the exterior of the house to get it ready to paint (see the winning paint colors in this post).
They recommended, to my dismay, removing ALL of the unpaintable caulking from the seams between the cedar shingles. So this definitely might delay our July 15th Weekend of Painting Extravaganza. I spent this past Saturday using a combination of utility knive, scraper, screwdriver, and wire brush wheel removing the bad caulking from the shingles around just one window. Definitely spent over 3 hours, was covered in dust from the multiple layers of paint that the wire brush wheel removes, and found out that it is extremely difficult to remove all the bad silicone without damaging the cedar shingles.
Once the bad silicon is removed and all the dust is washed off, I can apply the new paintable silicone to fill the seams and hide the damage caused by removing the bad silicon. And then the shingles will be ready to wash, prime, and paint.
It takes forever, it is noisy and dusty and I sweat, and the dust sticks to my skin. And I still have 8 windows to go. Wish me luck.
But to end on a happier note, check out these pictures of the windows that I sided around with the new cedar shingles! If they weren’t so darn expensive, I would have just used all new instead of reusing as many of the old as we could. But seriously, over $150 for a bundle of shingles that would side a 10′ x 10′ area of wall. No wonder people aren’t jumping to re-side their homes in sustainably harvested cedar – no one could afford to! So take in the beauty of these good smelling cedar shingles! I will get back to digging and scraping out the bad silicone…


You’re Invited!
Posted by Adam A. Ries in DIY, Home Improvement on June 1, 2011
That title is actually referring to two events. Allow me a medium length post to explain.
Summer has unofficially began. As I sit here writing this post, my back and shoulder are aching from replacing two very large windows this past Memorial Day weekend. But, on a celebratory note, those very large windows were the very last two left to replace! (Click here to read about how we measured for and chose new windows or click on this link to read about how time consuming they were to install.) After 6 rolls of self adhesive window wrap, 19 tubes of silicon caulk, and more broken shingles than I know what to do with, all of the windows are finished. On the outside, that is. As you can read here, each of the windows had mis-matched woodwork on the inside so we removed it all. But replacing that will be an ongoing project on days when I can’t work outside on anything else. Now what about this invitation?
With the windows installed and those warm summer days in our grasp, it is time to begin thinking about painting the house. As was common with small homes built in the decade following the end of WWII, our home is shingled with tall cedar shakes as you can see in these “before” and “current” pictures of the house.
 Before: How the house looked last summer.
 Current: How the house looks now.
As we had to blend new shingles with old shingles around the new windows, the house is needing a consistent color scheme. A previous owner painted the shingles probably 15 or so years ago to a pale cream color. A safe color, but not at all dramatic. Homes built in this style would have originally been natural cedar brown or bright pastel in color (as some of our neighbor’s homes still are – dark brown, reddish brown, blue-gray, grass-green, pinky-peach, sunshine yellow, etc). We are starting to see the paint they used was not a high quality product as it has faded badly in some areas and is beginning to peel in others. So this past weekend we hit the local Sherwin-Williams store to begin our color scheme search. That is how this post title ties in. We have decided on two color schemes we all seem to like; one is a bit safe while the other makes a bolder statement. Both will vastly improve the look of the home and add some much needed curb appeal while protecting the cedar shingles from the weather. So you are invited to vote in the poll below as to which color scheme you like better! And later in the summer, feel free to join us for a painting party – BYOB (bring your own brush)!
Here are the two photographs (both from Sherwin-Williams exterior color schemes books) of color schemes we like with a breakdown of the colors for each.
Color Scheme One:

This house is the epitome of traditional suburbia today. Greige on greige on greige. With a traditional color door. With this color scheme as inspiration, our colors would be:

Main house color (shingles). Tony Taupe, #7038, by Sherwin-Williams.

Secondary house color (gables). Accessible Beige, #7036, by Sherwin-Williams.

Shutters (which we will have to purchase and paint). Van Dyke Brown, #7041, by Sherwin-Williams.

Front door (and side door). Arresting Auburn, #6034, by Sherwin-Williams.
Now, onto Color Scheme Two:

Taken almost color for color out of another color scheme book, it has much more punch and personality. I added a slightly lighter color for contrast at the gables and a bolder door color. This color scheme looks so much better in the photograph, I don’t think computer screens represent the mushroom color very well).

Main house color (shingles). Portabello, #6102, by Sherwin-Williams.

Secondary house color (gables). Sands of Time, #6101, by Sherwin-Williams.

Shingles (which we would purchase and then paint). Urbane Bronze. #7048, by Sherwin-Williams.

Front Door (and side door). Fireweed, #6328, by Sherwin-Williams.
So there you have it. The two color schemes we are debating. And by debating, I mean we think we already know which one we like best, but aren’t rushing into this. We purchased Color to Go samples from the store this past weekend, and will be trying out swatches on the outside of the house sometime soon (that is if the rain holds off. We had over 9″ of rain during the month of May).
Remember to vote in the poll, leave a comment, and get those paint brushes ready for an old fashioned paintin’ party sometime between June/July!
